qcom 平台系统签名流程
security boot
平台的东东,oem 可定制的功能有限,只能参考平台文档,可以在高通的网站上搜索:Secure Boot Enablement,然后找对应平台的文档xxx-Secure Boot Enablement User Guide, step by step 操作即可
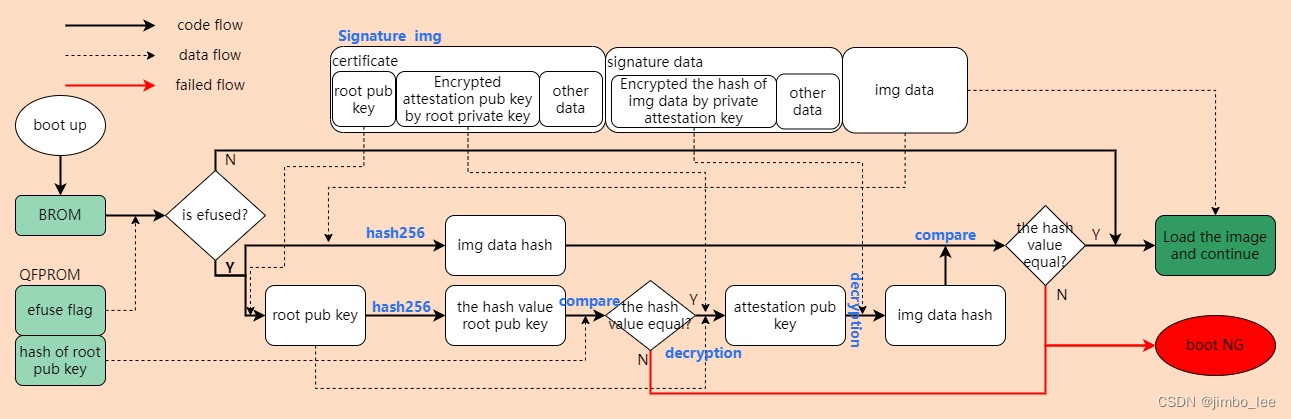
开机校验流程:
生成key step:
工具路径: Clarence.LA.2.0/common/sectoolsv2/ext/Linux_aarch64/
1、Clarence.LA.2.0/common/sectoolsv2/ext/Linux_aarch64/test_key/test_L400_key-secp384r1
生成:v3.ext v3_attest.ext
拷贝:opensslroot.cfg LA.QSSI.14.0.r1/LINUX/android/vendor/qcom/proprietary/common/scripts/gensecimage/qpsa/alt_resources/default/openssl/opensslroot.cfg
2、生成qpsa_rootca.key
openssl ecparam -genkey -name secp384r1 -outform PEM -out qpsa_rootca.key
3、生成 rootca_pem.crt
sudo openssl req -new -key qpsa_rootca.key -sha384 -out rootca_pem.crt -subj /C=CN/ST=ChinaGD/L="ChinaSZh"/OU="General test Key"/OU="CDMA Technologies"/O=test/CN="test Root CA 1" -config opensslroot.cfg -x509 -days 7300 -set_serial 1
4、生成qpsa_rootca.cer
openssl x509 -in rootca_pem.crt -inform PEM -out qpsa_rootca.cer -outform DER
查看刚才生成的证书
openssl x509 -text -inform DER -in qpsa_rootca.cer
5、生成CA key和证书
openssl ecparam -genkey -name secp384r1 -outform PEM -out qpsa_ca.key
sudo openssl req -new -key qpsa_ca.key -out ca.CSR -subj /C=CN/ST=ChinaGD/L="ChinaSZh"/OU="CDMA Technologies"/O=test/CN="test Attestation CA" -config opensslroot.cfg -sha384
openssl x509 -req -in ca.CSR -CA rootca_pem.crt -CAkey qpsa_rootca.key -out ca_pem.crt -set_serial 1 -days 7300 -extfile v3.ext -sha384 -CAcreateserial
openssl x509 -inform PEM -in ca_pem.crt -outform DER -out qpsa_ca.cer
6.生成root key的hash值
openssl dgst -sha384 qpsa_rootca.cer >sha384rootcert.txt
参考文档:80-49880-42_REV_AA_SM4450_Secure_Boot_Enablement_User_Guide.pdf
给img签名
使用LOCAL 的方式签名命令:
$./Linux/sectools\
secure-image \
--sign /path/to/tz.mbn \
--image-id=TZ \
--security-profile /path/to/clarence_security_profile.xml \
--oem-id=0x1234 \
--oem-product-id=0x00 \
--anti-rollback-version=0x00 \
--signing-mode=LOCAL \
--root-certificate=./OEM-KEYS/qpsa_rootca.cer \
--ca-certificate=./OEM- KEYS/qpsa_attestca.cer \
--ca-key=./OEM-KEYS/qpsa_attestca.key \
--outfile ./signed_images_out/tz.mbn
note:
oem-id、oem-product-id、root-certificate、ca-certificate、ca-key:需要根据项目的时间情况填写。(和生成sec.elf 一样)
anti-rollback-verision:是用于bp镜像防回滚的,一般我们保持为0,因为我们不会对BP 镜像定制。如果要定制升级为1或者其他值,也是可以的,但是需要慎重,因为这里是更新到了efuse中。我们的项目暂时没动这部分,所以我是一直写的0,如果有需求,可以参考《SM4450 Secure Boot Enablement User Guide》第七章进行深入了解。
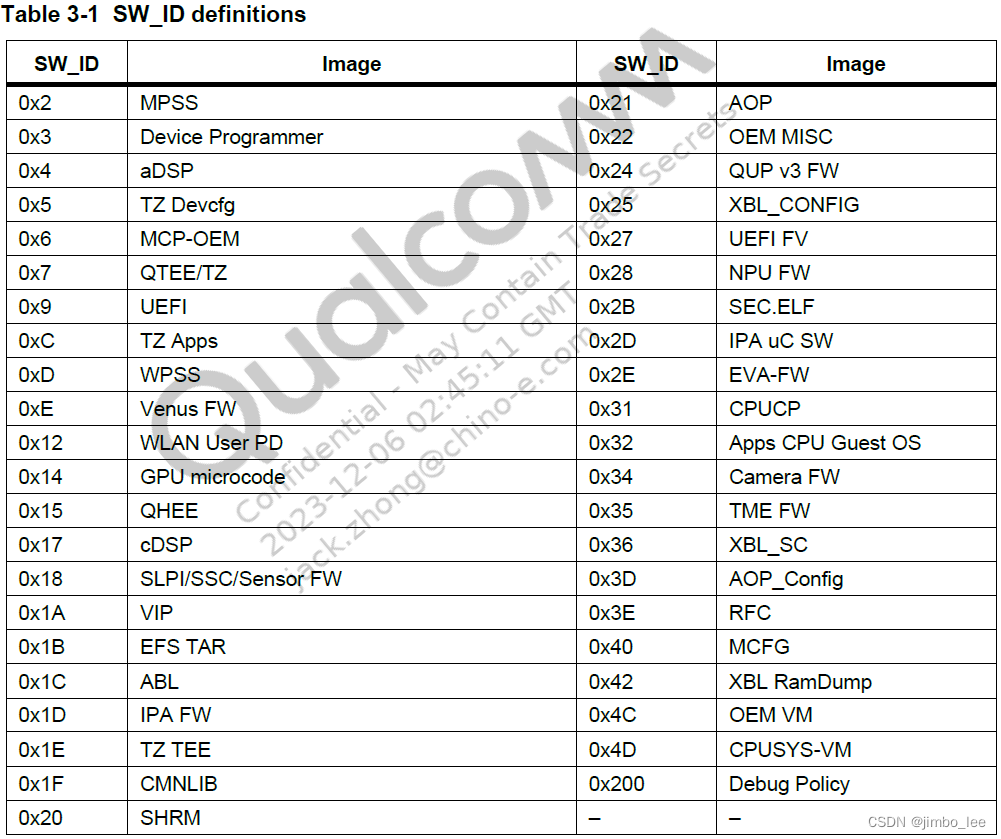
image-id:这个是高通定好了的,bp的每个镜像都有对应的值,这个和anti-rollbcak-verison 也是密切相关的,要注意不要用错了。具体需参考《SM4450 Secure Boot Enablement User Guide》 中3.2.1 Software ID field的表。当然也可以查看contents.xml 中oem_imageid 字段。
参考:《KBA-230410213415_REV_2_QCM4490_QCS4490_Enable_secure_boot_with_sectools_version2.0.pdf》
sec.elf 文件生成
作用:用于烧写efuse的,就是我们常说的熔断。所以刷这个文件需要慎重,由于efuse的特殊性,熔断是不可逆的。
时机:刷入到secdata分区中,设备启动时,BROM会检测secdata分区,如果有数据或者数据有变化,并且签名校验通过,那么就将其内容更新到efuse(QFPROM)中。
描述:efuse后,加载了TZ部分,系统会初始化RPMB 的key。这里说的是加载了TZ 才初始化RPMB key(在efuse 中有一位,是表征是否要使能RPMB的,所以我们会在日志中看到,只有efuse的设备才会使用RPMB),这属于软件部分的设置,所以我们也可以配置TZ,不进行某些操作。而TZ 是闭源的,所以我们只能配置,如何配置?只能咨询高通,或者查看高通TZ 相关的文档。
参考文档:《QCM4490/QCS4490 Enable secure boot with sectools version 2.0》
FAQ:
设备熔断后,将签名镜像刷入,要保证能正常启动、一些基本功能正常,如果有异常,需要获取日志(一般是串口日志)看看是否有镜像漏签或者错签。
一般会遇到的问题:
1.还未进入kernel之前就挂掉:BP 中某个镜像签名有问题。
2.进入kernel之后挂掉:可能是某个子系统固件签名有问题。
3.指纹、人脸等功能无法使用:可能是相关TA 签名有问题。
4.综测、校准等工厂问题:可能是fsg 的签名问题。
5.firehose 无法刷入:可能是firehose 签名有问题。
单独签名一个img文件:
Run the following command to sign XBL:
python sectools.py secimage -s -i "<path to xbl.elf>" -g xbl -p sm6150 --cfg_selected_cert_config= OEM-KEYS
note :
-s is to sign the image
-i: is the path to the image file
-g is the sign ID corresponding to the image_file provided
-p is the ID of the chipset corresponding to the image_file
--cfg_selected_cert_config is the OEM certificate configuration selection
Check the secimage_log.txt output file of XBL for following prints in the metadata:
| debug | 0x00000002 |
| multi_serial_numbers | 0x12345678 |