【吃透Java手写】5-RPC-简易版
【吃透Java手写】RPC-简易版-源码解析
- 1 RPC
- 1.1 RPC概念
- 1.2 常用RPC技术或框架
- 1.3 初始工程
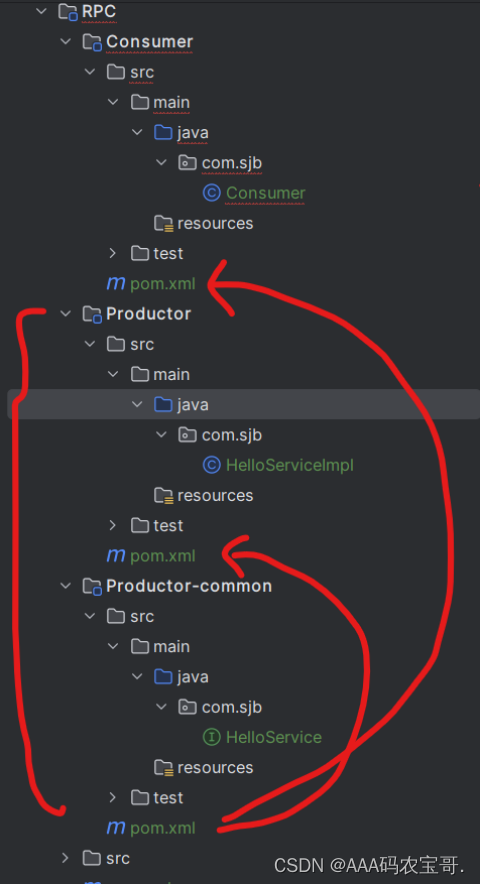
- 1.3.1 Productor-common:HelloService
- 1.3.2 Productor:HelloServiceImpl
- 1.3.3 Consumer
- 2 模拟RPC
- 2.1 Productor
- 2.2 模拟一个RPC框架
- 2.2.1 HttpServer
- 2.2.2 HttpClient
- 2.2.2 用rpc启动tomcat
- 2.2.3 启动Productor
- 2.3 DispatcherServlet
- 2.3.1 Handler
- 2.3.2 Invocation
- 2.3.3 完善Handler
- 2.4 注册中心LocalRegister
- 2.4.1 Productor
- 2.5 Handler
- 2.6 Consumer测试
- 3 优化
- 3.1 ProxyFactory
- 3.2 Consumer
- 3.3 测试
- 4 rpc服务注册和服务发现
- 4.1 URL
- 4.2 MapRemoteRegister
- 4.3 注册中心注册
- 4.4 负载均衡
- 4.5 测试
- 4.5.1 解决
- 4.6 BootStrap
- 5 服务重试
1 RPC
1.1 RPC概念
- RPC(Remote Procedure Call Protocol) 远程过程调用协议。
- RPC是一种通过网络从远程计算机程序上请求服务,不需要了解底层网络技术的协议。
- RPC主要作用就是不同的服务间方法调用就像本地调用一样便捷。
1.2 常用RPC技术或框架
- 应用级的服务框架:阿里的 Dubbo/Dubbox、Google gRPC、Spring Boot/Spring Cloud。
- 远程通信协议:RMI、Socket、SOAP(HTTP XML)、REST(HTTP JSON)。
- 通信框架:MINA 和 Netty
1.3 初始工程
1.3.1 Productor-common:HelloService
在Productor-common中创建com.sjb.HelloService
public interface HelloService {String sayHello(String name);
}
1.3.2 Productor:HelloServiceImpl
在Productor中创建com.sjb.HelloServiceImpl
public class HelloServiceImpl implements HelloService {@Overridepublic String sayHello(String name) {return "Hello, " + name;}
}
pom.xml依赖
<dependencies><dependency><groupId>org.example</groupId><artifactId>Productor-common</artifactId><version>1.0-SNAPSHOT</version></dependency>
</dependencies>
1.3.3 Consumer
在Consumer中创建com.sjb.Consumer
public class Consumer {public static void main(String[] args) {HelloService helloService = ?;System.out.println(helloService.sayHello("world"));}
}
pom.xml依赖
<dependencies><dependency><groupId>org.example</groupId><artifactId>Productor-common</artifactId><version>1.0-SNAPSHOT</version></dependency>
</dependencies>
2 模拟RPC
2.1 Productor
我们需要在springboot启动时完成一部分功能。启动时要能接收一部分功能的调用。只能通过网络来接收一定的请求,比如netty或者tomcat、socket。
在Productor中创建com.sjb.Productor
public class Productor {public static void main(String[] args) {//netty、tomcat}
}
2.2 模拟一个RPC框架
创捷sjbRPC模块,并且使Consumer模块和Productor模块依赖于sjbRPC模块
<dependency><groupId>org.example</groupId><artifactId>sjbRPC</artifactId><version>1.0-SNAPSHOT</version>
</dependency>
2.2.1 HttpServer
在sjbRPC模块中创建com.sjb.Productorcom.sjb.register.HttpServer,负责网络服务启动
public class HttpServer {public void start(String hostname, int port) {System.out.println("HttpServer start at " + hostname + ":" + port);}
}
然后Productor就可以创建HttpServer对象调用里面的start方法
public class Productor {public static void main(String[] args) {//netty、tomcatHttpServer httpServer = new HttpServer();httpServer.start("localhost", 8080);}
}
2.2.2 HttpClient
创建com.sjb.protocol.HttpClient
public class HttpClient {public String send(String hostName, int port, Invocation invocation) {//读取用户的发送方式//http、netty、tcptry{URL url = new URL("http", hostName, port, "/");HttpURLConnection connection = (HttpURLConnection) url.openConnection();connection.setRequestMethod("POST");connection.setDoOutput(true);//配置OutputStream outputStream = connection.getOutputStream();ObjectOutputStream oos = new ObjectOutputStream(outputStream);//发送oos.writeObject(invocation);oos.flush();oos.close();//接收InputStream inputStream = connection.getInputStream();String result = IOUtils.toString(inputStream);return result;} catch (MalformedURLException e) {throw new RuntimeException(e);} catch (IOException e) {throw new RuntimeException(e);}}
}
2.2.2 用rpc启动tomcat
为rpc添加tomcat依赖
<dependencies><dependency><groupId>org.apache.tomcat.embed</groupId><artifactId>tomcat-embed-core</artifactId><version>8.5.31</version></dependency>
</dependencies>
rpc第一步应当扫描当前模块的配置,获取需要启动的网络服务,这里写死直接启动tomcat
在com.sjb.register.HttpServer#start中
public void start(String hostname, int port) {//1.读取用户的配置(application.yaml或者Nacos配置)//2.这里启动一个TomcatTomcat tomcat = new Tomcat();Server server = tomcat.getServer();Service service = server.findService("Tomcat");Connector connector = new Connector();connector.setPort(port);Engine engine = new StandardEngine();engine.setDefaultHost(hostname);Host host = tomcat.getHost();host.setName(hostname);String contextPath = "";Context context = new StandardContext();context.setPath(contextPath);context.addLifecycleListener(new Tomcat.FixContextListener());host.addChild(context);engine.addChild(host);service.setContainer(engine);service.addConnector(connector);try{tomcat.start();tomcat.getServer().await();}catch (LifecycleException e){e.printStackTrace();}
}
2.2.3 启动Productor
public class Productor {public static void main(String[] args) {//netty、tomcatHttpServer httpServer = new HttpServer();httpServer.start("localhost", 8080);}
}
D:\Software\software_with_code\idea\jdk\jdk-17\bin\java.exe "-javaagent:D:\Software\software_with_code\idea\software\IntelliJ IDEA 2023.2\lib\idea_rt.jar=13802:D:\Software\software_with_code\idea\software\IntelliJ IDEA 2023.2\bin" -Dfile.encoding=UTF-8 -classpath D:\Code\JavaCode\handwith-Spring\handwith-Spring\RPC\Productor\target\classes;D:\Code\JavaCode\handwith-Spring\handwith-Spring\RPC\Productor-common\target\classes;D:\Code\JavaCode\handwith-Spring\handwith-Spring\RPC\sjbRPC\target\classes;D:\Software\software_with_code\apache-maven-3.9.5-bin\apache-maven-3.9.5\mvn_repo\org\apache\tomcat\embed\tomcat-embed-core\8.5.31\tomcat-embed-core-8.5.31.jar;D:\Software\software_with_code\apache-maven-3.9.5-bin\apache-maven-3.9.5\mvn_repo\org\apache\tomcat\tomcat-annotations-api\8.5.31\tomcat-annotations-api-8.5.31.jar com.sjb.Productor
5月 13, 2024 1:26:00 下午 org.apache.coyote.AbstractProtocol init
信息: Initializing ProtocolHandler ["http-nio-8080"]
5月 13, 2024 1:26:00 下午 org.apache.tomcat.util.net.NioSelectorPool getSharedSelector
信息: Using a shared selector for servlet write/read
5月 13, 2024 1:26:00 下午 org.apache.catalina.core.StandardService startInternal
信息: Starting service [Tomcat]
5月 13, 2024 1:26:00 下午 org.apache.catalina.core.StandardEngine startInternal
信息: Starting Servlet Engine: Apache Tomcat/8.5.31
5月 13, 2024 1:26:01 下午 org.apache.catalina.util.SessionIdGeneratorBase createSecureRandom
警告: Creation of SecureRandom instance for session ID generation using [SHA1PRNG] took [117] milliseconds.
5月 13, 2024 1:26:01 下午 org.apache.coyote.AbstractProtocol start
信息: Starting ProtocolHandler ["http-nio-8080"]
2.3 DispatcherServlet
大家如果学过Spring MVC的底层原理就会知道,在SpringMVC中有一个Servlet非常核心,那就是DispatcherServlet,这个DispatcherServlet需要绑定一个Spring容器,因为DispatcherServlet接收到请求后,就会从所绑定的Spring容器中找到所匹配的Controller,并执行所匹配的方法,所有的服务都会放入DispatchServlet中。我们rpc框架启动的服务也要放入DispatcherServlet
在com.sjb.protocol.HttpServer#start中
tomcat.addServlet(contextPath, "dispatcher", new DispatcherServlet());
context.addServletMappingDecoded("/*", "dispatcher");try{tomcat.start();tomcat.getServer().await();
}
catch (LifecycleException e){e.printStackTrace();
context.addServletMappingDecoded("/*", "dispatcher");接收到的请求都会交由dispatcher处理
创建com.sjb.register.DispatcherServlet
public class DispatcherServlet extends HttpServlet {@Overridepublic void service(ServletRequest req, ServletResponse res) throws ServletException, IOException {new HttpServerHandler().handle(req, res);}
}
2.3.1 Handler
创建com.sjb.register.HttpServerHandler,因为有可能有很多请求请求dispatcher,相当于一个过滤器的作用,相当可以用每一个请求都可以用一个独立的handler类处理,也就是new一个新handler来处理。
public class HttpServerHandler {public void handle(ServletRequest req, ServletResponse res) {//处理请求}
}
2.3.2 Invocation
创建com.sjb.common.Invocation,记录传入的接口名、方法名、参数列表、参数值
implements Serializable序列化是方便解析request
public class Invocation implements Serializable {private String interfaceName;private String methodName;private Class[] paramTypes;private Object[] params;public String getInterfaceName() {return interfaceName;}public void setInterfaceName(String interfaceName) {this.interfaceName = interfaceName;}public String getMethodName() {return methodName;}public void setMethodName(String methodName) {this.methodName = methodName;}public Class[] getParamTypes() {return paramTypes;}public void setParamTypes(Class[] paramTypes) {this.paramTypes = paramTypes;}public Object[] getParams() {return params;}public void setParams(Object[] params) {this.params = params;}public Invocation(String interfaceName, String methodName, Class[] paramTypes, Object[] params) {this.interfaceName = interfaceName;this.methodName = methodName;this.paramTypes = paramTypes;this.params = params;}
}
2.3.3 完善Handler
public class HttpServerHandler {public void handle(ServletRequest req, ServletResponse res) {//处理请求-->接口,方法,参数try {Invocation invocation=(Invocation)new ObjectInputStream(req.getInputStream()).readObject();String interfaceName=invocation.getInterfaceName();} catch (IOException e) {throw new RuntimeException(e);} catch (ClassNotFoundException e) {throw new RuntimeException(e);}}
}
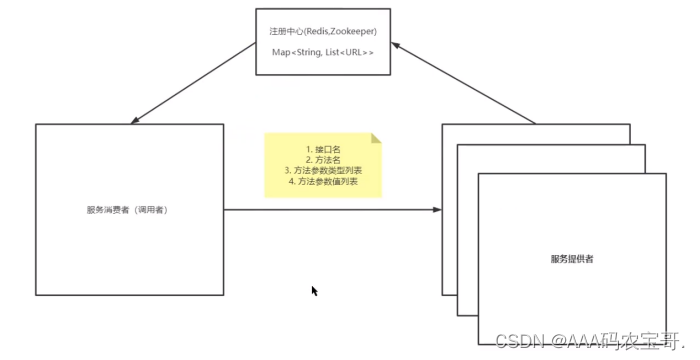
这样就获取到调用请求的类的接口,那么怎么找到接口的实现类呢?如果是扫描全包查看谁实现了HelloService这样性能就非常的低。所以我们需要一个注册中心。
2.4 注册中心LocalRegister
创建com.sjb.register.LocalRegister
public class LocalRegister {private static Map<String, Class> map = new HashMap<>();public static void register(String interfaceName, Class implClass) {map.put(interfaceName, implClass);}public static Class get(String interfaceName) {return map.get(interfaceName);}
}
2.4.1 Productor
这样就可以在Productor中将接口和实现类放入,在com.sjb.Productor中
public class Productor {public static void main(String[] args) {//注册服务LocalRegister.register(HelloService.class.getName(), HelloServiceImpl.class);//netty、tomcatHttpServer httpServer = new HttpServer();httpServer.start("localhost", 8080);}
}
这样在Handler中就可以从LocalRegister的map中拿到对应的接口和实现类
2.5 Handler
添加commons-io依赖
<dependency><groupId>org.apache.commons</groupId><artifactId>commons-io</artifactId><version>1.3.2</version>
</dependency>
public class HttpServerHandler {public void handle(ServletRequest req, ServletResponse res) {//处理请求-->接口,方法,参数try {Invocation invocation=(Invocation)new ObjectInputStream(req.getInputStream()).readObject();String interfaceName=invocation.getInterfaceName();Class implClass= LocalRegister.get(interfaceName);Method method = implClass.getMethod(invocation.getMethodName(), invocation.getParamTypes());Object result = method.invoke(implClass.newInstance(), invocation.getParams());//res.getOutputStream().write(invoke.toString().getBytes());IOUtils.write(result.toString(), res.getOutputStream());} catch (IOException e) {throw new RuntimeException(e);} catch (ClassNotFoundException e) {throw new RuntimeException(e);} catch (NoSuchMethodException e) {throw new RuntimeException(e);} catch (InvocationTargetException e) {throw new RuntimeException(e);} catch (IllegalAccessException e) {throw new RuntimeException(e);} catch (InstantiationException e) {throw new RuntimeException(e);}}
}
Invocation invocation=(Invocation)new ObjectInputStream(req.getInputStream()).readObject();反序列化获取invocationString interfaceName=invocation.getInterfaceName();获取接口名Class implClass= LocalRegister.get(interfaceName);通过注册中心获取接口实现类Method method = implClass.getMethod(invocation.getMethodName(), invocation.getParamTypes());获取实现类中的方法Object result = method.invoke(implClass.newInstance(), invocation.getParams());执行方法返回返回值IOUtils.write(result.toString(), res.getOutputStream());写入response中
2.6 Consumer测试
public class Consumer {public static void main(String[] args) {
//        HelloService helloService = ?;
//        System.out.println(helloService.sayHello("world"));Invocation invocation = new Invocation(HelloService.class.getName(), "sayHello", new Class[]{String.class}, new Object[]{"world"});HttpClient httpClient = new HttpClient();String result = httpClient.send("localhost", 8080, invocation);System.out.println(result);}
}
输出
Hello, world
3 优化
我们想让网络调用像调用本地方法一样,创建一个HelloService对象,直接传参就好了
HelloService helloService = ?;
System.out.println(helloService.sayHello("world"));
所以我们需要在rpc框架中创建一个代理对象代理HelloService
3.1 ProxyFactory
创建com.sjb.proxy.ProxyFactory
public class ProxyFactory {public static <T> T getProxy(Class interfaceClass) {//读取用户配置Object proxyInstance = Proxy.newProxyInstance(interfaceClass.getClassLoader(), new Class[]{interfaceClass}, new InvocationHandler() {@Overridepublic Object invoke(Object proxy, Method method, Object[] args) throws Throwable {Invocation invocation = new Invocation(interfaceClass.getName(),method.getName(),method.getParameterTypes(),args);HttpClient httpClient = new HttpClient();String result = httpClient.send("localhost", 8080, invocation);return result;}});return (T) proxyInstance;}}
3.2 Consumer
public class Consumer {public static void main(String[] args) {
//        HelloService helloService = ?;
//        System.out.println(helloService.sayHello("world"));HelloService helloService = ProxyFactory.getProxy(HelloService.class);System.out.println(helloService.sayHello("world"));}
}
helloService.sayHello("world")调用invoke方法返回
3.3 测试
Hello, world
4 rpc服务注册和服务发现
我们希望String result = httpClient.send("localhost", 8080, invocation);在send的时候可以灵活的找到传入的接口对应的ip和端口是多少,也就是应用所对应的ip和端口是多少,所以就自然而然的想到注册中心,在Productor创建的时候,将对应服务的ip和端口保存到rpc中起来,以供其他服务使用。
4.1 URL
public class URL {private String hostname;private Integer port;
这样我们Productor启动的时候,不仅需要注册服务,还要注册注册中心
4.2 MapRemoteRegister
创建com.sjb.register.MapRemoteRegister
public class MapRemoteRegister {private static Map<String, List<URL>> mapRemoteRegister = new HashMap<>();public static void register(String interfaceName,URL url) {List<URL> list = mapRemoteRegister.get(interfaceName);if (list == null) {list = new java.util.ArrayList<>();}list.add(url);mapRemoteRegister.put(interfaceName, list);}public static List<URL> get(String interfaceName) {return mapRemoteRegister.get(interfaceName);}
}
4.3 注册中心注册
public class Productor {public static void main(String[] args) {//注册服务LocalRegister.register(HelloService.class.getName(), HelloServiceImpl.class);//注册中心注册URL url = new URL("localhost", 8080);MapRemoteRegister.register(HelloService.class.getName(), url);
那么在创建HelloService的代理对象时,就要读取注册中心
public class ProxyFactory {public static <T> T getProxy(Class interfaceClass) {//读取用户配置Object proxyInstance = Proxy.newProxyInstance(interfaceClass.getClassLoader(), new Class[]{interfaceClass}, new InvocationHandler() {@Overridepublic Object invoke(Object proxy, Method method, Object[] args) throws Throwable {Invocation invocation = new Invocation(interfaceClass.getName(),method.getName(),method.getParameterTypes(),args);HttpClient httpClient = new HttpClient();//服务发现List<URL> urls = MapRemoteRegister.get(interfaceClass.getName());//负载均衡URL url = LoadBalance.random(urls);//服务调用String result = httpClient.send(url.getHostname(), url.getPort(), invocation);return result;}});return (T) proxyInstance;}}
4.4 负载均衡
创建com.sjb.loadbalance.LoadBalance
public class LoadBalance {public static URL random(List<URL> list) {int i = new Random().nextInt(list.size());return list.get(i);}
}
4.5 测试
感觉没问题,测试一下
Exception in thread "main" java.lang.NullPointerException: Cannot invoke "java.util.List.size()" because "list" is nullat com.sjb.loadbalance.LoadBalance.random(LoadBalance.java:10)at com.sjb.proxy.ProxyFactory$1.invoke(ProxyFactory.java:29)at jdk.proxy1/jdk.proxy1.$Proxy0.sayHello(Unknown Source)at com.sjb.Consumer.main(Consumer.java:11)
报错,发现在Product中
//注册服务
LocalRegister.register(HelloService.class.getName(), HelloServiceImpl.class);
//注册中心注册
URL url = new URL("localhost", 8080);
MapRemoteRegister.register(HelloService.class.getName(), url);
LocalRegister.register的调用是在Product启动的HttpServer的handler处理中,等于LocalRegister这个map还是在Product这个进程中。而MapRemoteRegister.register的存放是在Product进程中,而调用却是在Consumer中的代理方法的invoke中,自然调用不到。
4.5.1 解决
要么使用redis等统一管理,但是又涉及心跳检测等等。我们这里使用一个简单的存入一个文件,再从文件里读取
public class MapRemoteRegister {private static Map<String, List<URL>> mapRemoteRegister = new HashMap<>();public static void register(String interfaceName,URL url) {List<URL> list = mapRemoteRegister.get(interfaceName);if (list == null) {list = new java.util.ArrayList<>();}list.add(url);mapRemoteRegister.put(interfaceName, list);saveFile();}public static List<URL> get(String interfaceName) {mapRemoteRegister = getFile();return mapRemoteRegister.get(interfaceName);}public static void saveFile(){try{FileOutputStream fos = new FileOutputStream("/temp.txt");ObjectOutputStream oos = new ObjectOutputStream(fos);oos.writeObject(mapRemoteRegister);oos.close();} catch (FileNotFoundException e) {throw new RuntimeException(e);} catch (IOException e) {throw new RuntimeException(e);}}public static Map<String,List<URL>> getFile(){try{FileInputStream fis = new FileInputStream("/temp.txt");ObjectInputStream ois = new ObjectInputStream(fis);Map<String,List<URL>> map = (Map<String,List<URL>>)ois.readObject();ois.close();return map;} catch (FileNotFoundException e) {throw new RuntimeException(e);} catch (IOException e) {throw new RuntimeException(e);} catch (ClassNotFoundException e) {throw new RuntimeException(e);}}
}
因为我们的URL也要存入文件,所以也要序列化
public class URL implements Serializable {
再次测试,成功输出
Hello, world
在实际的分布式系统中,通常会使用专门的分布式服务注册中心(例如ZooKeeper、Consul等)来管理服务的注册和发现。这样可以确保注册信息的一致性、可靠性和可扩展性。
4.6 BootStrap
我们注册服务和注册注册中心的操作可以作为一个方法一起使用
创建com.sjb.bootstrap.BootStrap
public class BootStrap {public static void bindAndStart(Class interfaceClass, Class implClass, String hostname, Integer port) {//注册服务LocalRegister.register(interfaceClass.getName(), implClass);//注册中心注册URL url = new URL("localhost", 8080);MapRemoteRegister.register(interfaceClass.getName(), url);//netty、tomcatHttpServer httpServer = new HttpServer();httpServer.start(url.getHostname(), url.getPort());}
}
product调用的时候
public class Productor {public static void main(String[] args) {BootStrap.bindAndStart(HelloService.class, HelloServiceImpl.class, "localhost", 8080);}
}
5 服务重试
可以设置默认的重试次数,直到全部失败
在com.sjb.proxy.ProxyFactory#getProxy中
//服务发现
List<URL> urls = MapRemoteRegister.get(interfaceClass.getName());
//负载均衡
URL url = LoadBalance.random(urls);
//服务调用
String result =null;
int defaltRetry = 3;
for (int i = 0; i < defaltRetry; i++) {try {result = httpClient.send(url.getHostname(), url.getPort(), invocation);if (result != null) {break;}} catch (Exception e) {e.printStackTrace();}
}
return result;