YOLOV8 + 双目测距
YOLOV8 + 双目测距
- 1. 环境配置
- 2. 测距流程和原理
- 2.1 测距流程
- 2.2 测距原理
- 3. 代码部分解析
- 3.1 相机参数stereoconfig.py
- 3.2 测距部分
- 3.3 主代码yolov8-stereo.py
- 4. 实验结果
- 4.1 测距
- 4.2 测距+跟踪
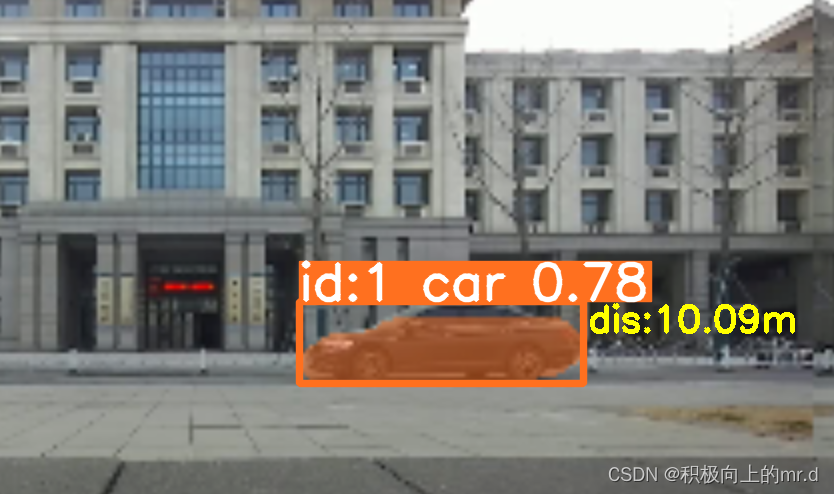
- 4.3 测距+跟踪+分割
- 4.4 视频展示
相关文章
1. YOLOv5+双目测距(python)
2. YOLOv7+双目测距(python)
如果有用zed相机,可以进我主页👇👇👇直接调用内部相机参数,精度比双目测距好很多
https://blog.csdn.net/qq_45077760
下载链接(求STAR):https://github.com/up-up-up-up/YOLOv8-stereo
1. 环境配置
具体可见: Windows+YOLOV8环境配置
2. 测距流程和原理
2.1 测距流程
大致流程: 双目标定→双目校正→立体匹配→结合yolov8→深度测距
- 找到目标识别源代码中输出物体坐标框的代码段。
- 找到双目测距代码中计算物体深度的代码段。
- 将步骤2与步骤1结合,计算得到目标框中物体的深度。
- 找到目标识别网络中显示障碍物种类的代码段,将深度值添加到里面,进行显示
注:我所做的是在20m以内的检测,没计算过具体误差,当然标定误差越小精度会好一点,其次注意光线、亮度等影响因素,当然检测范围效果跟相机的好坏也有很大关系
2.2 测距原理
如果想了解双目测距原理,请移步该文章 双目三维测距(python)
3. 代码部分解析
3.1 相机参数stereoconfig.py
双目相机标定误差越小越好,我这里误差为0.1,尽量使误差在0.2以下
import numpy as np
# 双目相机参数
class stereoCamera(object):def __init__(self):self.cam_matrix_left = np.array([[1101.89299, 0, 1119.89634],[0, 1100.75252, 636.75282],[0, 0, 1]])self.cam_matrix_right = np.array([[1091.11026, 0, 1117.16592],[0, 1090.53772, 633.28256],[0, 0, 1]])self.distortion_l = np.array([[-0.08369, 0.05367, -0.00138, -0.0009, 0]])self.distortion_r = np.array([[-0.09585, 0.07391, -0.00065, -0.00083, 0]])self.R = np.array([[1.0000, -0.000603116945856524, 0.00377055351856816],[0.000608108737333211, 1.0000, -0.00132288199083992],[-0.00376975166958581, 0.00132516525298933, 1.0000]])self.T = np.array([[-119.99423], [-0.22807], [0.18540]])self.baseline = 119.99423
3.2 测距部分
这一部分我用了多线程加快速度,计算目标检测框中心点的深度值
config = stereoconfig_040_2.stereoCamera()
map1x, map1y, map2x, map2y, Q = getRectifyTransform(720, 1280, config)
thread = MyThread(stereo_threading, args=(config, im0, map1x, map1y, map2x, map2y, Q))
thread.start()
results = model.predict(im0, save=False, conf=0.5)
annotated_frame = results[0].plot()
boxes = results[0].boxes.xywh.cpu()
for i, box in enumerate(boxes):# for box, class_idx in zip(boxes, classes):x_center, y_center, width, height = box.tolist()x1 = x_center - width / 2y1 = y_center - height / 2x2 = x_center + width / 2y2 = y_center + height / 2if (0 < x2 < 1280):thread.join()points_3d = thread.get_result()# gol.set_value('points_3d', points_3d)a = points_3d[int(y_center), int(x_center), 0] / 1000b = points_3d[int(y_center), int(x_center), 1] / 1000c = points_3d[int(y_center), int(x_center), 2] / 1000distance = ((a ** 2 + b ** 2 + c ** 2) ** 0.5)
3.3 主代码yolov8-stereo.py
(1)加入了多线程处理,加快处理速度
(2)如果想打开相机,直接把cap = cv2.VideoCapture(‘a1.mp4’)改成cap = cv2.VideoCapture(0)即可
import cv2
import torch
import argparse
from ultralytics import YOLO
from stereo import stereoconfig_040_2
from stereo.stereo import stereo_40
from stereo.stereo import stereo_threading, MyThread
from stereo.dianyuntu_yolo import preprocess, undistortion, getRectifyTransform, draw_line, rectifyImage, \stereoMatchSGBMdef main():cap = cv2.VideoCapture('ultralytics/assets/a1.mp4')model = YOLO('yolov8n.pt')cv2.namedWindow('00', cv2.WINDOW_NORMAL)cv2.resizeWindow('00', 1280, 360)  # 设置宽高out_video = cv2.VideoWriter('output.avi', cv2.VideoWriter_fourcc(*'XVID'), 30, (2560, 720))while True:ret, im0 = cap.read()if not ret:print("Video frame is empty or video processing has been successfully completed.")break# img = cv2.cvtColor(image_net, cv2.COLOR_BGRA2BGR)config = stereoconfig_040_2.stereoCamera()map1x, map1y, map2x, map2y, Q = getRectifyTransform(720, 1280, config)thread = MyThread(stereo_threading, args=(config, im0, map1x, map1y, map2x, map2y, Q))thread.start()results = model.predict(im0, save=False, conf=0.5)annotated_frame = results[0].plot()boxes = results[0].boxes.xywh.cpu()for i, box in enumerate(boxes):# for box, class_idx in zip(boxes, classes):x_center, y_center, width, height = box.tolist()x1 = x_center - width / 2y1 = y_center - height / 2x2 = x_center + width / 2y2 = y_center + height / 2if (0 < x2 < 1280):thread.join()points_3d = thread.get_result()# gol.set_value('points_3d', points_3d)a = points_3d[int(y_center), int(x_center), 0] / 1000b = points_3d[int(y_center), int(x_center), 1] / 1000c = points_3d[int(y_center), int(x_center), 2] / 1000distance = ((a ** 2 + b ** 2 + c ** 2) ** 0.5)if (distance != 0):text_dis_avg = "dis:%0.2fm" % distancecv2.putText(annotated_frame, text_dis_avg, (int(x2 + 5), int(y1 + 30)), cv2.FONT_ITALIC, 1.2,(0, 255, 255), 3)cv2.imshow('00', annotated_frame)out_video.write(annotated_frame)key = cv2.waitKey(1)if key == 'q':breakout_video.release()cap.release()cv2.destroyAllWindows()if __name__ == '__main__':parser = argparse.ArgumentParser()parser.add_argument('--weights', type=str, default='yolov8n.pt', help='model.pt path(s)')parser.add_argument('--svo', type=str, default=None, help='optional svo file')parser.add_argument('--img_size', type=int, default=416, help='inference size (pixels)')parser.add_argument('--conf_thres', type=float, default=0.4, help='object confidence threshold')opt = parser.parse_args()with torch.no_grad():main()
4. 实验结果
可实现测距、跟踪和分割功能,实现不同功能仅需修改以下代码,具体见 此篇文章
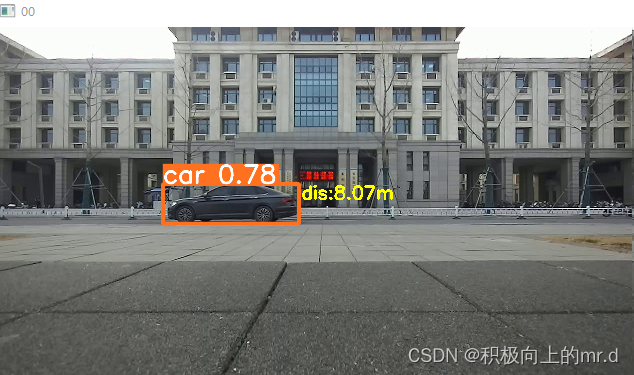
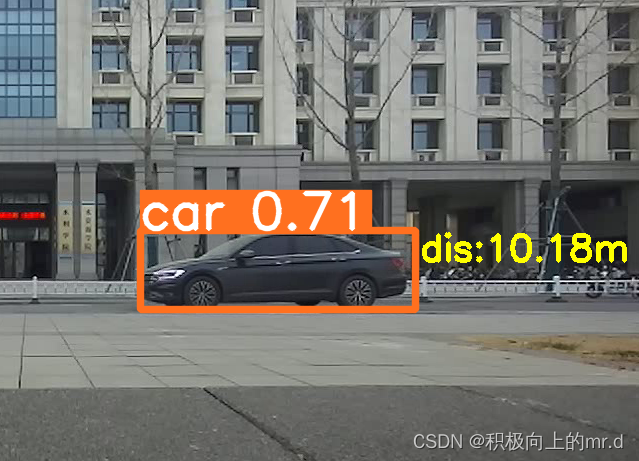
4.1 测距
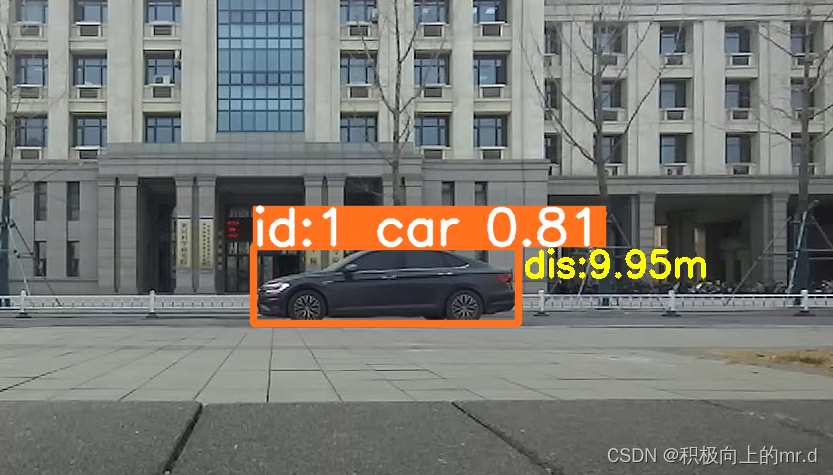
4.2 测距+跟踪
4.3 测距+跟踪+分割