sheng的学习笔记-Actuator健康监控
前言
在微服务系统里,对微服务程序的运行状况的跟踪和监控是必不可少的;例如GPE,Telegraf+influxDB都提供了微服务体系监控的方案, ZIPKIN, Skywalking都提供了微服务云体系的APM的方案; 这些解决方案功能全面;但是都需要提供额外的资源进行架构; 其实在SpringBoot构建的微服务中本身就带有了Actuator组件,能够提供相关的功能,如果我们对此要求不特别高,我们可以在自己的微服务中开启Actuator的功能即可;
Spring Boot Actuator
Spring Boot Actuator是SpringBoot框架的一个子项目。它使用HTTP的方式公开任何正在运行的应用程序的操作信息。Spring Boot Actuator直接是内嵌如我们的微服务中,可以直接从生产就绪的应用程序中获取健康和监控指标。通过Actuator,收集度量、了解流量或了解数据库状态变得非常容易。今天咱们这个文章,我们一起来看看如何使用和配置Spring Boot Actuator。
引入Actuator
在项目pom.xml文件里,引入actuator的依赖包
<dependency>
<groupId>org.springframework.boot</groupId>
<artifactId>spring-boot-starter-actuator</artifactId>
</dependency>
服务端点(ENDPOINT)
Spring Boot Actuator通过HTTP的方式为使用者提供了一个内置端点列表;端点列表可以展示出应用程序的操作信息;通过Actuator的技术规范,开发者可以在自己的相关组件中实现Actuator的Endpoint,而启用组件相关的端点信息;在最新版本中,默认情况下,Actuator启动后,默认启用了两个端点,/health和/info。
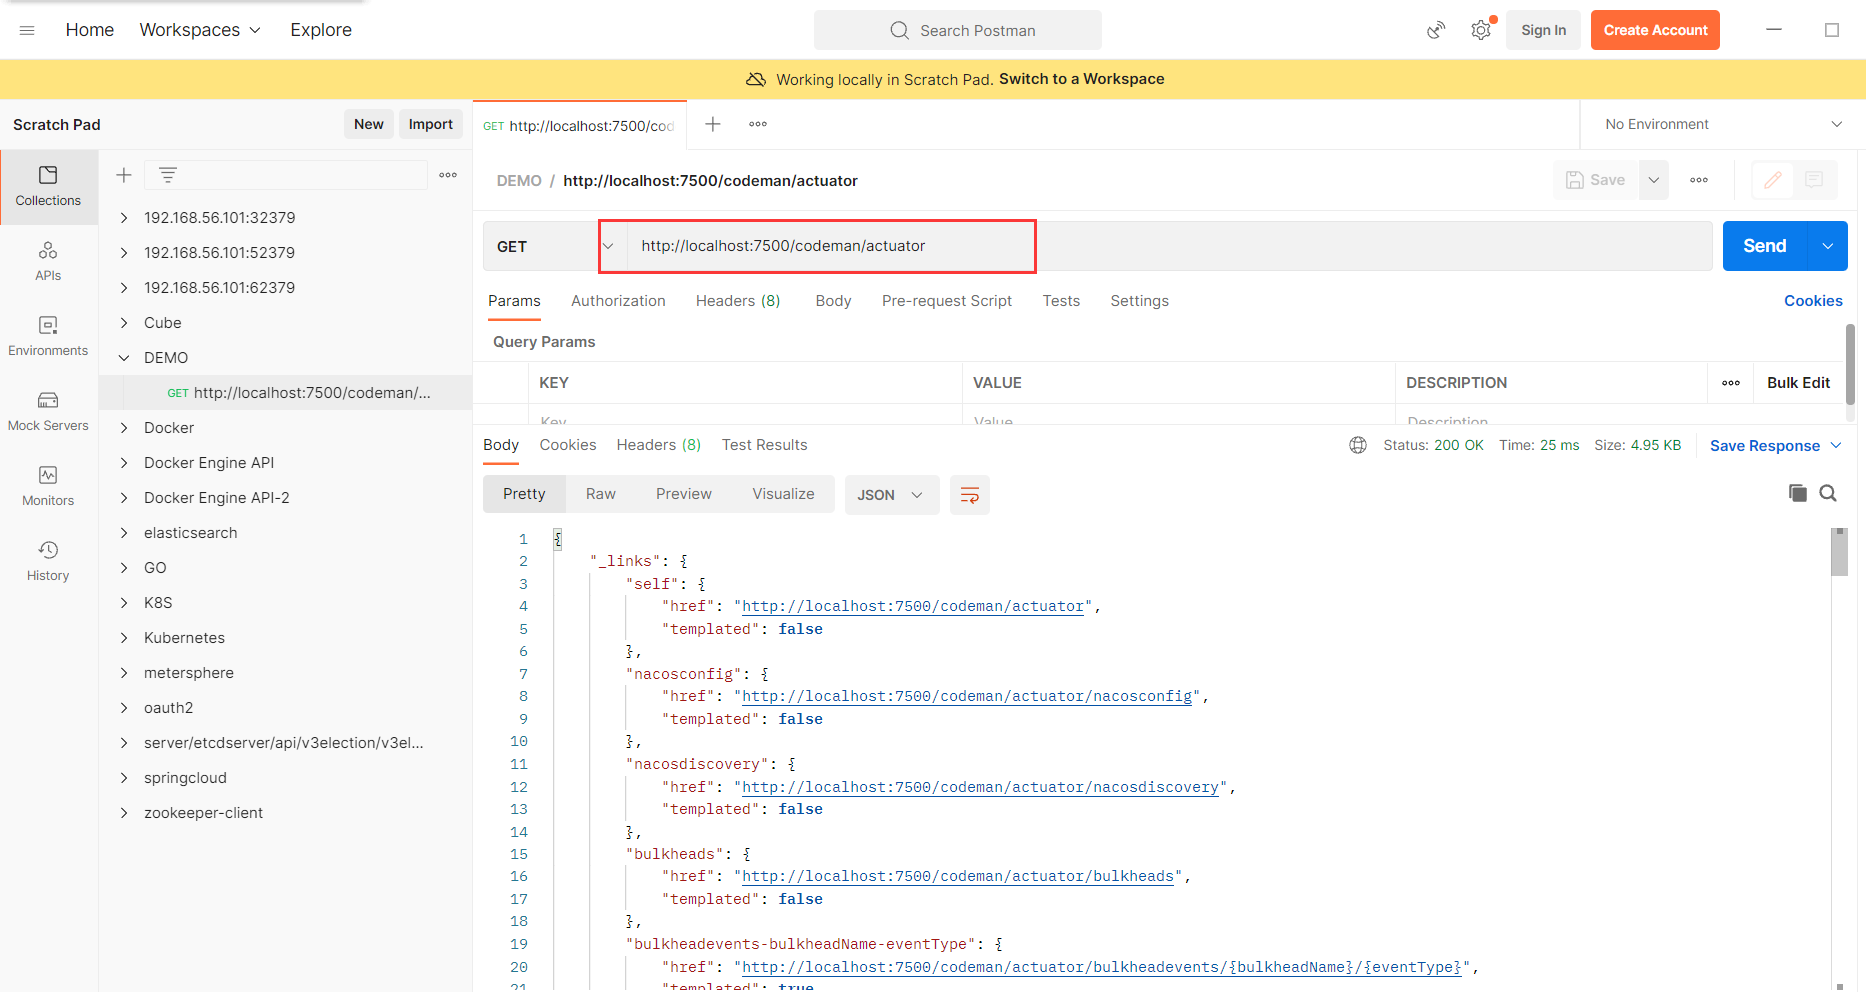
启动Spring Boot的应用; 根据应用的端口,在http://IP:port/context/actuator 这个地址,就可以查看到应用的Actuator信息
默认情况下,只启用health和info两个Endpoint; 我们通过exposure的配置,对可以暴露的Endpoint进行配置;
在yaml或者properties中配置
暴露部分端点
management.endpoints.web.exposure.include=info,health,beans,env
暴露所有端点
management.endpoints.web.exposure.include=*
不暴露beans端点
management.endpoints.web.exposure.exclude=beans

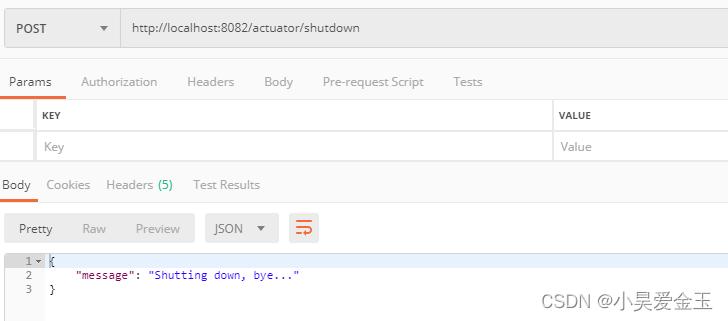
开启shutdown端点
用来关闭服务,开启远程关闭功能。这个很危险,默认关闭,一般情况下别开,有安全风险
上面开启所有端点也不会打开shutdown端点,需要配置文件单独配置。
management.endpoint.shutdown.enabled=true
/actuator/shutdown 只支持POST请求。
在图中出现了很多的比如:http://localhost:7500/codeman/actuator/nacosdiscovery;这是由于其他的nacos-discovery-starter扩展了自己的Endpoint;
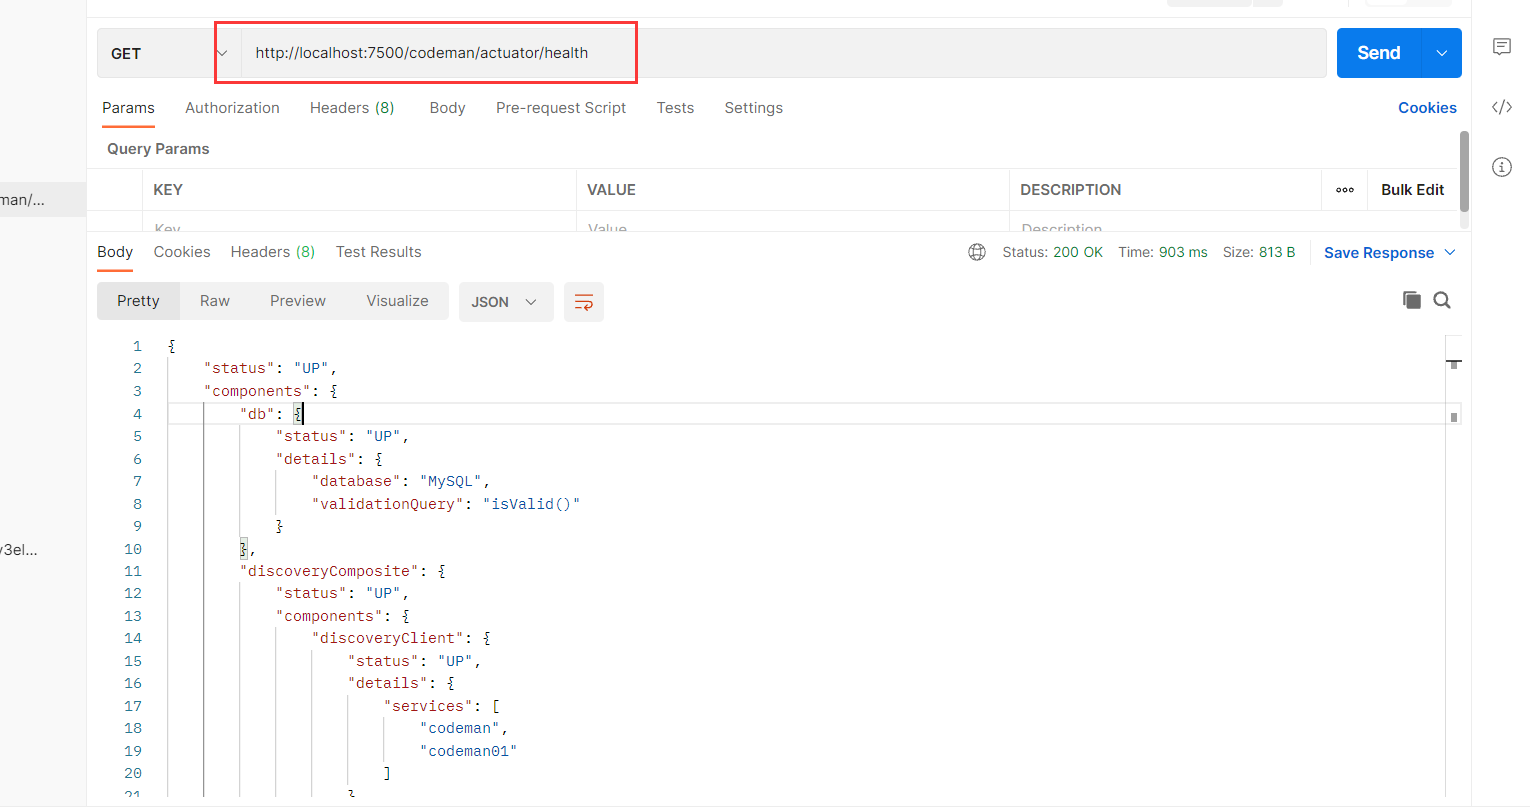
每个这里的endpoint都可以通过http进行访问;比如: http://localhost:7500/codeman/actuator/health
查看重要度量指标信息
"metrics-requiredMetricName": {
"href": "http://localhost:8082/actuator/metrics/{requiredMetricName}",
"templated": true
},
//返回应用的各类重要度量指标信息
"metrics": {
"href": "http://localhost:8082/actuator/metrics",
"templated": false
},
先通过http://localhost:8082/actuator/metrics应用的各类重要度量指标信息。
{
"names": [
"http.server.requests",
"jvm.buffer.count",
"jvm.buffer.memory.used",
"jvm.buffer.total.capacity",
"jvm.classes.loaded",
"jvm.classes.unloaded",
"jvm.gc.live.data.size",
"jvm.gc.max.data.size",
"jvm.gc.memory.allocated",
"jvm.gc.memory.promoted",
"jvm.gc.pause",
"jvm.memory.committed",
"jvm.memory.max",
"jvm.memory.used",
"jvm.threads.daemon",
"jvm.threads.live",
"jvm.threads.peak",
"jvm.threads.states",
"logback.events",
"process.cpu.usage",
"process.start.time",
"process.uptime",
"system.cpu.count",
"system.cpu.usage",
"tomcat.sessions.active.current",
"tomcat.sessions.active.max",
"tomcat.sessions.alive.max",
"tomcat.sessions.created",
"tomcat.sessions.expired",
"tomcat.sessions.rejected"
]
}
然后通过http://localhost:8082/actuator/metrics/{requiredMetricName}查看对应指标详细数据,比如我们要查看jvm内存使用情况,就通过http://localhost:8082/actuator/metrics/jvm.memory.used查看。

系统环境变量
http://localhost:8082/actuator/env
路径映射和端口
最新版本中;默认情况所有端点都暴露在“/actuator”路径下,可以通过路径映射来修改默认的路径,这个方法也是一种比较简易的安全保护方法;把默认值换成自己的值;
配置
management.endpoints.web.base-path=/manage
通过上面的配置就把路径换成了自己的manager路径,需要使用xxxx/manage来进行访问,避免其他的外部使用者猜到路径;
也可以通过路径映射,去修改endpoint的访问路径
配置
management.endpoints.web.path-mapping.info=_info
通过上面的配置将info修改成_info
默认情况下,actuator使用和应用相同的端口;也可以配置actuator使用自己的端口
配置
management.server.port=17501


路径映射和端口保护,是最简单的安全保护的一种方法; 也可以使用spring-boot-starter-security模板的集成,来更高级的对actuator的访问进行保护
常用的Endpoint
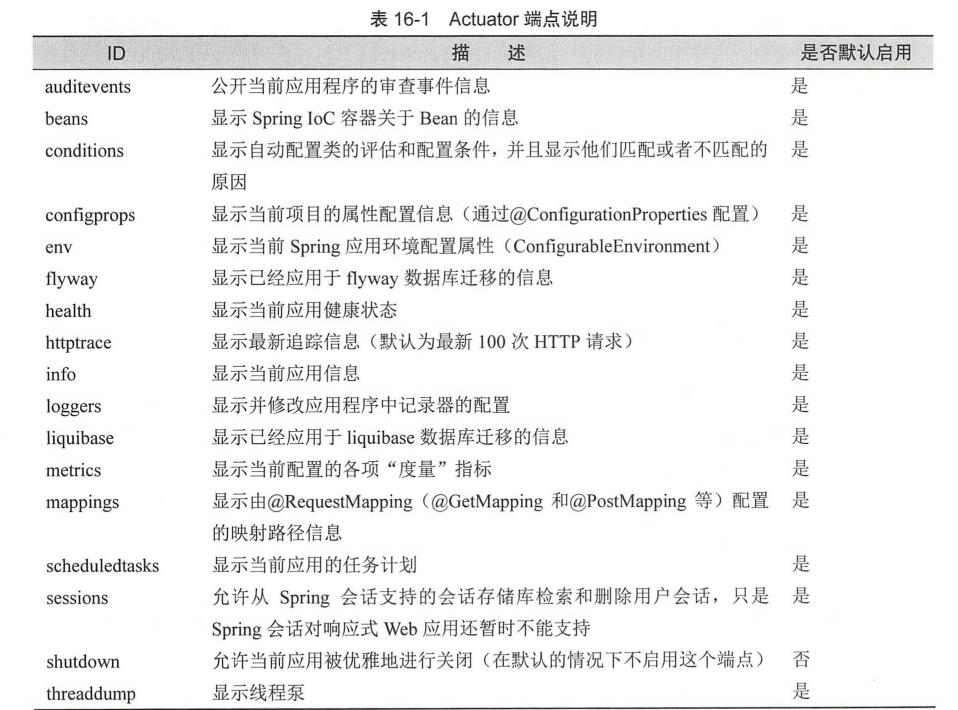
推荐大家一定要自行去试试并查看以下Endpoint;这几个Endpoint是排查Spring Boot非常有用的Endpoint
/health 端点;应用健康信息是一个汇总的信息; management.endpoint.health.show-details=always开启详细信息
/metrics 端点;当前应用的各类重要度量指标,比如:内存信息、线程信息、垃圾回收信息、tomcat、数据库连接池等
/beans 端点;当前应用的各Bean对象的注册信息
/heapdump 端点 ;自动生成一个 当前Jvm 的堆文件 heapdump。
/threaddump 端点;当前线程的情况。 主要展示了线程名、线程ID、线程的状态、是否等待锁资源、线程堆栈等信息
Endpoint扩展(自定义)
如上图中我们看到的http://localhost:7500/codeman/actuator/nacosdiscovery;不是默认的actuator的端点,是nacos-discovery-starter扩展的Endpoint;用来对获取和知悉Nacos Discovery当前的信息; 有时候我们需要去扩展自己的Endpoint;
定义Endpoint入口
@Slf4j
@Endpoint(id = "feign-info")
@Component
public class FeignSampleEndpoint{@ReadOperationpublic FeignSampleState detailState(@Selector String[] paths){FeignSampleState state = feignSampleState;if(paths!=null){Arrays.stream(paths).forEach( one-> {state.getInfo().put(one , one );});}return state;}
}
这个就是一个简单的Endpoint定义, 通过@Endpoint(id="feign-info"),定义了一个feign-info的Endpoint, 方法@ReadOperation使用Get @DeleteOperation使用Delete协议 @WriteOperation使用Post协议
定义后就可以通过 xxxx/actuator/feign-info 来进行Endpoint的访问Endpoint了;
参考文章
https://blog.csdn.net/inthirties/article/details/126850399
https://blog.csdn.net/weixin_34628145/article/details/123188215