FFmpeg-aac、h264封装flv及时间转换
文章目录
- 时间概念
- 流程
- api
- 核心代码
时间概念
dts: 解码时间戳, 表示压缩帧的解码时间
pts: 显示时间戳, 表示将压缩帧解码后得到的原始帧的显示时间
时间基: time_base , 通常以ms为单位
时间戳: timestamp , 多少个时间基
真实时间:time_base * timestamp
如一个视频帧的dts为40(时间戳) ,time_base:1/1000s
真实时间: 40 * 1/1000 s
ffmpeg/ffplay命令参数:
tbr: 通常为帧率
tbn: 视频流的时间基
tbc: 视频解码的时间基
ffmepg内部时间基:
#define AV_TIME_BASE 1000000 //微妙
时间转换
av_q2d():将时间从AVRational(分数)形式转换为double形式
static inline double av_q2d(AVRational a){return a.num / (double) a.den;
}
时间基转换函数:
av_rescale_q() :⽤于将时间值从⼀种时间基转换为另⼀种时间基
av_rescale_rnd():用于时间取整
av_packet_rescale_ts:⽤于将AVPacket中各种时间值从⼀种时间基转换为另⼀种时间基
1 视频流
转封装过程中的时间基转换:
AVStream.time_base是AVPacket中pts和dts的时间单位
- 对于输⼊流:打开输⼊⽂件后,调⽤avformat_find_stream_info()可获取到每个流中的time_base
- 对于输出流:打开输出⽂件后,调⽤avformat_write_header()可根据输出⽂件封装格式确定每个流的time_base并写⼊输出⽂件中
转码过程中的时间基转换:
编解码器中的时间基为 AVCodecContext.time_base,值为帧率(视频帧)的倒数
解码视频帧:
时间基为 1/framerate
- 视频解码过程中的时间基转换处理:
若从av_read_frame读取的packet,是以AVSteam->time_base,是avcodec_receive_frame后以AVSteam->time_base为准 - 视频编码过程中的时间基转换处理:
编码的时候frame如果以AVstream为time_base送编码器,
则avcodec_receive_packet读取的时候也是以转成AVSteam->time_base
2 视频流
解码后的原始视频帧时间基为 1/framerate
流程
首先生成一个h264和aac,封装为flv add_stream函数类似编码过程
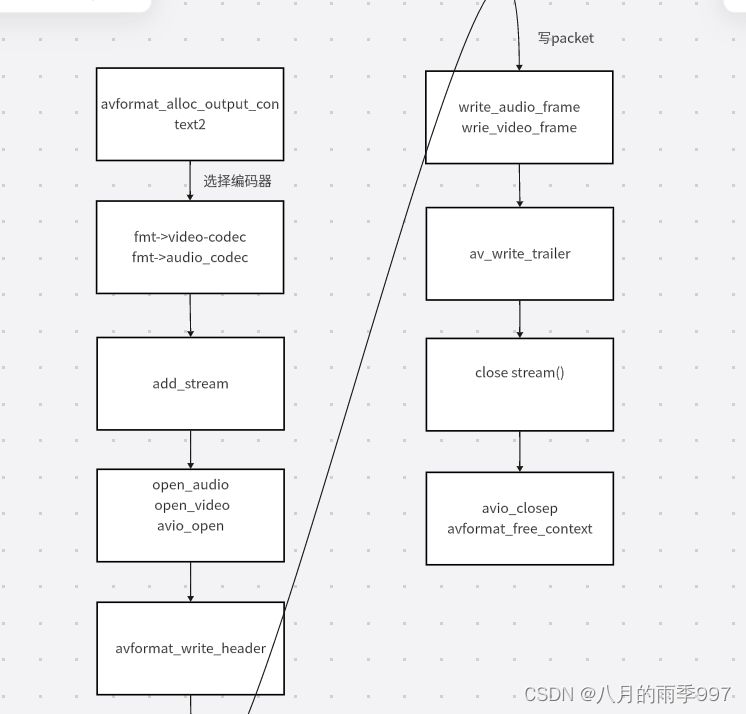
api
- avformat_write_header : 写⽂件头
- av_write_frame/av_interleaved_write_frame: 写packet
- av_write_trailer : 写⽂件尾
- avcodec_parameters_from_context: 将AVCodecContext结构体中码流参数拷⻉到AVCodecParameters结构体中
- int avformat_alloc_output_context2 – 根据filename申请上下文
- AVStream *avformat_new_stream(AVFormatContext *s, const AVCodec *c) // 新增流通道
int avformat_alloc_output_context2(AVFormatContext **ctx, ff_const59 AVOutputFormat *oformat,const char *format_name, const char *filename) {} ctx:需要创建的context,返回NULL表示失败format:指定对应的AVOutputFormatformat_name: 指定⾳视频的格式,⽐如“flv”,“mpeg”等,如果设置为NULL,则由filename进⾏指定,让ffmpeg⾃⼰推断filename: 指定⾳视频⽂件的路径核心代码
命令行参数: test.flv aac h264创建流生成
如何转换时间time_base:
open_audio: 关联编码器,会设置codec_ctx->time_base
avformat_write_header: base_time 转化为 1/1000
write_audio_frame中调用write_frame,pts会进行转化
如采样率44.1hz , pts_after = pts_before(-1024) * 1/44100 * 1000 = -23
//输出⽂件容器格式,生成flv文件,对应的ffmepg的源文件为flvenc.c
AVOutputFormat ff_flv_muxer = {.name           = "flv",.long_name      = NULL_IF_CONFIG_SMALL("FLV (Flash Video)"),.mime_type      = "video/x-flv",.extensions     = "flv",.priv_data_size = sizeof(FLVContext),.audio_codec    = CONFIG_LIBMP3LAME ? AV_CODEC_ID_MP3 : AV_CODEC_ID_ADPCM_SWF,.video_codec    = AV_CODEC_ID_FLV1,.init           = flv_init,.write_header   = flv_write_header,.write_packet   = flv_write_packet,.write_trailer  = flv_write_trailer,.check_bitstream= flv_check_bitstream,
};static int write_video_frame(AVFormatContext *oc, OutputStream *ost)
{int ret;AVCodecContext *codec_ctx;AVFrame *frame;int got_packet = 0;AVPacket pkt = { 0 };codec_ctx = ost->enc;frame = get_video_frame(ost);av_init_packet(&pkt);/* encode the image */avcodec_encode_video2(codec_ctx, &pkt, frame, &got_packet);if (got_packet){ret = write_frame(oc, &codec_ctx->time_base, ost->st, &pkt);}else{ret = 0;}if (ret < 0){fprintf(stderr, "Error while writing video frame: %s\n", av_err2str(ret));exit(1);}return (frame || got_packet) ? 0 : 1;
}int main(int argc, char **argv)
{OutputStream video_st = { 0 }; // 封装视频编码相关的OutputStream audio_st = { 0 }; // 封装音频编码相关的const char *filename;   // 输出文件// AVOutputFormat ff_flv_muxerAVOutputFormat *fmt;    // 输出文件容器格式, 封装了复用规则,AVInputFormat则是封装了解复用规则AVFormatContext *oc;AVCodec *audio_codec, *video_codec;int ret;int have_video = 0, have_audio = 0;int encode_video = 0, encode_audio = 0;AVDictionary *opt = NULL;int i;filename = argv[1];/* 分配AVFormatContext并根据filename绑定合适的AVOutputFormat */avformat_alloc_output_context2(&oc, NULL, NULL, filename);fmt = oc->oformat; // 获取绑定的AVOutputFormat// 我们音视频课程音视频编解码主要涉及H264和AAC, 所以我们指定为H264+AACfmt->video_codec = AV_CODEC_ID_H264;    // 指定编码器fmt->audio_codec = AV_CODEC_ID_AAC;     // 指定编码器/* 使用指定的音视频编码格式增加音频流和视频流 */if (fmt->video_codec != AV_CODEC_ID_NONE){add_stream(&video_st, oc, &video_codec, fmt->video_codec);have_video = 1;encode_video = 1;}if (fmt->audio_codec != AV_CODEC_ID_NONE){add_stream(&audio_st, oc, &audio_codec, fmt->audio_codec);have_audio = 1;encode_audio = 1;}if (have_video)open_video(oc, video_codec, &video_st, opt);if (have_audio)open_audio(oc, audio_codec, &audio_st, opt);/* open the output file, if needed */if (!(fmt->flags & AVFMT_NOFILE)){// 打开对应的输出文件,没有则创建avio_open(&oc->pb, filename, AVIO_FLAG_WRITE);}// audio AVstream->base_time = 1/44100, video AVstream->base_time = 1/25// base_time audio = 1/1000 video = 1/1000avformat_write_header(oc, &opt);while (encode_video || encode_audio){/* select the stream to encode */if (encode_video &&         // video_st.next_pts值 <= audio_st.next_pts时(!encode_audio || av_compare_ts(video_st.next_pts, video_st.enc->time_base,audio_st.next_pts, audio_st.enc->time_base) <= 0)) {printf("\nwrite_video_frame\n");encode_video = !write_video_frame(oc, &video_st);}else{printf("\nwrite_audio_frame\n");encode_audio = !write_audio_frame(oc, &audio_st);}}av_write_trailer(oc);/* Close each codec. */if (have_video)close_stream(oc, &video_st);if (have_audio)close_stream(oc, &audio_st);if (!(fmt->flags & AVFMT_NOFILE))avio_closep(&oc->pb);avformat_free_context(oc);return 0;
}