rtt的io设备框架面向对象学习-电阻屏LCD设备
目录
- 1.8080通信的电阻屏LCD设备
- 1.1 构造流程
- 1.2 使用
- 2.i2c和spi通信的电阻屏LCD
电阻屏LCD通信接口有支持I2c、SPI和8080通信接口的。
1.8080通信的电阻屏LCD设备
lcd这块不像其他设备类,rtt没有实现的设备驱动框架层,那么是在驱动层直接实现的。
以stm32f407-atk-explorer为例,该bsp支持电阻触摸屏LCD,在/bsp / stm32 / stm32f407-atk-explorer / board / ports /drv_lcd.c中定义了该设备类:
struct drv_lcd_device
{struct rt_device parent;struct rt_device_graphic_info lcd_info;
};
其中struct rt_device_graphic_info是在/ components / drivers / include / drivers /classes/graphic.h定义的:
struct rt_device_graphic_info
{rt_uint8_t  pixel_format;                           /**< graphic format */rt_uint8_t  bits_per_pixel;                         /**< bits per pixel */rt_uint16_t pitch;                                  /**< bytes per line */rt_uint16_t width;                                  /**< width of graphic device */rt_uint16_t height;                                 /**< height of graphic device */rt_uint8_t *framebuffer;                            /**< frame buffer */rt_uint32_t smem_len;                               /**< allocated frame buffer size */
};
然后实例化了该设备类
static struct drv_lcd_device _lcd;
1.1 构造流程
并实现了其构造函数drv_lcd_hw_init:
int drv_lcd_hw_init(void)
{rt_err_t result = RT_EOK;struct rt_device *device = &_lcd.parent;/* memset _lcd to zero */memset(&_lcd, 0x00, sizeof(_lcd));_lcd.lcd_info.bits_per_pixel = 16;_lcd.lcd_info.pixel_format = RTGRAPHIC_PIXEL_FORMAT_RGB565;device->type = RT_Device_Class_Graphic;
#ifdef RT_USING_DEVICE_OPSdevice->ops = &lcd_ops;
#elsedevice->init = drv_lcd_init;device->control = drv_lcd_control;
#endifdevice->user_data = &fsmc_lcd_ops;/* register lcd device */rt_device_register(device, "lcd", RT_DEVICE_FLAG_RDWR | RT_DEVICE_FLAG_STANDALONE);return result;
}
INIT_DEVICE_EXPORT(drv_lcd_hw_init);
可以看到其重写了父类——设备基类的方法——但是只是重写了init方法和control方法。
其对象图如下
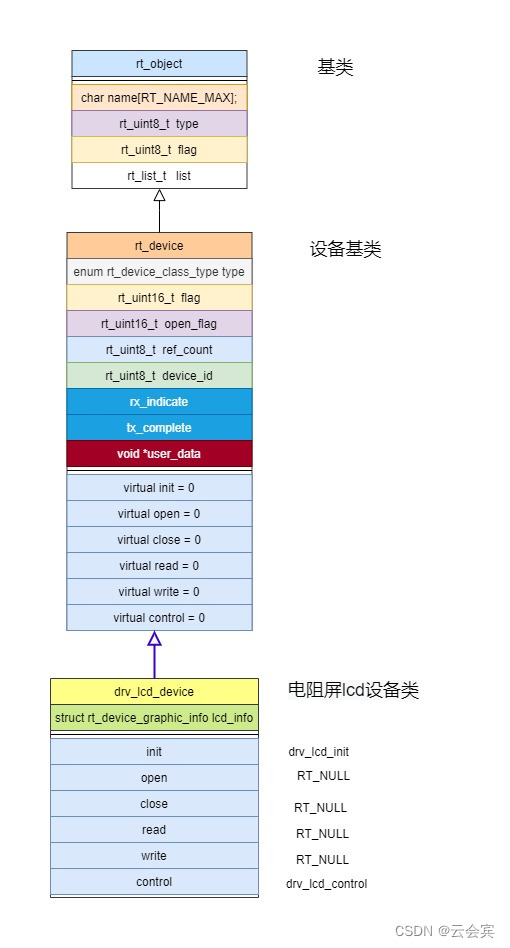
然后它就调用设备基类的构造函数rt_device_register,将电阻屏LCD设备对象放到对象容器里管理。
详细参见io设备管理层。
https://blog.csdn.net/yhb1206/article/details/136440373
1.2 使用
在/bsp / stm32 / stm32f407-atk-explorer / board / ports / touch /drv_xpt2046_init.c中,
static int touch_xpt2046_init(void)
{xpt2046_init_hw();rt_thread_t tid = rt_thread_create("xpt2046", xpt2046_entry, RT_NULL, 1024, 8, 20);RT_ASSERT(tid != RT_NULL);rt_thread_startup(tid);return RT_EOK;
}
INIT_COMPONENT_EXPORT(touch_xpt2046_init);
void xpt2046_init_hw(void)
{……lcd = rt_device_find("lcd");rt_device_init(lcd);
}
在rtt的io设备框架面向对象学习-touch设备中说过,因为此bsp的LCD是电阻触摸LCD屏,所以在xpt2046_init_hw中初始化触摸设备,最后也初始化了LCD。
在xpt2046_entry线程中,读取到触摸坐标点,若开启了lvgl绘图,则通知lvgl绘图,否则直接调用rt_graphix_ops(lcd)->set_pixel在LCD上绘制点的轨迹。
void xpt2046_entry(void *parameter)
{……  while (1){        ……  #ifdef PKG_USING_LVGL            lv_port_indev_input(read_data.x_coordinate, read_data.y_coordinate, ((read_data.event == RT_TOUCH_EVENT_DOWN) ? LV_INDEV_STATE_PR : LV_INDEV_STATE_REL));#else /* PKG_USING_LVGL */            const rt_uint32_t black = 0x0;            rt_graphix_ops(lcd)->set_pixel((const char *)(&black),                                        read_data.x_coordinate,                                         read_data.y_coordinate);#endif rt_thread_mdelay(1);     }        }
如上线程,若是lvgl读到触摸坐标则调用lv_port_indev_input通知lvgl事件,/bsp / stm32 / stm32f407-atk-explorer / board / ports/drv_lcd.c中的函数lcd_fill_array作为对接lvgl的绘图回调函数:
void lcd_fill_array(rt_uint16_t x_start, rt_uint16_t y_start, rt_uint16_t x_end, rt_uint16_t y_end, void *pcolor)
{
rt_uint16_t *pixel = RT_NULL;
rt_uint16_t cycle_y, x_offset = 0;
pixel = (rt_uint16_t *)pcolor;
for(cycle_y = y_start; cycle_y <= y_end; )    {
LCD_SetCursor(x_start, cycle_y);        LCD_WriteRAM_Prepare();
for(x_offset = 0;x_start + x_offset <= x_end; x_offset++)
{
LCD->RAM = *pixel++;       }        cycle_y++;    }
}
可以看到通过绘点来实现显示刷新。
但是如果没有开启lvgl,则直接调用rt_graphix_ops(lcd)->set_pixel,它是/ components / drivers / include / drivers /classes/graphic.h定义的lcd操作接口:
struct rt_device_graphic_ops
{void (*set_pixel) (const char *pixel, int x, int y);void (*get_pixel) (char *pixel, int x, int y);void (*draw_hline)(const char *pixel, int x1, int x2, int y);void (*draw_vline)(const char *pixel, int x, int y1, int y2);void (*blit_line) (const char *pixel, int x, int y, rt_size_t size);
};
#define rt_graphix_ops(device)          ((struct rt_device_graphic_ops *)(device->user_data))
而之前drv_lcd.c中实现了该接口:
struct rt_device_graphic_ops fsmc_lcd_ops ={LCD_Fast_DrawPoint,LCD_ReadPoint,LCD_HLine,LCD_VLine,LCD_BlitLine,
};
并在构造函数drv_lcd_hw_init中赋给了设备基类的user_data 成员
device->user_data = &fsmc_lcd_ops;
这样就能直接操作lcd绘图。
2.i2c和spi通信的电阻屏LCD
至于i2c和spi通信的电阻屏LCD是怎么操作的,通过查找,是没有新的对象的,都是直接对i2c总线和spi设备关联,直接包装发送数据即可,没有上面8080通信口那样子的新的设备框架对象。
spi的LCD屏可以参照官方开发板麻雀一号开发板。
i2c未找到参照物,但是应该是spi一样。