【C项目】顺序表
简介:本系列博客为C项目系列内容,通过代码来具体实现某个经典简单项目
适宜人群:已大体了解C语法同学
作者留言:本博客相关内容如需转载请注明出处,本人学疏才浅,难免存在些许错误,望留言指正
作者博客链接:睡觉待开机
下面是本项目的大体思路梳理:

引言:
一般来说,顺序表作为基本的数据结构类型是不需要我们进行实现的,因为一些高级语言比如C++或者java直接具备的这样的内置数据结构,但是为了深入了解顺序表的底层,这里也是建议自己动手用C写一下,一是便于复习C学到的知识,二是更加深入了解顺序表的实现底层逻辑。
1.顺序表思路
为了明晰顺序表的实现思路,我们首先来铺垫一下我到底要在怎么写一个顺序表。
首先啥是顺序表?
一种线性表,底层是数组,只不过这个顺序表所谓的数组不单单可以放各种类型的数据,还可以有各种接口,包括增删查改操作的接口等等。
注:线性表的概念:逻辑结构上是连续的,物理结构不一定连续的数据结构称为线性表。
顺序表的概念:逻辑结构上是连续的,物理结构上也是连续的,底层是以数组为实现,有着增删查改各种接口的基本数据组织结构。

那么我就可以大致明白了我要写一个顺序表,这个顺序表实现了一些功能。
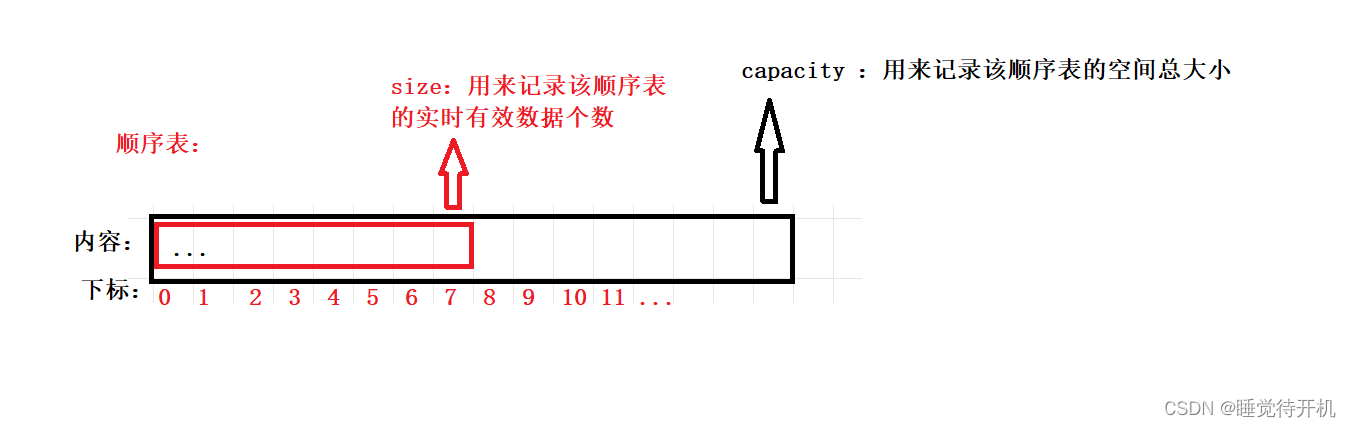
首先我要写一个顺序表的话,要有一个顺序表的大体类型吧,所以我就写了一个动态顺序表的类型
typedef int SLDateType;typedef struct SeqList
{SLDateType* arr;int size;int capacity;
}SL;
然后我想要在这个顺序表中实现各种功能(接口),那这个顺序表首先得初始化吧,有初始化顺序表了那肯定对应着销毁这个接口,自然也需要顺序表销毁,然后还要有头插尾插任意插入这个”增“的功能,还有有头删尾删任意删的这个”删“的共能,然后还要有查找功能,还要修改功能,那么我针对该顺序表的每个接口专门搞一个函数
为了便于代码书写,我将各种接口以及顺序表类型本身定义在SeqList.h头文件中进行声明与定义:
#pragma once
#include<stdio.h>
#include<assert.h>
#include<stdlib.h>typedef int SLDateType;typedef struct SeqList
{SLDateType* arr;int size;int capacity;
}SL;//初始化和销毁
void SLInit(SL* ps);
void SLDestroy(SL* ps);
void SLPrint(SL* ps);//顺序表的头部输入/尾部输入
void SLPushBack(SL* ps,SLDateType x);
void SLPushFront(SL* ps, SLDateType x);//顺序表的头部删除/尾部删除
void SLPopBack(SL* ps);
void SLPopFront(SL* ps);//指定位置放入/删除数据
void SLInsert(SL* ps, int pos, SLDateType x);
void SLErase(SL* ps, int pos);//查找数据
int SLFind(SL* ps, SLDateType x);//修改数据
void SLModify(SL* ps, int pos, SLDateType x);
2.具体实现各种接口
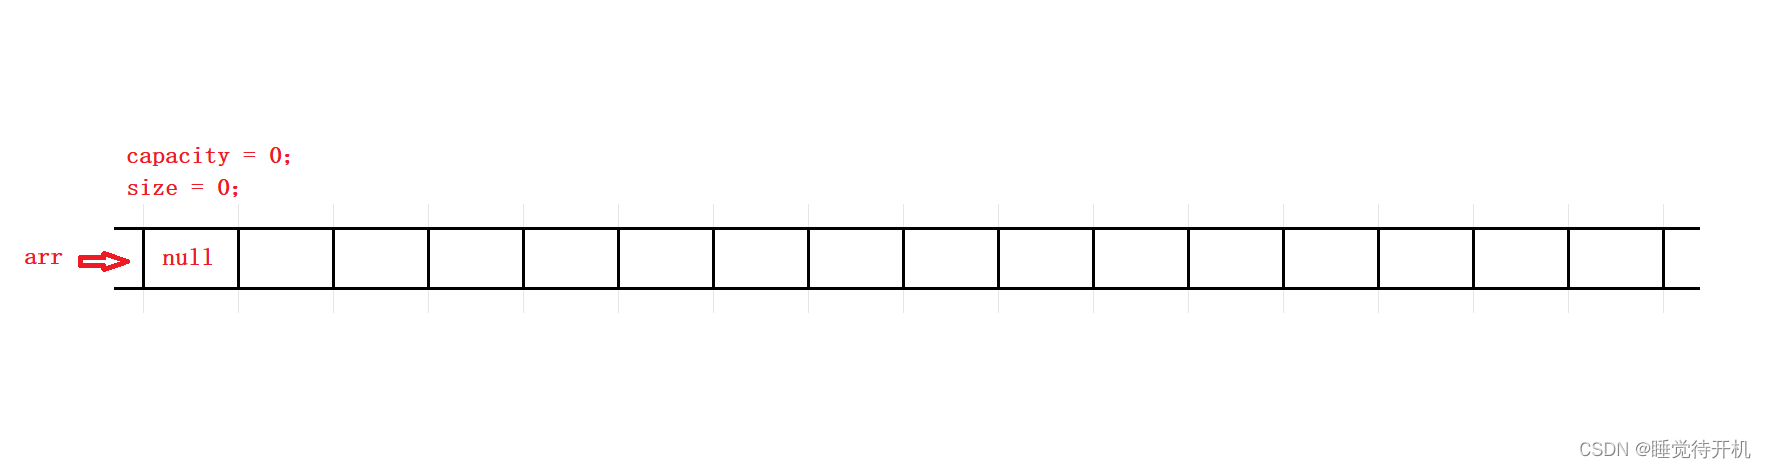
顺序表初始化接口:
void SLInit(SL* ps)
{assert(ps);ps->arr = NULL;ps->capacity = ps->size = 0;
}
顺序表初始化插图:
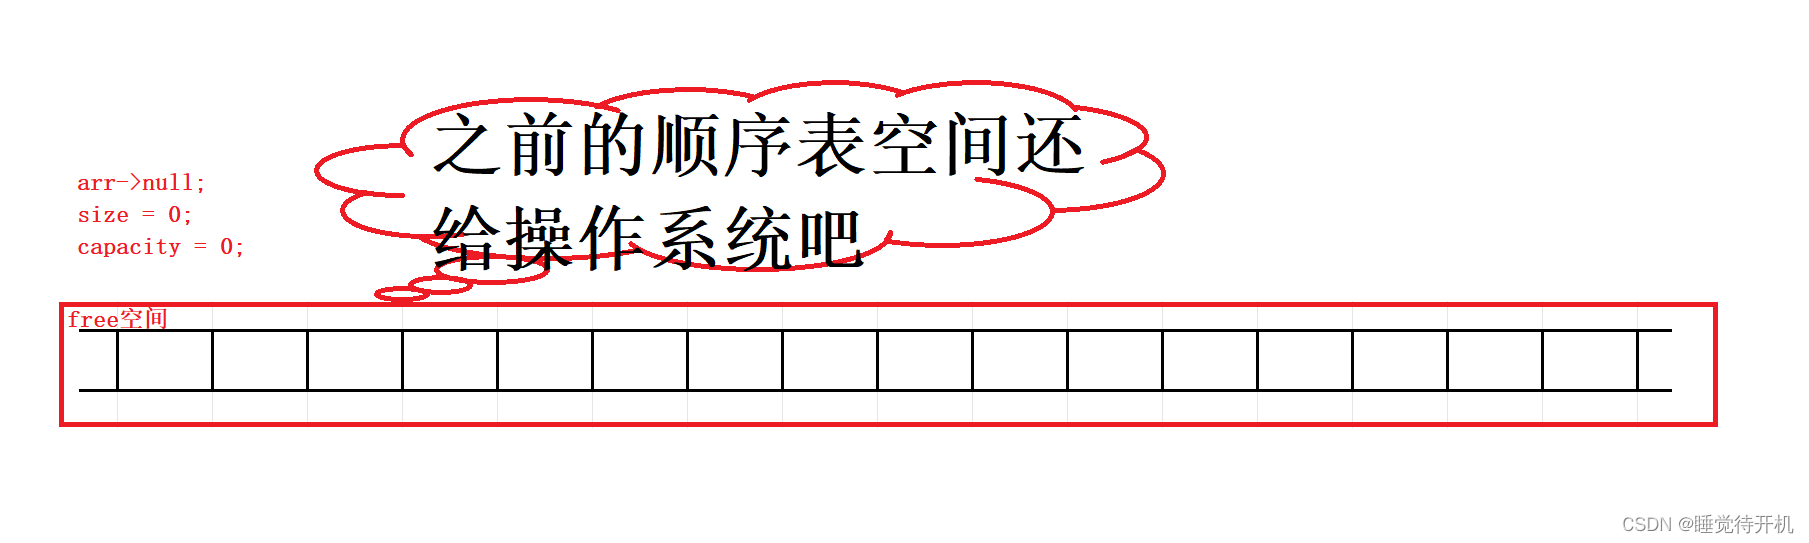
顺序表销毁接口:
void SLDestroy(SL* ps)
{assert(ps);if (ps->arr){free(ps->arr);}ps->arr = NULL;ps->capacity = ps->size = 0;
}
顺序表销毁插图:
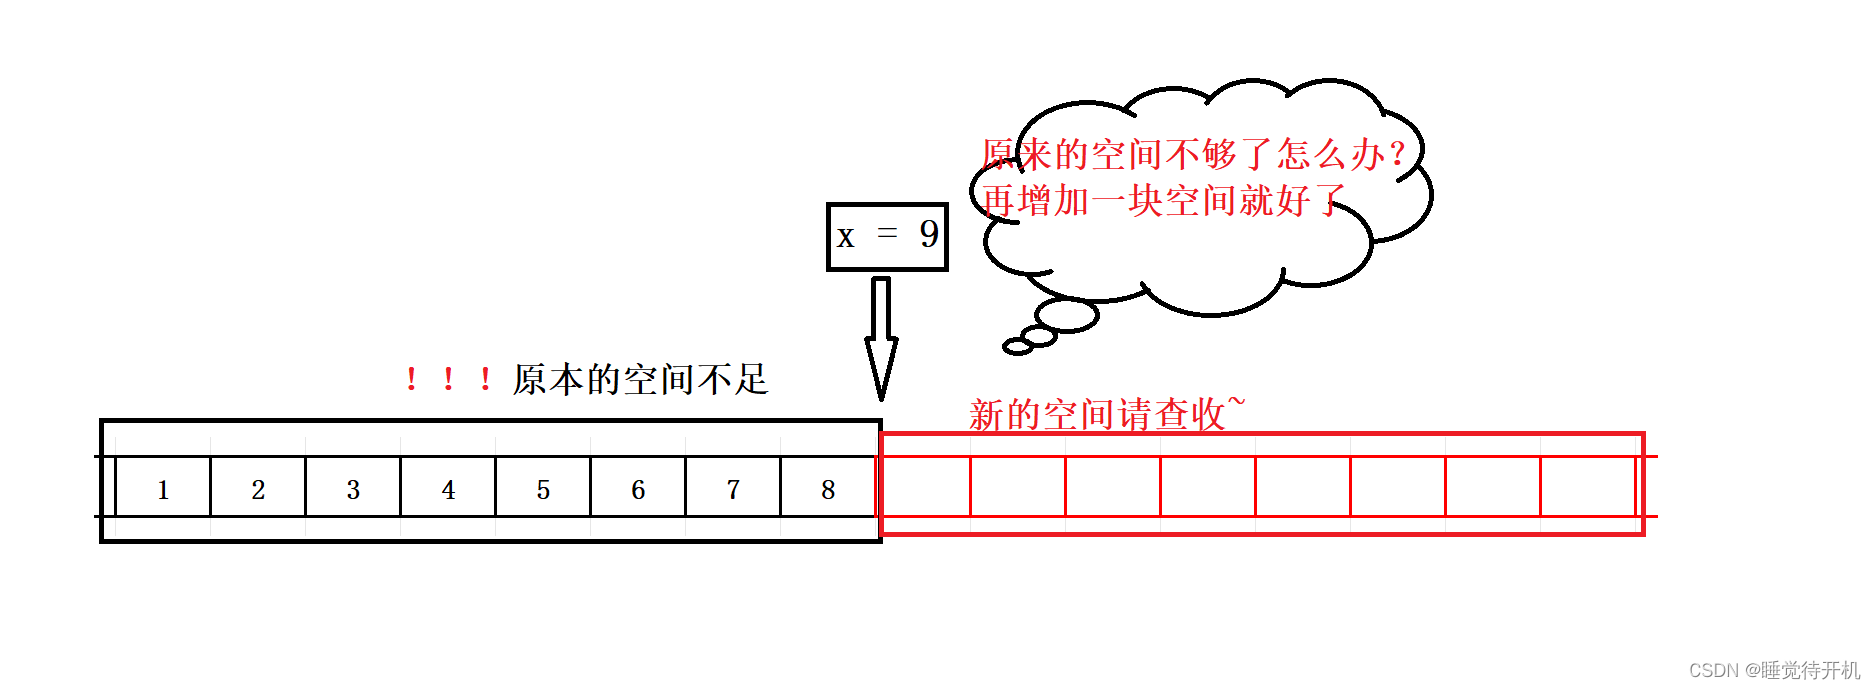
顺序表扩容接口:
void SLCheckCapacity(SL* ps)
{assert(ps);if (ps->capacity == ps->size){//小问题:刚开始的时候,sl->capacity是0值int newcapacity = ps->capacity == 0 ? 4 : 2 * ps->capacity;SLDateType* temp = realloc(ps->arr,sizeof(SLDateType)*newcapacity);if (!temp){perror("realloc fail!");return;}ps->arr = temp;ps->capacity = newcapacity;}
}
顺序表扩容插图:
顺序表插入接口
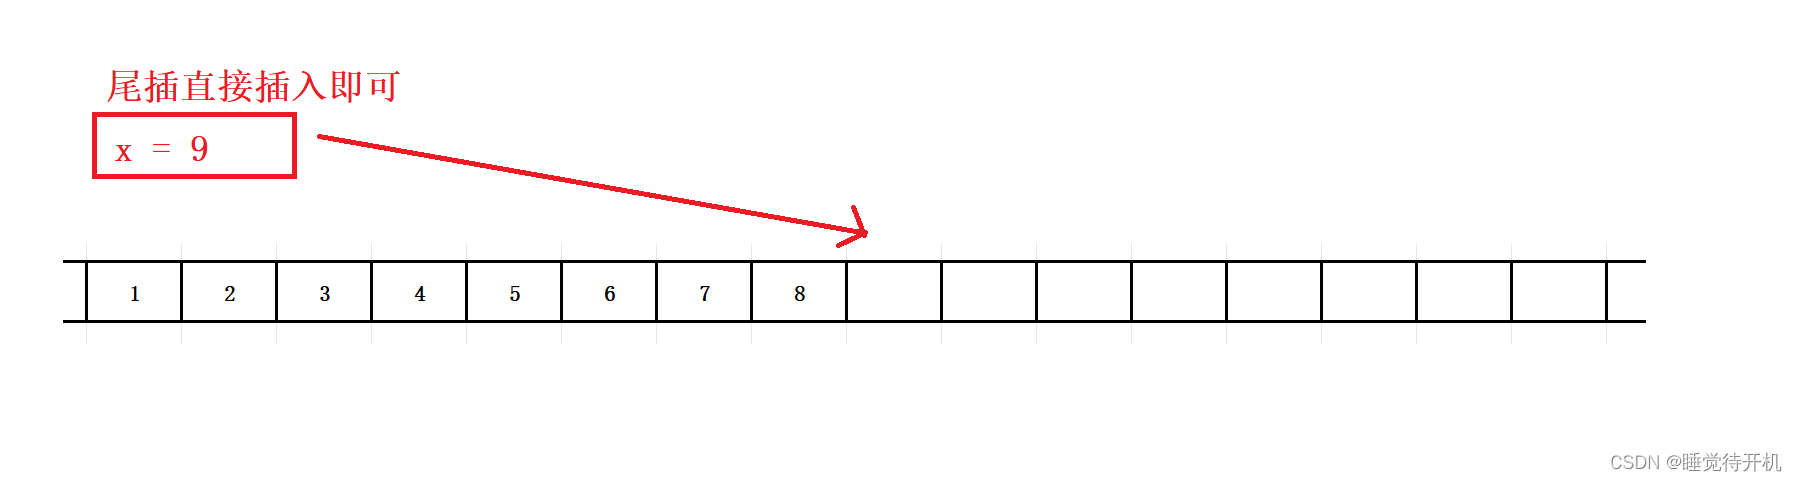
void SLPushBack(SL* ps,SLDateType x)
{assert(ps);//1.空间不足需要扩大容量//2.空间足够直接放入数据SLCheckCapacity(ps);ps->arr[ps->size] = x;ps->size++;
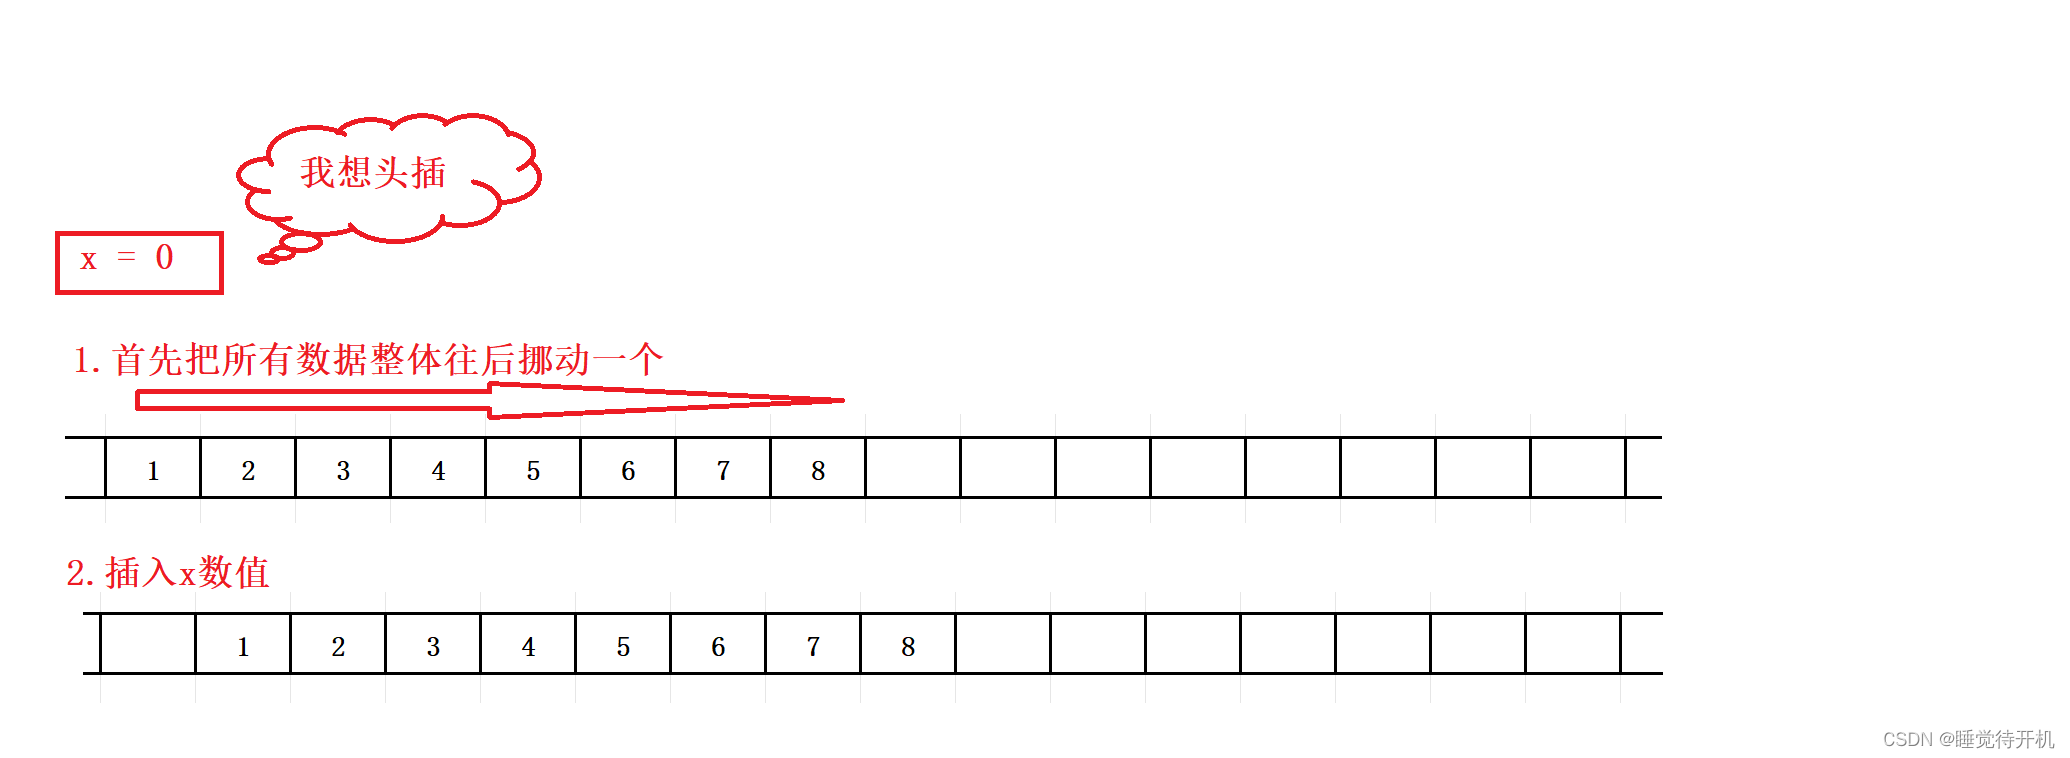
}void SLPushFront(SL* ps, SLDateType x)
{assert(ps);SLCheckCapacity(ps);//挪动数据int i = 0;for (i = ps->size - 1; i >= 0; i--){ps->arr[i+1] = ps->arr[i];}//放入数据*(ps->arr) = x;ps->size++;
}
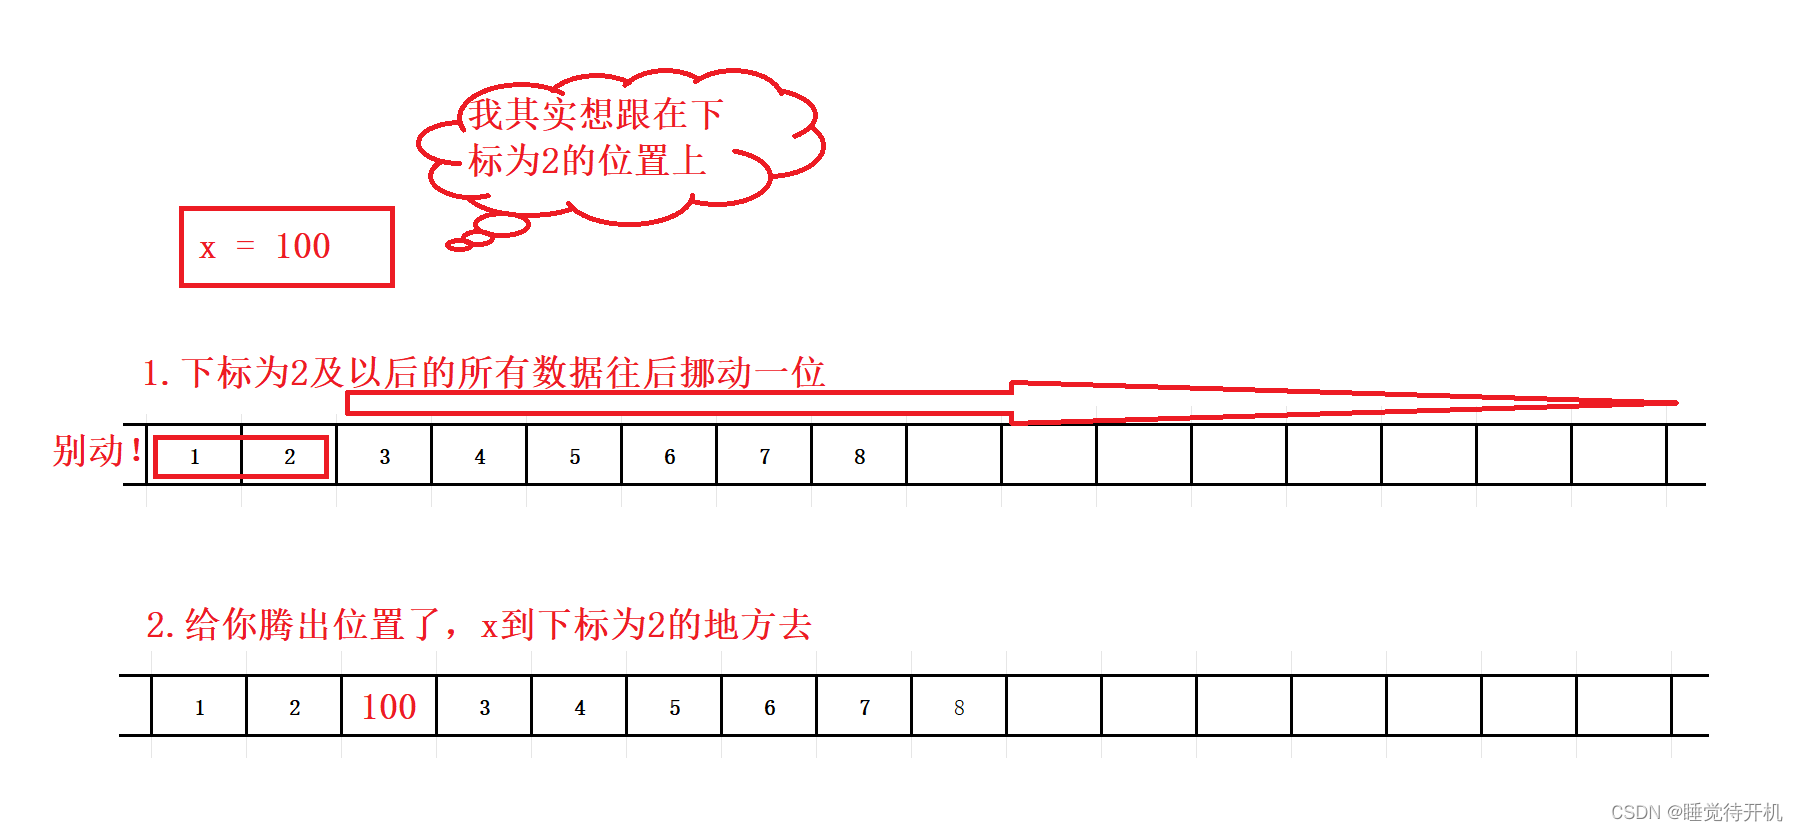
void SLInsert(SL* ps, int pos, SLDateType x)
{assert(ps);assert(pos >= 0 && pos <= ps->size);SLCheckCapacity(ps);int i = 0;for (i = ps->size - 1; i >= pos; i--){ps->arr[i+1] = ps->arr[i];}ps->arr[pos] = x;ps->size++;
}
头插的插图:
尾插的插图:
任意插入的插图:
顺序表删除接口:
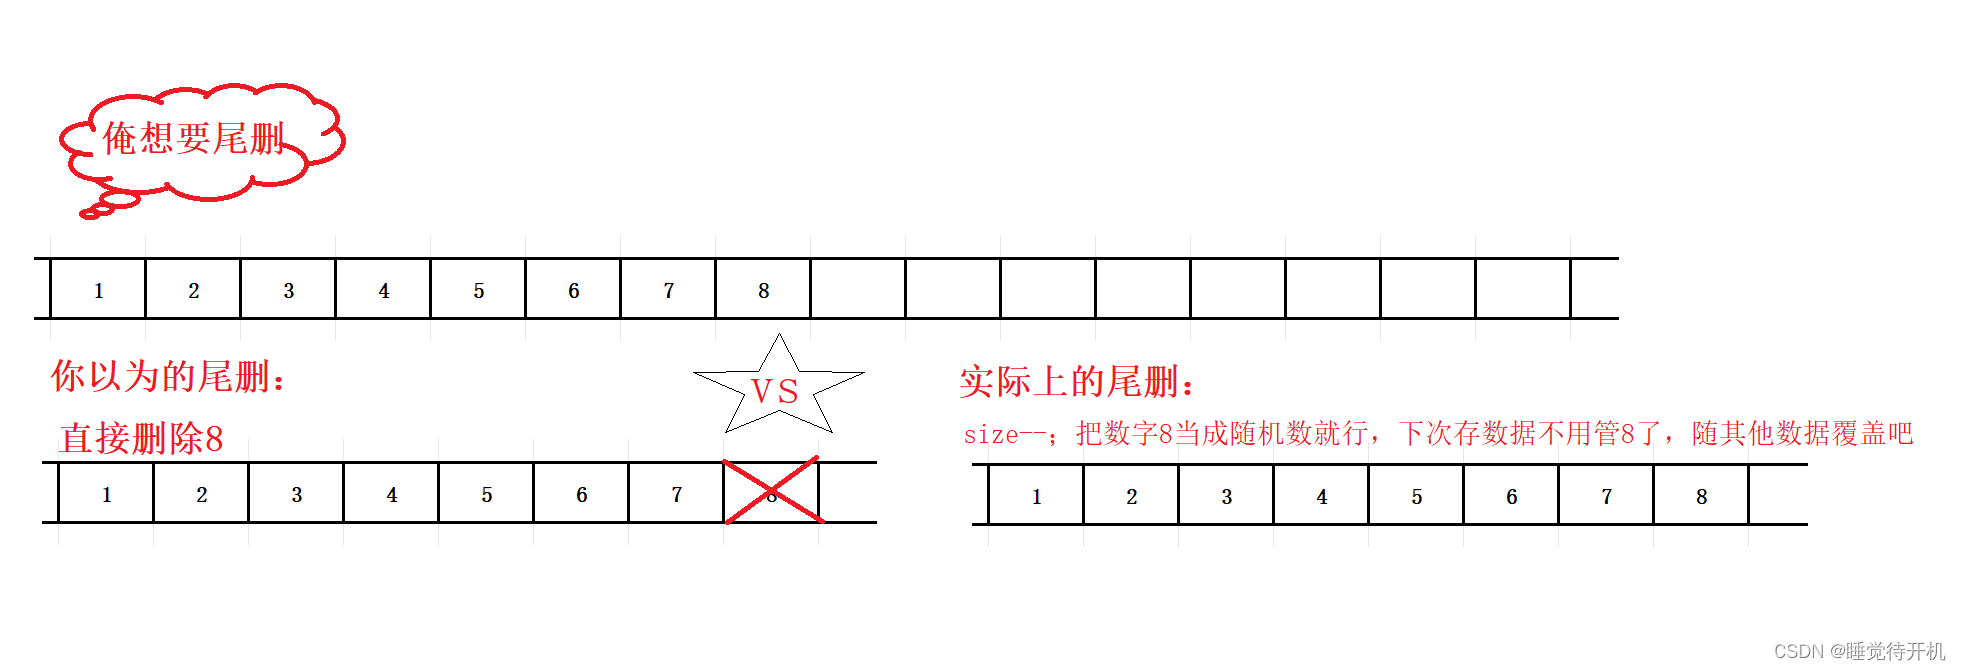
void SLPopBack(SL* ps)
{assert(ps);assert(ps->size);ps->size--;
}void SLPopFront(SL* ps)
{assert(ps);assert(ps->size);int i = 0;for (i = 1; i < ps->size; i++){ps->arr[i-1] = ps->arr[i];}ps->size--;
}
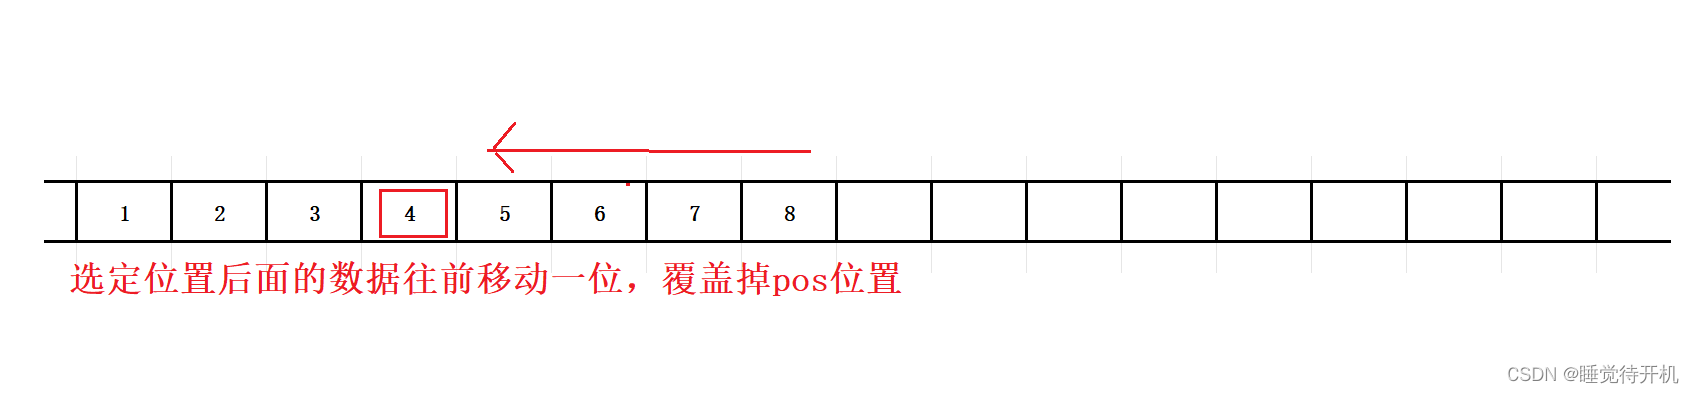
void SLErase(SL* ps, int pos)
{assert(ps);assert(pos >= 0 && pos < ps->size);int i = 0;for (i = pos + 1; i < ps->size; i++){ps->arr[i-1] = ps->arr[i];}ps->size--;
}
头删插图:

尾删插图:
任意删插图:
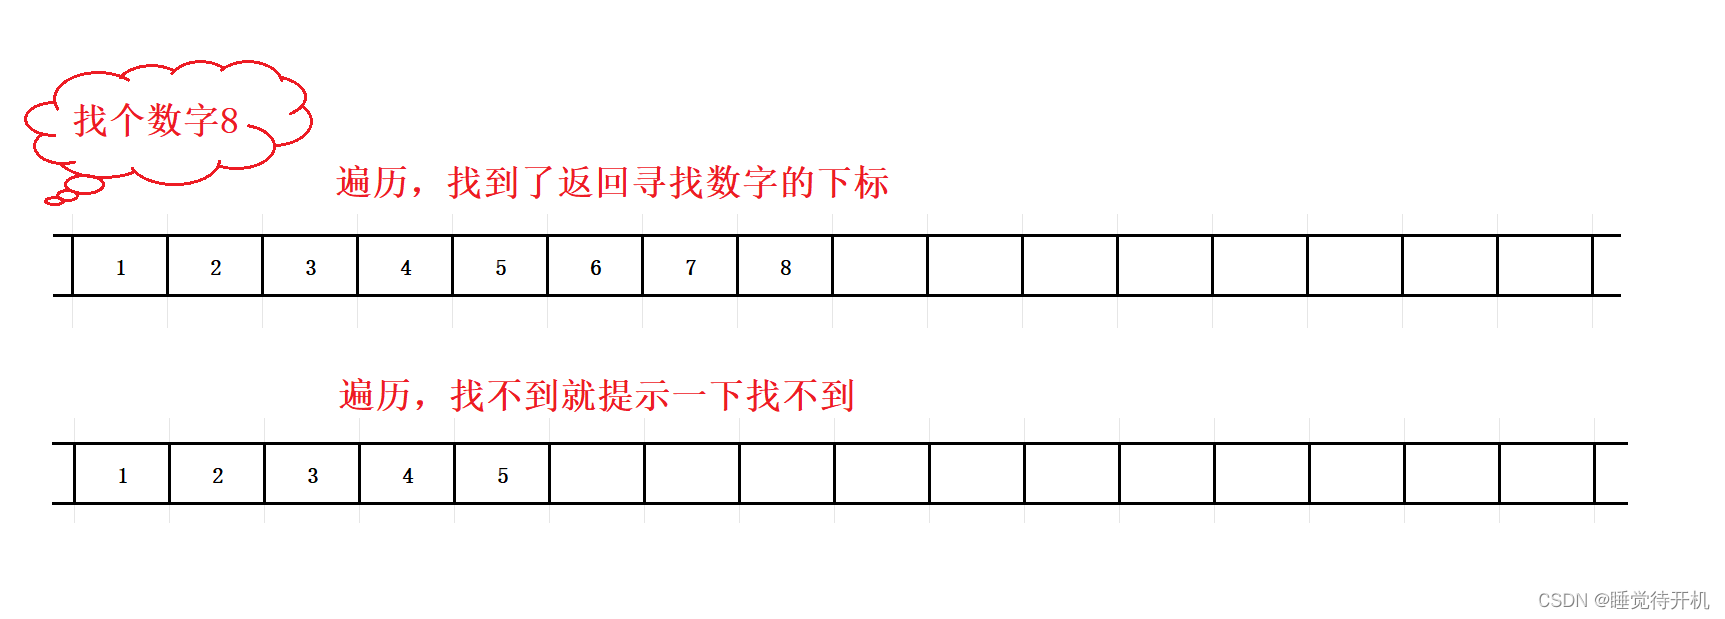
顺序表查找接口:
int SLFind(SL* ps, SLDateType x)
{assert(ps);int i = 0;for (i = 0; i < ps->size; i++){if (x == ps->arr[i]){printf("%d找到了:",x);return i;}}printf("没有找到\n");return -1;
}
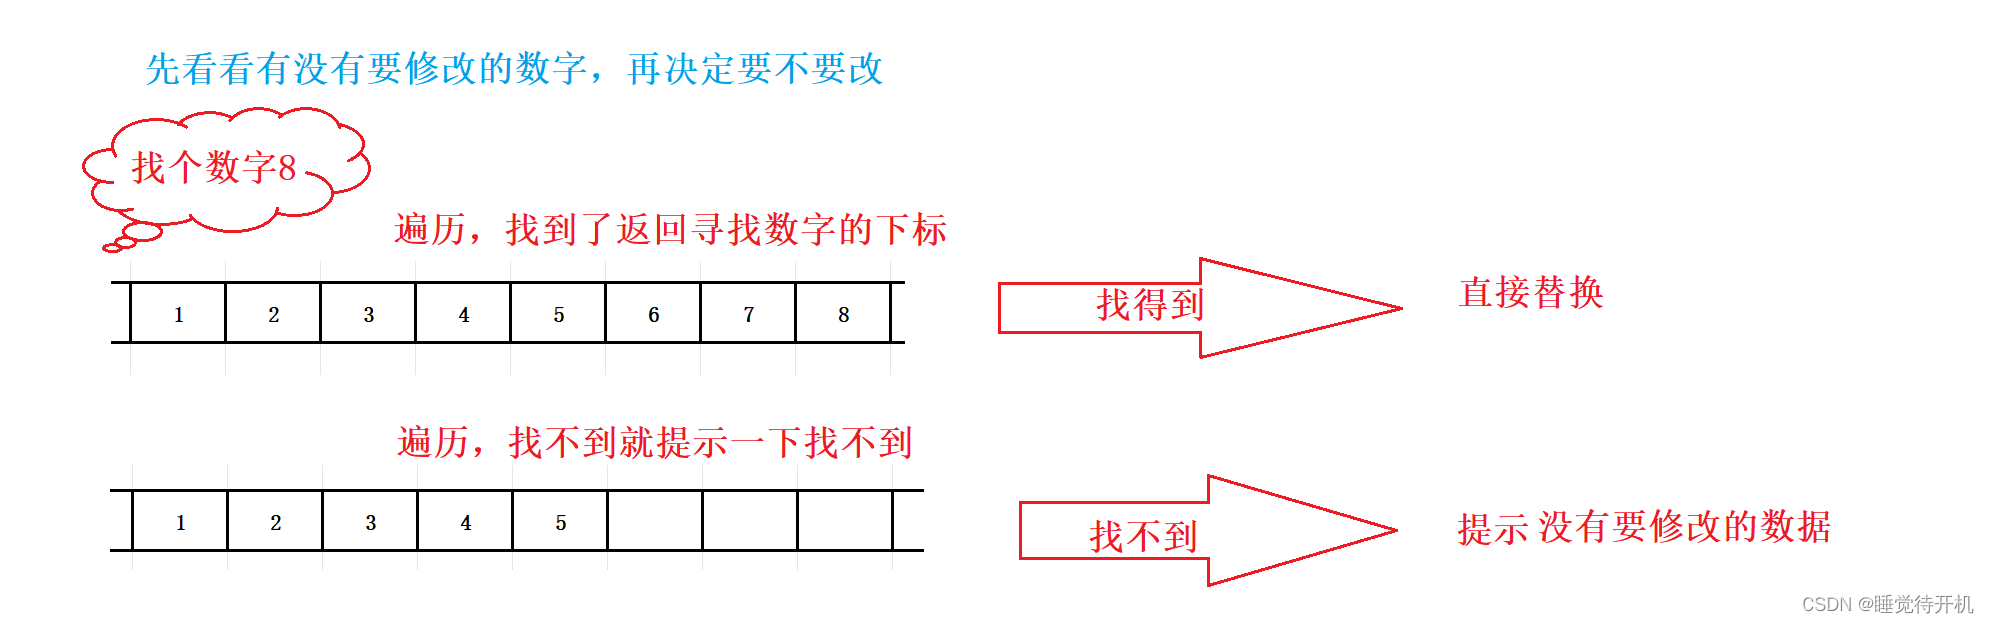
顺序表修改接口:
void SLModify(SL* ps, int pos, SLDateType x)
{assert(ps);assert(pos >= 0 && pos <= ps->size - 1);ps->arr[pos] = x;printf("修改成功\n");
}
修改插图:
3.全部接口代码实现:
#include"SeqList.h"void SLCheckCapacity(SL* ps)
{assert(ps);if (ps->capacity == ps->size){//小问题:刚开始的时候,sl->capacity是0值int newcapacity = ps->capacity == 0 ? 4 : 2 * ps->capacity;SLDateType* temp = realloc(ps->arr,sizeof(SLDateType)*newcapacity);if (!temp){perror("realloc fail!");return;}ps->arr = temp;ps->capacity = newcapacity;}
}void SLInit(SL* ps)
{assert(ps);ps->arr = NULL;ps->capacity = ps->size = 0;
}void SLDestroy(SL* ps)
{assert(ps);if (ps->arr){free(ps->arr);}ps->arr = NULL;ps->capacity = ps->size = 0;
}void SLPrint(SL* ps)
{assert(ps);int i = 0;for (i = 0; i < ps->size; i++){printf("%d ", *(ps->arr + i));//ps->arr[i];}printf("\n");
}void SLPushBack(SL* ps,SLDateType x)
{assert(ps);//1.空间不足需要扩大容量//2.空间足够直接放入数据SLCheckCapacity(ps);ps->arr[ps->size] = x;ps->size++;
}void SLPushFront(SL* ps, SLDateType x)
{assert(ps);SLCheckCapacity(ps);//挪动数据int i = 0;for (i = ps->size - 1; i >= 0; i--){ps->arr[i+1] = ps->arr[i];}//放入数据*(ps->arr) = x;ps->size++;
}void SLPopBack(SL* ps)
{assert(ps);assert(ps->size);ps->size--;
}void SLPopFront(SL* ps)
{assert(ps);assert(ps->size);int i = 0;for (i = 1; i < ps->size; i++){ps->arr[i-1] = ps->arr[i];}ps->size--;
}void SLInsert(SL* ps, int pos, SLDateType x)
{assert(ps);assert(pos >= 0 && pos <= ps->size);SLCheckCapacity(ps);int i = 0;for (i = ps->size - 1; i >= pos; i--){ps->arr[i+1] = ps->arr[i];}ps->arr[pos] = x;ps->size++;
}void SLErase(SL* ps, int pos)
{assert(ps);assert(pos >= 0 && pos < ps->size);int i = 0;for (i = pos + 1; i < ps->size; i++){ps->arr[i-1] = ps->arr[i];}ps->size--;
}int SLFind(SL* ps, SLDateType x)
{assert(ps);int i = 0;for (i = 0; i < ps->size; i++){if (x == ps->arr[i]){printf("%d找到了:",x);return i;}}printf("没有找到\n");return -1;
}void SLModify(SL* ps, int pos, SLDateType x)
{assert(ps);assert(pos >= 0 && pos <= ps->size - 1);ps->arr[pos] = x;printf("修改成功\n");
}
完。