51单片机1-6
目录
单片机介绍
点亮一个LED
流水灯参考代码
点亮流水LEDplus版本
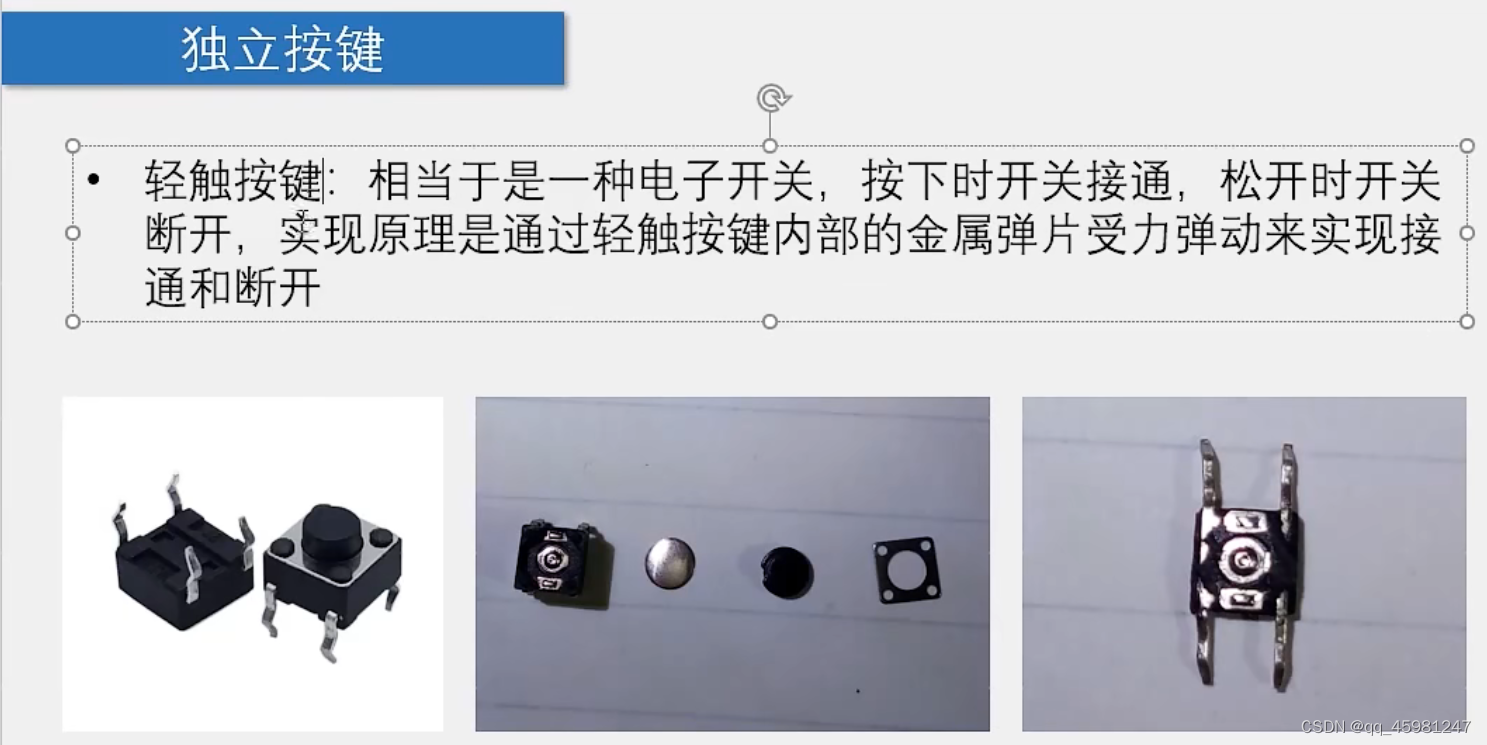
独立按键
独立按键控制LED亮灭
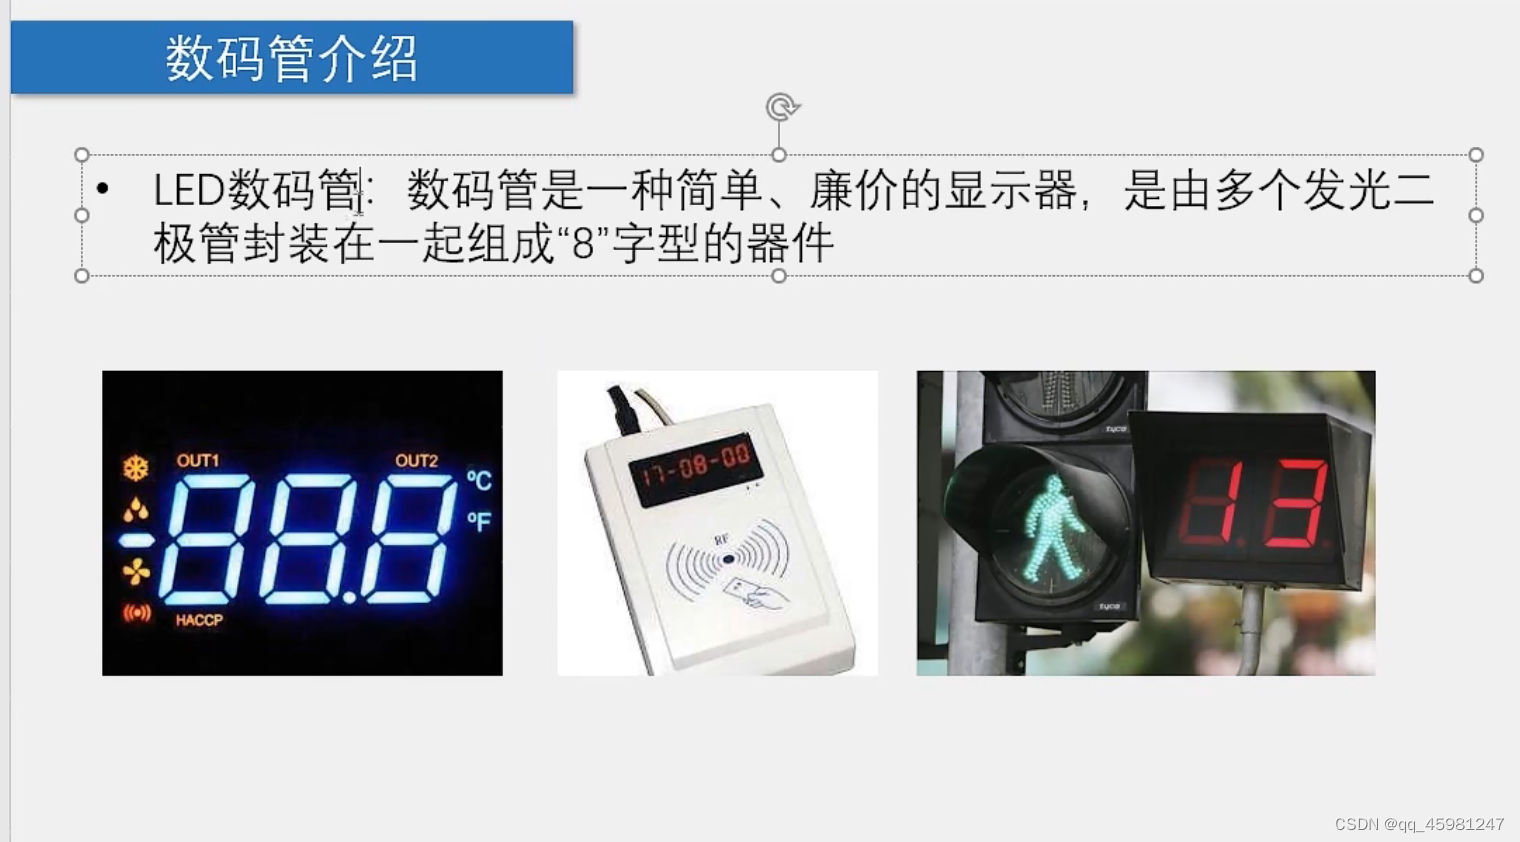
静态数码管
静态数码管显示
动态数码管显示
模块化编程
调试工具
矩阵键盘
矩阵键盘显示数据
矩阵键盘密码锁
学习B站江协科技课程笔记。
安装keil,下载大佬简介内的应用,注意注册机是keygen那个文件,解压前先关闭防火墙。
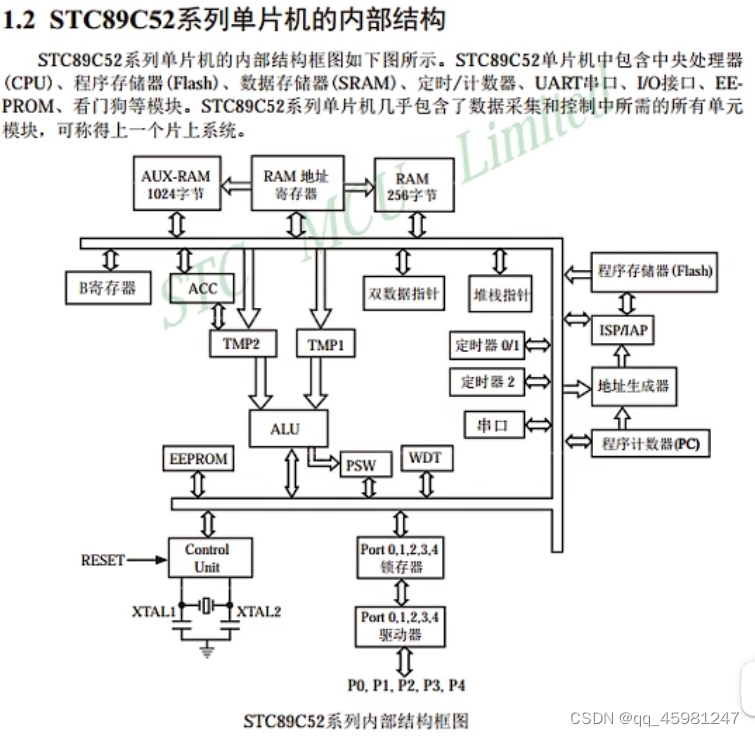
单片机介绍
单片机,Micro Controller Unit,简称MCU
内部集成了CPU、ARM、ROM、定时器、中断系统、通讯接口等一系列电脑的常用硬件功能
单片机的任务是信息采集(依靠传感器)、处理(依靠CPU)和硬件设备(例如电机、LED等)的控制
单片机跟计算机相比,单片机算是一个袖珍版计算机,一个芯片就能构成完整的计算机系统。但性能上,与计算机相差甚远,但单片机成本低,体积小,结构简单,在生活和工业控制领域大有所用
同时,学习使用单片机是了解计算机原理与结构的最佳选择
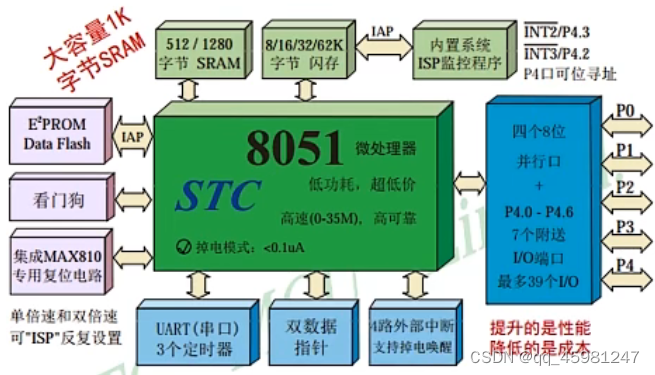
STC89C52单片机
所属系列:51单片机系列
公司:STC公司
位数:8位
RAM:512字节
ROM:8k(flash)
工作频率:12MHz(本开发板使用)


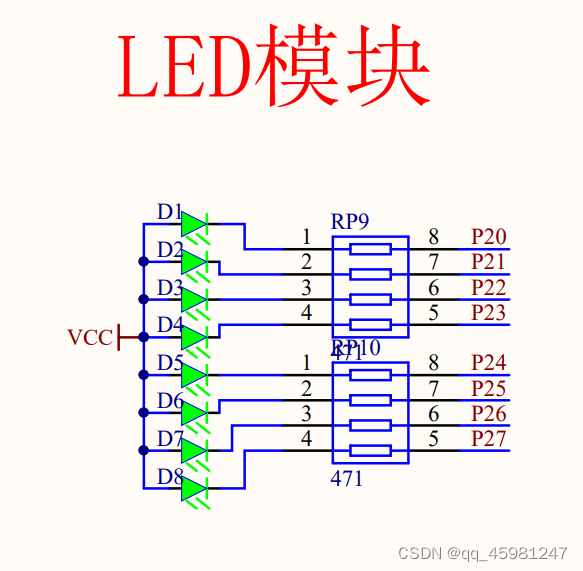
LED介绍
中文名:发光二极管
外文名:Light Emitting Diode
简称:LED
用途:照明、广告灯、指引灯、屏幕
keil中新建文件选择CPU:Atmel ->at89c52

本想使用proteus进行模拟实验,技术力不太足够。只好浅浅投资了
点亮一个LED
先进行编程

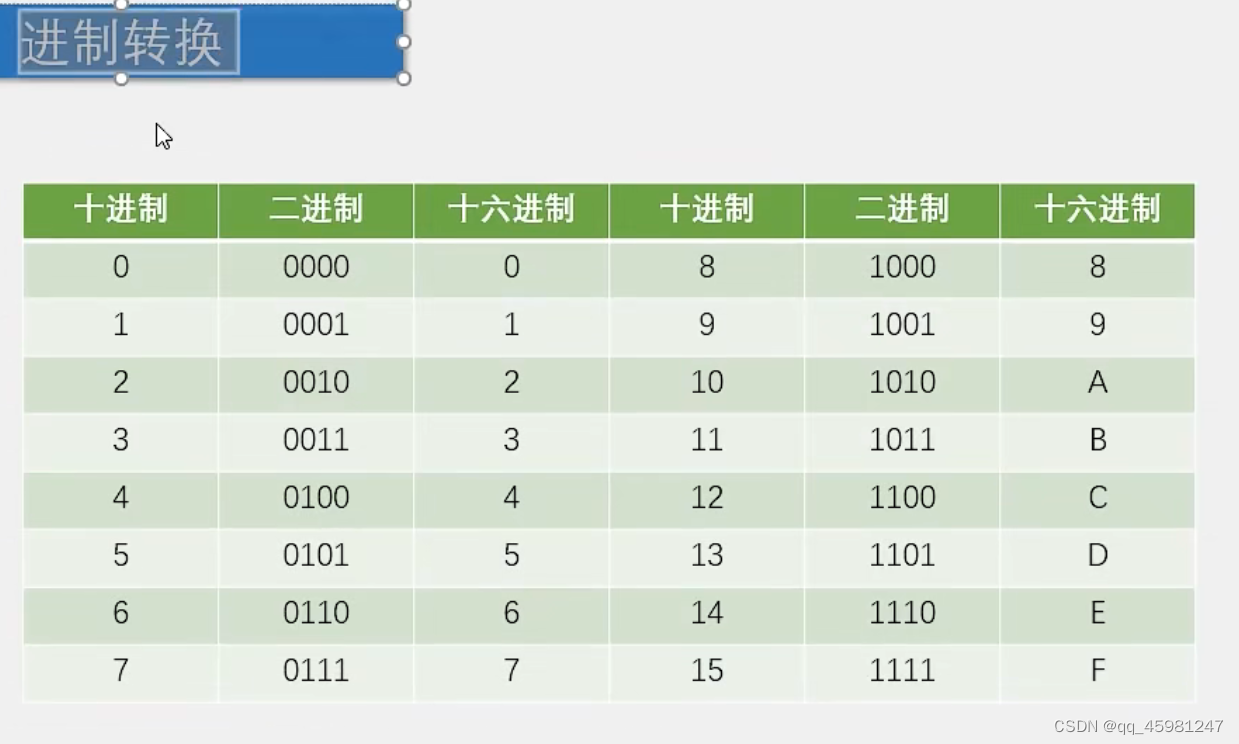
注意:P2 端口大写,为什么是P2
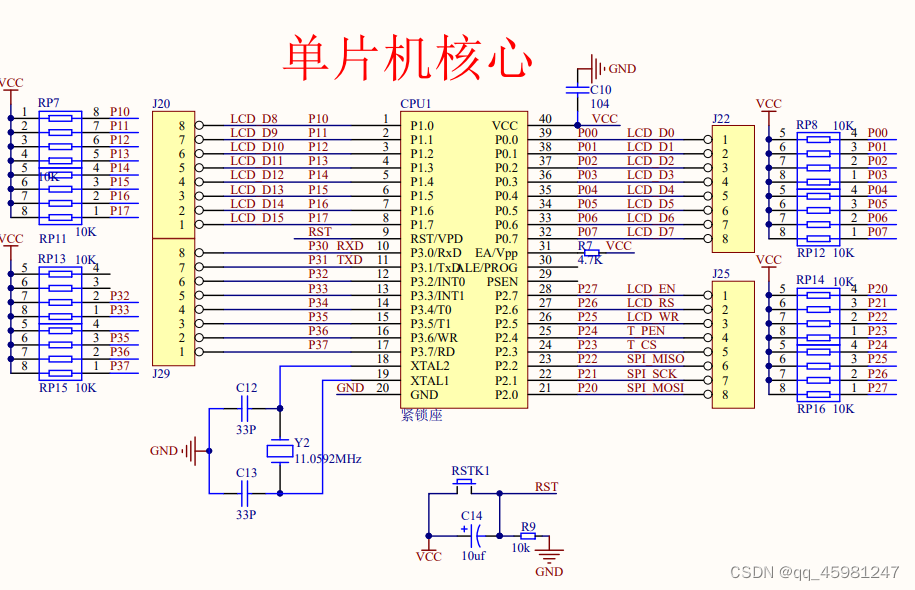
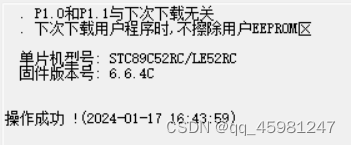
P21到P27都由P2.X进行控制,为什么亮的位置置零,设置低电平才会有电流流过,要用16进制数进行设置,0x...。烧录时注意单片机型号在上面有写,打开生成的.hex文件,点击下载/编程。然后重启单片机。右下角显示
keil编辑新项目:
1.创建项目
2.选择芯片类型
3.添加主函数
4.编入程序
延时函数:
void Delay500ms() //@12.000MHz
{
unsigned char i, j, k;
_nop_();//¿ÕÓï¾ä
i = 4;
j = 205;
k = 187;
do
{
do
{
while (--k);
} while (--j);
} while (--i);
}
使其能够进行亮灭控制,注意加入 INTRINS.H 头函数,以及每写一句记得加 ;
流水灯参考代码
#include <REGX52.H>
#include <INTRINS.H>
void Delay500ms()		//@12.000MHz
{unsigned char i, j, k;_nop_();i = 4;j = 205;k = 187;do{do{while (--k);} while (--j);} while (--i);
}void main(){while(1){P2 = 0xFE;//1111 1110Delay500ms();P2 = 0xFD;//1111 1101Delay500ms();P2 = 0xFB;//1111 1011Delay500ms();P2 = 0xF7;//1111 0111Delay500ms();P2 = 0xEF;//1110 1111Delay500ms();P2 = 0xDF;//1101 1111Delay500ms();P2 = 0xBF;//1011 1111Delay500ms();P2 = 0x7F;//0111 1111Delay500ms();}
}
点亮流水LEDplus版本
#include <REGX52.H>
void Delay1ms(unsigned int xms)		//@12.000MHz
{while (xms) {unsigned char i, j;i = 2;j = 239;do{while (--j);} while (--i);xms --;}}void main(){while(1){P2 = 0xFE;//1111 1110Delay1ms(500);P2 = 0xFD;//1111 1101Delay1ms(500);P2 = 0xFB;//1111 1011Delay1ms(500);P2 = 0xF7;//1111 0111Delay1ms(500);P2 = 0xEF;//1110 1111Delay1ms(500);P2 = 0xDF;//1101 1111Delay1ms(500);P2 = 0xBF;//1011 1111Delay1ms(500);P2 = 0x7F;//0111 1111Delay1ms(500);}
}
独立按键
独立按键控制LED亮灭
#include <REGX52.H>
void main(){//P2 = 0xFE;//1111 1110操作八位寄存器给八位P2_0 = 0;//操作一位寄存器给一位赋值即可,控制其亮P2_0 = 1;//控制其灭while(1){if(P3_1 == 0){P2_0 = 0;}else{P2_0 = 1;}}
}
为什么是P3_1


独立按键控制LED状态
#include <REGX52.H>
void Delay(unsigned int xms) //@12.000MHz
{unsigned char i, j;while(xms){i = 2;j = 239;do{while (--j);} while (--i);xms--;}
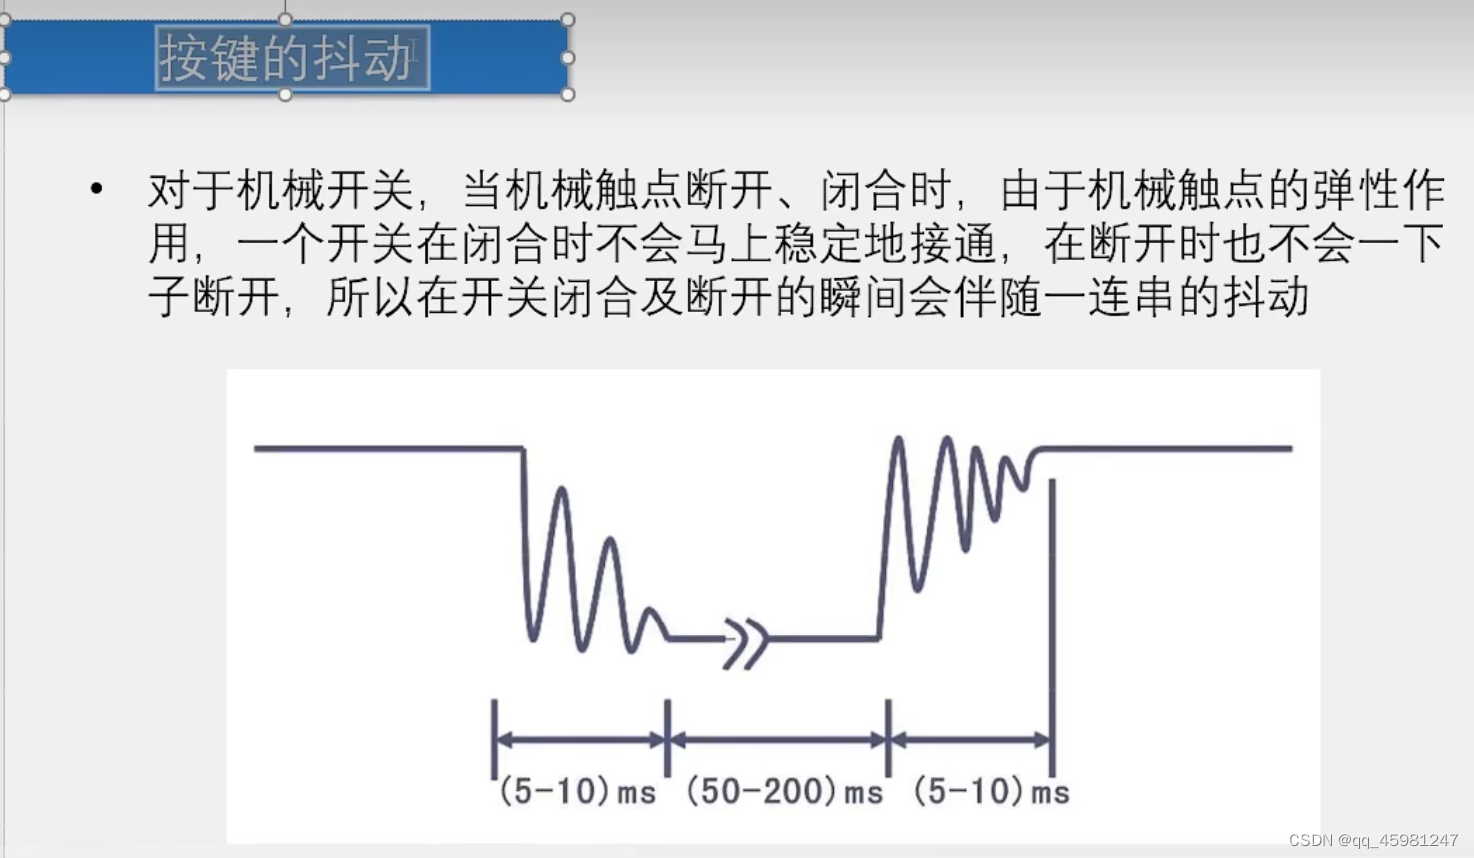
}void main(){while(1){//按下过后弹起才变化电平if(P3_1 == 0){//按下按键Delay(20);//除抖,这段时间都是低电平while(P3_1 == 0);//再次判断,这时是低电平,是否是持续按下的//如果是真的是就什么都不做。等待弹起Delay(20);//除抖,这段时间变为高电平//按下并弹起后引起灯灭灯亮P2_0 = ~P2_0;}}
}独立按键控制二进制输出
#include <REGX52.H>void Delay(unsigned int xms)		//@12.000MHz
{unsigned char i, j;while(xms--){i = 2;j = 239;do{while (--j);} while (--i);}
}void main(){unsigned char LEDNum = 0;while(1){if(P3_1 == 0){Delay(20);while(P3_1 == 0);Delay(20);LEDNum ++;//P2 = ~LEDNum;//按位取反}}
}
多个按键实现移位
#include <REGX52.H>void Delay(unsigned int xms)		//@12.000MHz
{unsigned char i, j;while(xms--){i = 2;j = 239;do{while (--j);} while (--i);}
}
unsigned char LEDNum;
void main(){P2 =~0x01;while (1){if ( P3_1 == 0 ){Delay(20);while ( P3_1 == 0 )Delay(20);LEDNum ++ ;if( LEDNum >= 8 )LEDNum = 0;P2 = ~( 0x01 << LEDNum );}if ( P3_0 == 0 ){Delay(20);while ( P3_0 == 0 )Delay(20);if(LEDNum == 0){LEDNum = 7 ;}else{LEDNum --;}P2 = ~( 0x01 << LEDNum );}}}
对固定值进行位移时,选择同一方向。
静态数码管
公用引脚
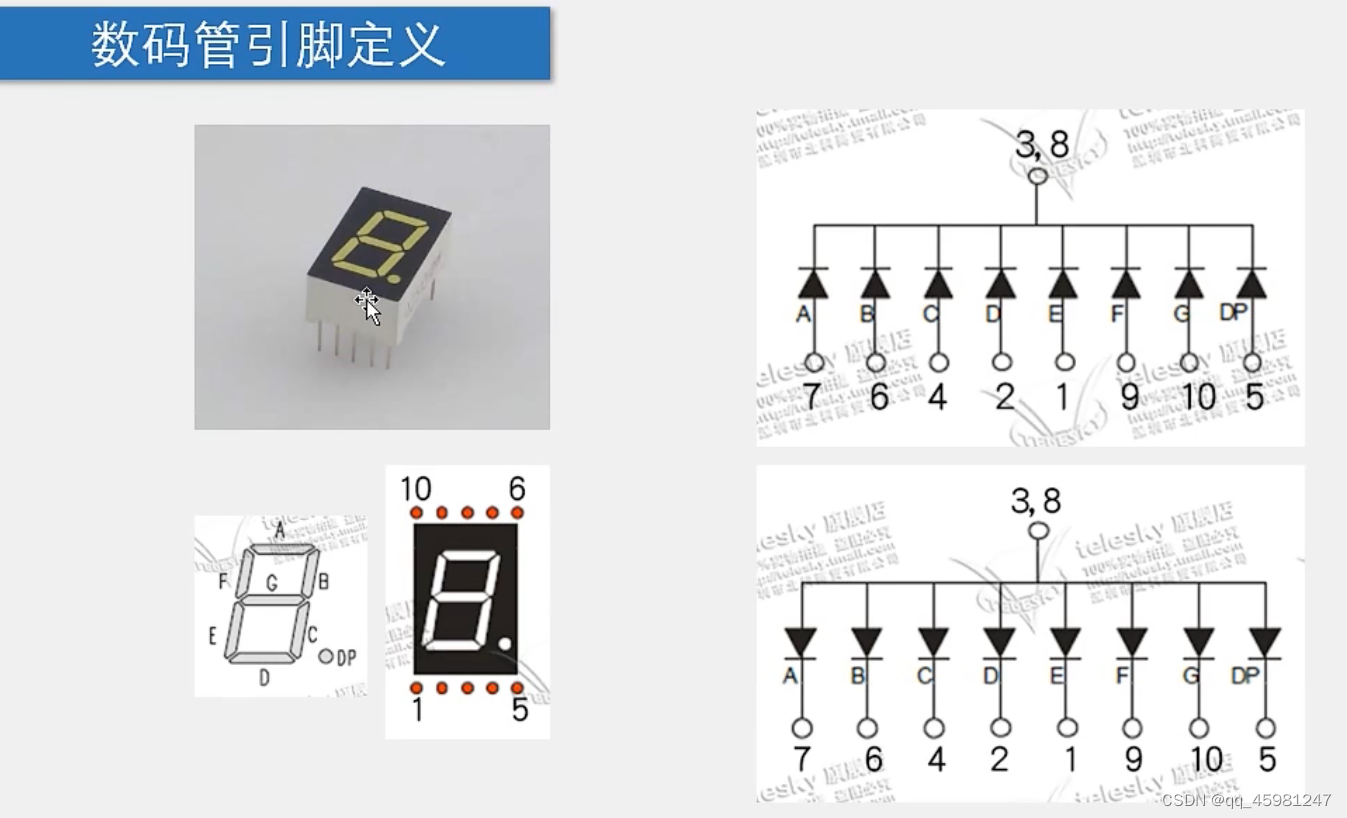
共阴极(上)与共阳极连接(下),想选中该数码管就要赋值0,反之1,共阴极要想亮就设置高电平(为公共的地方是接地的,需要高电平流过),共阳极要想亮就设置低电平(公共的地方是接电的,需要低电平流过)
共阴极(上)与共阳极(下)连接方式。与上同理
静态数码管显示
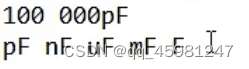
电容单位,进率为1000

输出静态数字
例如选择第三个数码管显示6;
#include <REGX52.H>
void main(){P2_4 = 1;//101P2_3 = 0;P2_2 = 1;P0 = 0x7D;while(1){}}
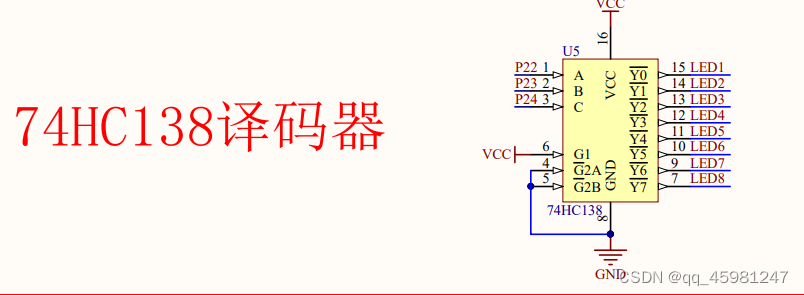

其中为什么是P2_2~P2_4进行赋值,因为数码管连接译码器,由译码器输入高低电平进行显示,这里赋值是为了选择第几个led亮,从左往右的第三个代表着LED6,而LED6需要Y5进行输入,需要三位二进制数代表5,从而使其被选择,即101,此时LED6已被选中,6需要acdefg灯管亮,又因为是共阴极,故1才代表亮,从上至下写出应为 1011 1110,最后一个代表dp而从左边输入到右边需要从下往上进行输入故需要倒置为 0111 1101转化为十六进制为 0x7D
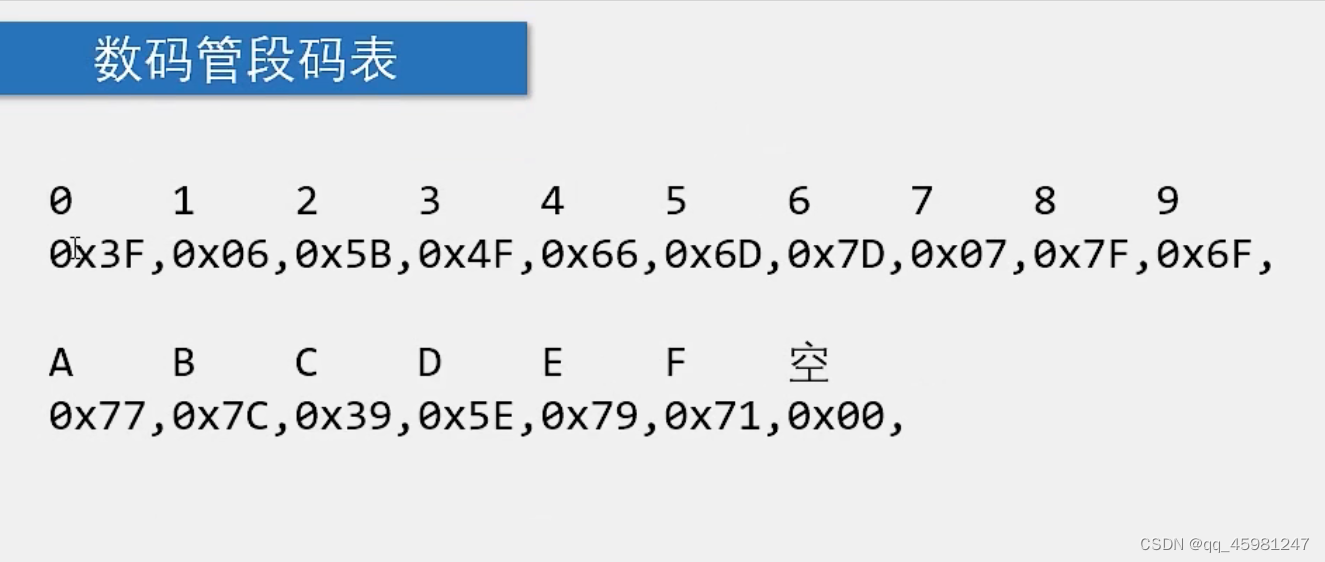
就如6的来历,段码表也是这样推出来的。
将显示的位置以及显示的数字抽象为一个函数。
#include <REGX52.H>
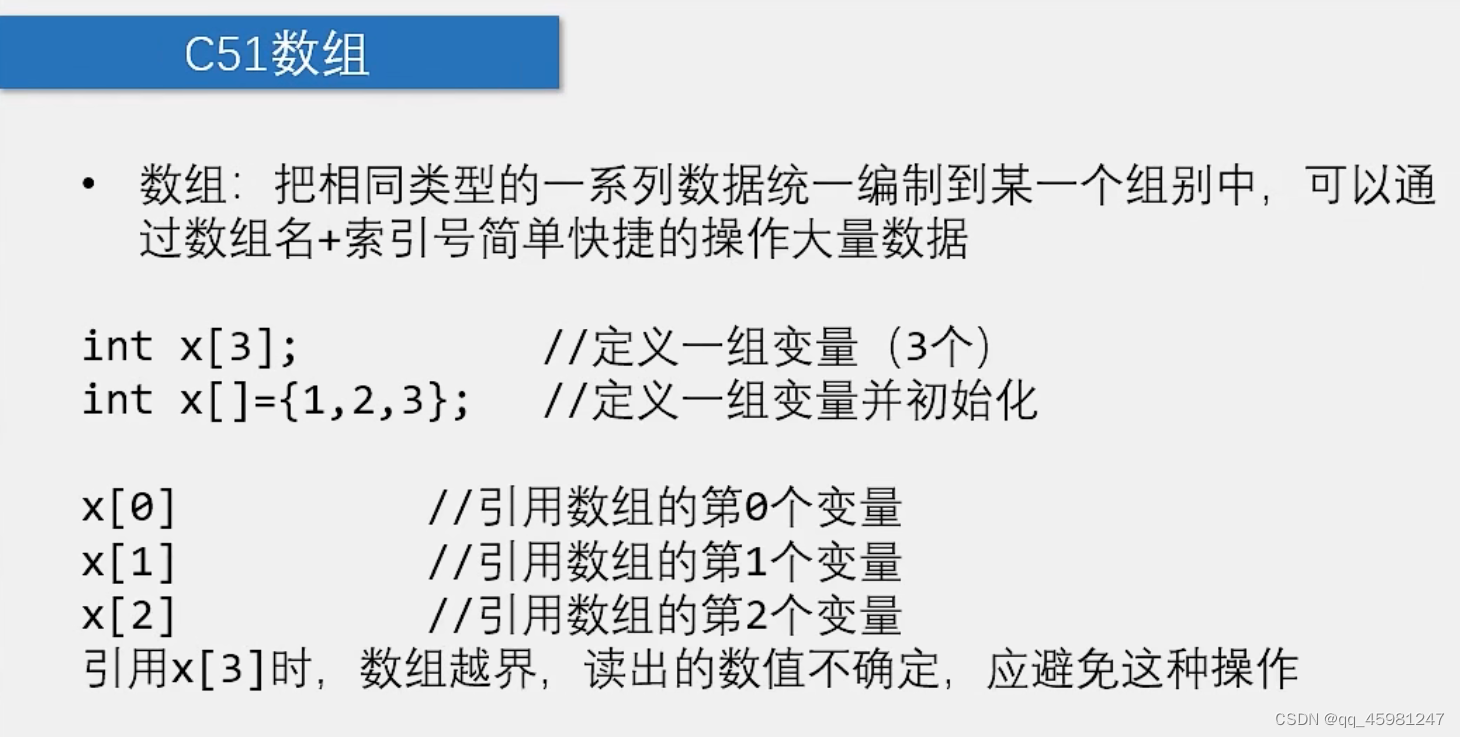
unsigned char NixieTable [] = {0x3F,0x06,0x5B,0x4F,0x66,0x6D,0x7D,0x07,0x7F,0x6F};
void Nixie(unsigned char Location,Number){switch(Location){case 1:P2_4 = 1;P2_3 = 1;P2_2 = 1;break;case 2:P2_4 = 1;P2_3 = 1;P2_2 = 0;break;case 3:P2_4 = 1;P2_3 = 0;P2_2 = 1;break;case 4:P2_4 = 1;P2_3 = 0;P2_2 = 0;break;case 5:P2_4 = 0;P2_3 = 1;P2_2 = 1;break;case 6:P2_4 = 0;P2_3 = 1;P2_2 = 0;break;case 7:P2_4 = 0;P2_3 = 0;P2_2 = 1;break;case 8:P2_4 = 0;P2_3 = 0;P2_2 = 0;break;}P0 = NixieTable[Number];
}
void main(){Nixie(7,2);while(1){}}
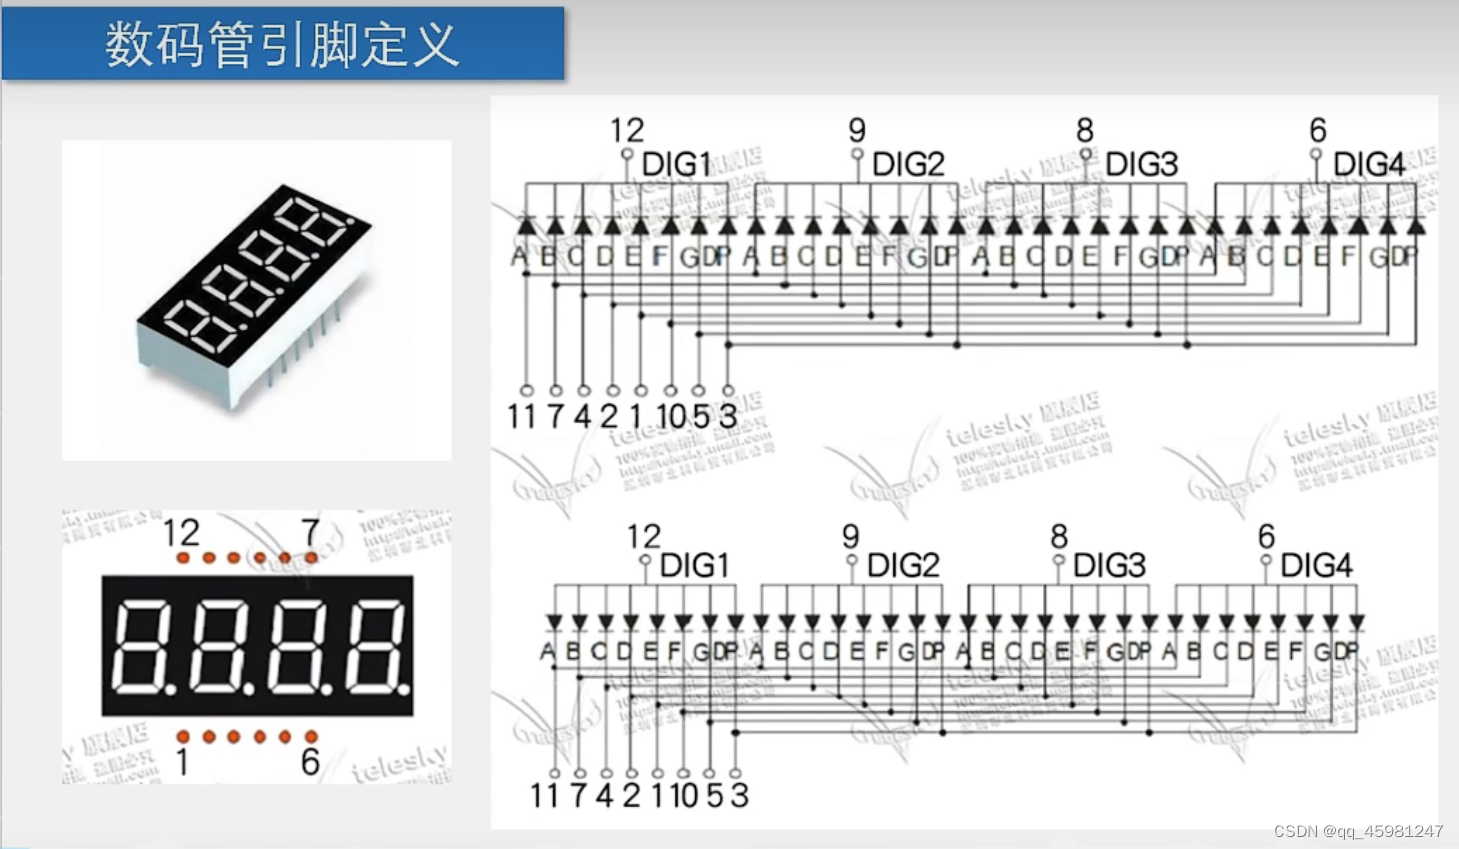
动态数码管显示
消影

#include <REGX52.H>
unsigned char NixieTable [] = {0x3F,0x06,0x5B,0x4F,0x66,0x6D,0x7D,0x07,0x7F,0x6F};void Delay(unsigned int xms)		//@12.000MHz
{unsigned char i, j;while(xms--){i = 2;j = 239;do{while (--j);} while (--i);}
}void Nixie(unsigned char Location,Number){switch(Location){case 1:P2_4 = 1;P2_3 = 1;P2_2 = 1;break;case 2:P2_4 = 1;P2_3 = 1;P2_2 = 0;break;case 3:P2_4 = 1;P2_3 = 0;P2_2 = 1;break;case 4:P2_4 = 1;P2_3 = 0;P2_2 = 0;break;case 5:P2_4 = 0;P2_3 = 1;P2_2 = 1;break;case 6:P2_4 = 0;P2_3 = 1;P2_2 = 0;break;case 7:P2_4 = 0;P2_3 = 0;P2_2 = 1;break;case 8:P2_4 = 0;P2_3 = 0;P2_2 = 0;break;}P0 = NixieTable[Number];Delay(1);//消影操作P0 = 0x00;
}void main(){while(1){Nixie(1,1);//Delay(1);Nixie(2,2);//Delay(1);Nixie(3,3);//Delay(1);}}
模块化编程
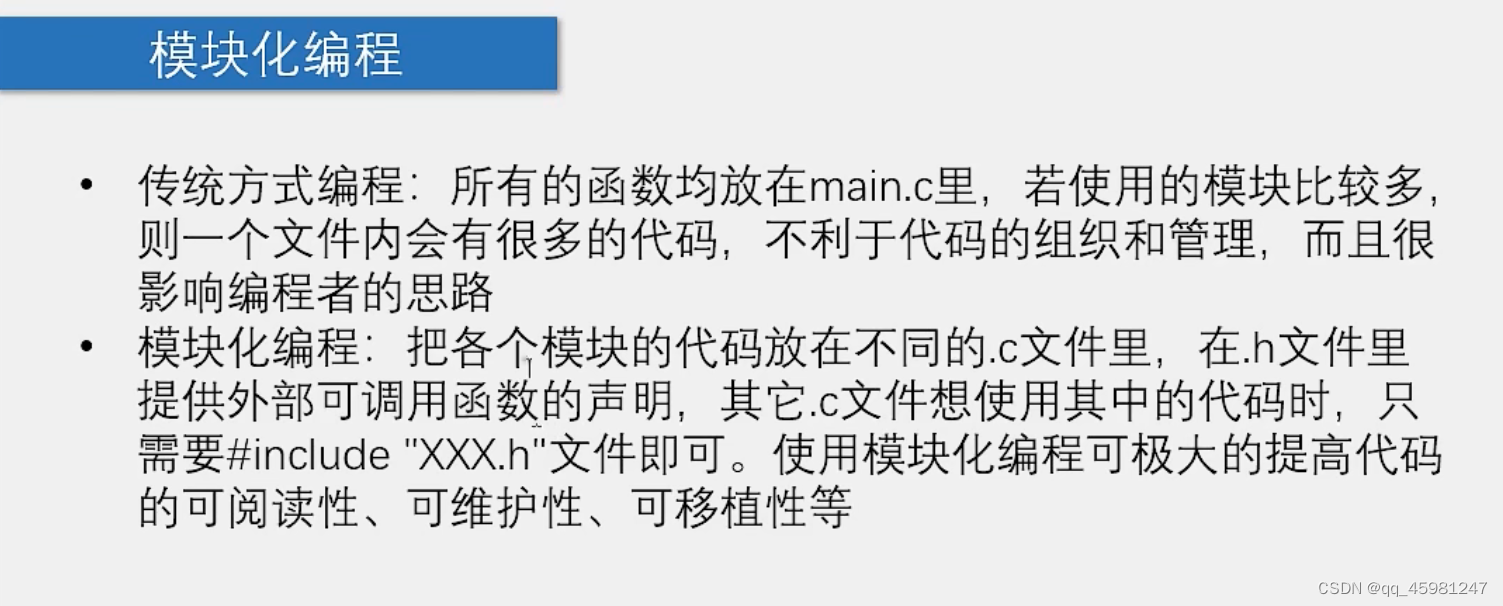

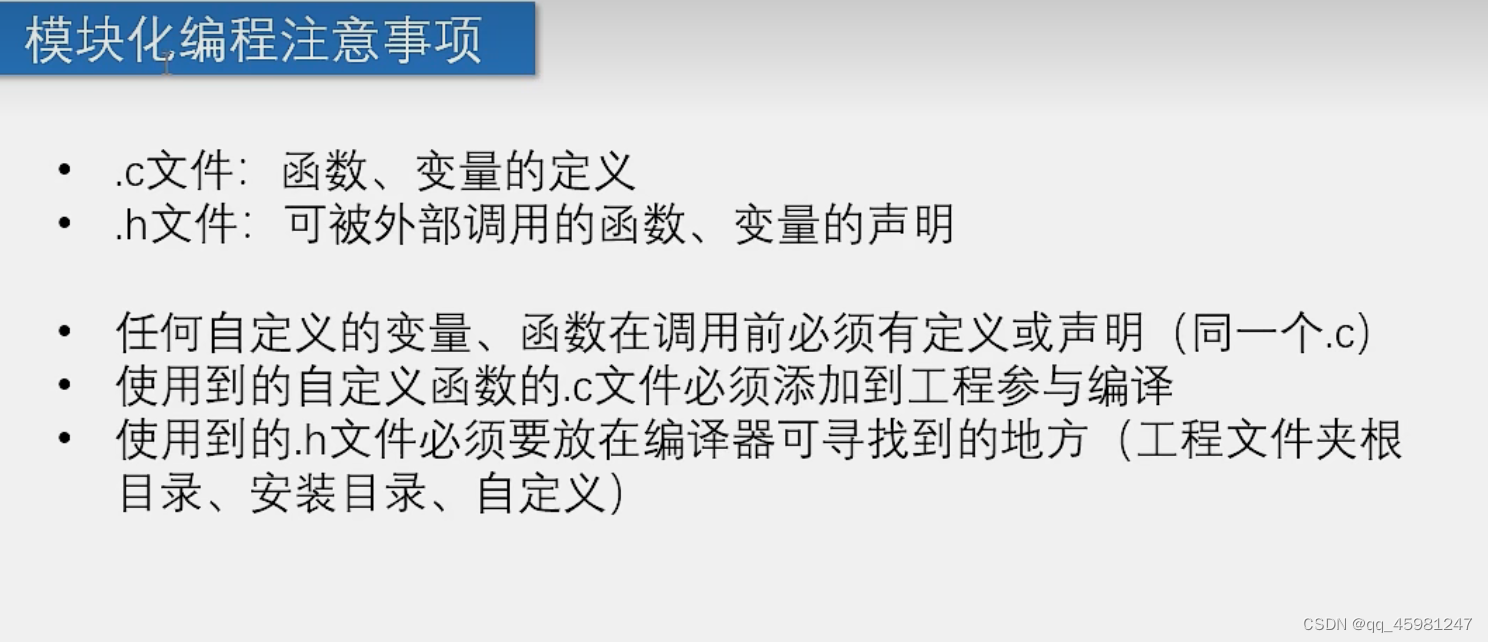

模块化编程需要注意:
1.使用ifndef 以及 define 尽量将被定义的变量进行大写。
2. .c文件放置函数体以及被调用的头文件, .h文件放置函数声明以及预编译语句
3.函数声明句末记得添加 ;
将Delay函数变为一个模块
Delay.h中
#ifndef __DELAY_H__
#define __DELAY_H__void Delay(unsigned int xms);#endif
Delay.c中
void Delay(unsigned int xms)		//@12.000MHz
{unsigned char i, j;while(xms--){i = 2;j = 239;do{while (--j);} while (--i);}
}
将晶体管显示也转变为一个模块
Nixie.h中
#ifndef __NIXIE_H__
#def  __NIXIE_H__void Nixie(unsigned char Location,Number);#endif
Nixie.c中
#include <REGX52.H>
#include "Delay.h"
unsigned char NixieTable [] = {0x3F,0x06,0x5B,0x4F,0x66,0x6D,0x7D,0x07,0x7F,0x6F};
void Nixie(unsigned char Location,Number){switch(Location){case 1:P2_4 = 1;P2_3 = 1;P2_2 = 1;break;case 2:P2_4 = 1;P2_3 = 1;P2_2 = 0;break;case 3:P2_4 = 1;P2_3 = 0;P2_2 = 1;break;case 4:P2_4 = 1;P2_3 = 0;P2_2 = 0;break;case 5:P2_4 = 0;P2_3 = 1;P2_2 = 1;break;case 6:P2_4 = 0;P2_3 = 1;P2_2 = 0;break;case 7:P2_4 = 0;P2_3 = 0;P2_2 = 1;break;case 8:P2_4 = 0;P2_3 = 0;P2_2 = 0;break;}P0 = NixieTable[Number];Delay(1);P0 = 0x00;
}
在需要的地方进行引用头文件以及调用函数即可。
调试工具

加入LCD1602调试头文件以及c语言文件
LCD1602.h
#ifndef __LCD1602_H__
#define __LCD1602_H__//用户调用函数:
void LCD_Init();
void LCD_ShowChar(unsigned char Line,unsigned char Column,char Char);
void LCD_ShowString(unsigned char Line,unsigned char Column,char *String);
void LCD_ShowNum(unsigned char Line,unsigned char Column,unsigned int Number,unsigned char Length);
void LCD_ShowSignedNum(unsigned char Line,unsigned char Column,int Number,unsigned char Length);
void LCD_ShowHexNum(unsigned char Line,unsigned char Column,unsigned int Number,unsigned char Length);
void LCD_ShowBinNum(unsigned char Line,unsigned char Column,unsigned int Number,unsigned char Length);#endif
LCD1602.c
#include <REGX52.H>//引脚配置:
sbit LCD_RS=P2^6;
sbit LCD_RW=P2^5;
sbit LCD_EN=P2^7;
#define LCD_DataPort P0//函数定义:
/*** @brief  LCD1602延时函数,12MHz调用可延时1ms* @param  无* @retval 无*/
void LCD_Delay()
{unsigned char i, j;i = 2;j = 239;do{while (--j);} while (--i);
}/*** @brief  LCD1602写命令* @param  Command 要写入的命令* @retval 无*/
void LCD_WriteCommand(unsigned char Command)
{LCD_RS=0;LCD_RW=0;LCD_DataPort=Command;LCD_EN=1;LCD_Delay();LCD_EN=0;LCD_Delay();
}/*** @brief  LCD1602写数据* @param  Data 要写入的数据* @retval 无*/
void LCD_WriteData(unsigned char Data)
{LCD_RS=1;LCD_RW=0;LCD_DataPort=Data;LCD_EN=1;LCD_Delay();LCD_EN=0;LCD_Delay();
}/*** @brief  LCD1602设置光标位置* @param  Line 行位置,范围:1~2* @param  Column 列位置,范围:1~16* @retval 无*/
void LCD_SetCursor(unsigned char Line,unsigned char Column)
{if(Line==1){LCD_WriteCommand(0x80|(Column-1));}else if(Line==2){LCD_WriteCommand(0x80|(Column-1+0x40));}
}/*** @brief  LCD1602初始化函数* @param  无* @retval 无*/
void LCD_Init()
{LCD_WriteCommand(0x38);//八位数据接口,两行显示,5*7点阵LCD_WriteCommand(0x0c);//显示开,光标关,闪烁关LCD_WriteCommand(0x06);//数据读写操作后,光标自动加一,画面不动LCD_WriteCommand(0x01);//光标复位,清屏
}/*** @brief  在LCD1602指定位置上显示一个字符* @param  Line 行位置,范围:1~2* @param  Column 列位置,范围:1~16* @param  Char 要显示的字符* @retval 无*/
void LCD_ShowChar(unsigned char Line,unsigned char Column,char Char)
{LCD_SetCursor(Line,Column);LCD_WriteData(Char);
}/*** @brief  在LCD1602指定位置开始显示所给字符串* @param  Line 起始行位置,范围:1~2* @param  Column 起始列位置,范围:1~16* @param  String 要显示的字符串* @retval 无*/
void LCD_ShowString(unsigned char Line,unsigned char Column,char *String)
{unsigned char i;LCD_SetCursor(Line,Column);for(i=0;String[i]!='\0';i++){LCD_WriteData(String[i]);}
}/*** @brief  返回值=X的Y次方*/
int LCD_Pow(int X,int Y)
{unsigned char i;int Result=1;for(i=0;i<Y;i++){Result*=X;}return Result;
}/*** @brief  在LCD1602指定位置开始显示所给数字* @param  Line 起始行位置,范围:1~2* @param  Column 起始列位置,范围:1~16* @param  Number 要显示的数字,范围:0~65535* @param  Length 要显示数字的长度,范围:1~5* @retval 无*/
void LCD_ShowNum(unsigned char Line,unsigned char Column,unsigned int Number,unsigned char Length)
{unsigned char i;LCD_SetCursor(Line,Column);for(i=Length;i>0;i--){LCD_WriteData(Number/LCD_Pow(10,i-1)%10+'0');}
}/*** @brief  在LCD1602指定位置开始以有符号十进制显示所给数字* @param  Line 起始行位置,范围:1~2* @param  Column 起始列位置,范围:1~16* @param  Number 要显示的数字,范围:-32768~32767* @param  Length 要显示数字的长度,范围:1~5* @retval 无*/
void LCD_ShowSignedNum(unsigned char Line,unsigned char Column,int Number,unsigned char Length)
{unsigned char i;unsigned int Number1;LCD_SetCursor(Line,Column);if(Number>=0){LCD_WriteData('+');Number1=Number;}else{LCD_WriteData('-');Number1=-Number;}for(i=Length;i>0;i--){LCD_WriteData(Number1/LCD_Pow(10,i-1)%10+'0');}
}/*** @brief  在LCD1602指定位置开始以十六进制显示所给数字* @param  Line 起始行位置,范围:1~2* @param  Column 起始列位置,范围:1~16* @param  Number 要显示的数字,范围:0~0xFFFF* @param  Length 要显示数字的长度,范围:1~4* @retval 无*/
void LCD_ShowHexNum(unsigned char Line,unsigned char Column,unsigned int Number,unsigned char Length)
{unsigned char i,SingleNumber;LCD_SetCursor(Line,Column);for(i=Length;i>0;i--){SingleNumber=Number/LCD_Pow(16,i-1)%16;if(SingleNumber<10){LCD_WriteData(SingleNumber+'0');}else{LCD_WriteData(SingleNumber-10+'A');}}
}/*** @brief  在LCD1602指定位置开始以二进制显示所给数字* @param  Line 起始行位置,范围:1~2* @param  Column 起始列位置,范围:1~16* @param  Number 要显示的数字,范围:0~1111 1111 1111 1111* @param  Length 要显示数字的长度,范围:1~16* @retval 无*/
void LCD_ShowBinNum(unsigned char Line,unsigned char Column,unsigned int Number,unsigned char Length)
{unsigned char i;LCD_SetCursor(Line,Column);for(i=Length;i>0;i--){LCD_WriteData(Number/LCD_Pow(2,i-1)%2+'0');}
}
主函数中进行调用
#include <REGX52.H>
#include "LCD1602.h"
#include "Delay.h"int Res = 0;void main(){LCD_Init();LCD_ShowChar(1,1,'A');LCD_ShowString(1,3,"Hello");LCD_ShowNum(1,9,123,3);//位数不够显示会高位补零,位数多余显示位,//会显示从后开始数的几位LCD_ShowSignedNum(1,13,-65,2);//显示位数不算符号位LCD_ShowHexNum(2,1,0xA8,2);LCD_ShowBinNum(2,4,0xAA,8);while(1){Res++;Delay(1000);LCD_ShowNum(2,13,Res,3);}}
细节:LCD1602需要插紧,有时对比度也有影响,看着没有显示出来,其实已经显示出来了
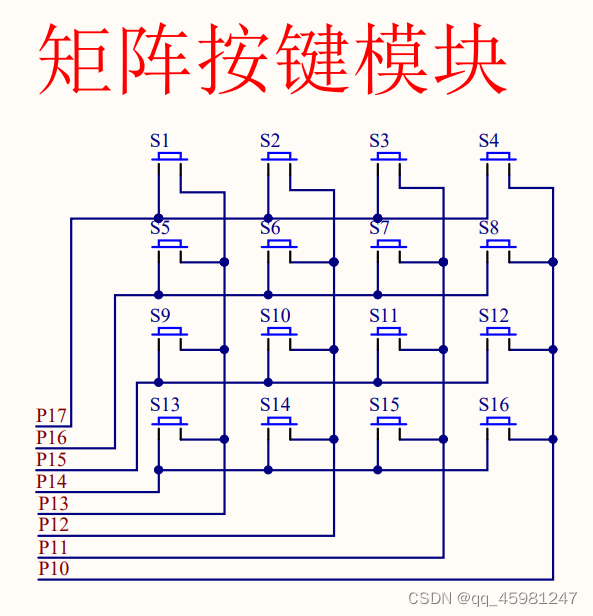
矩阵键盘
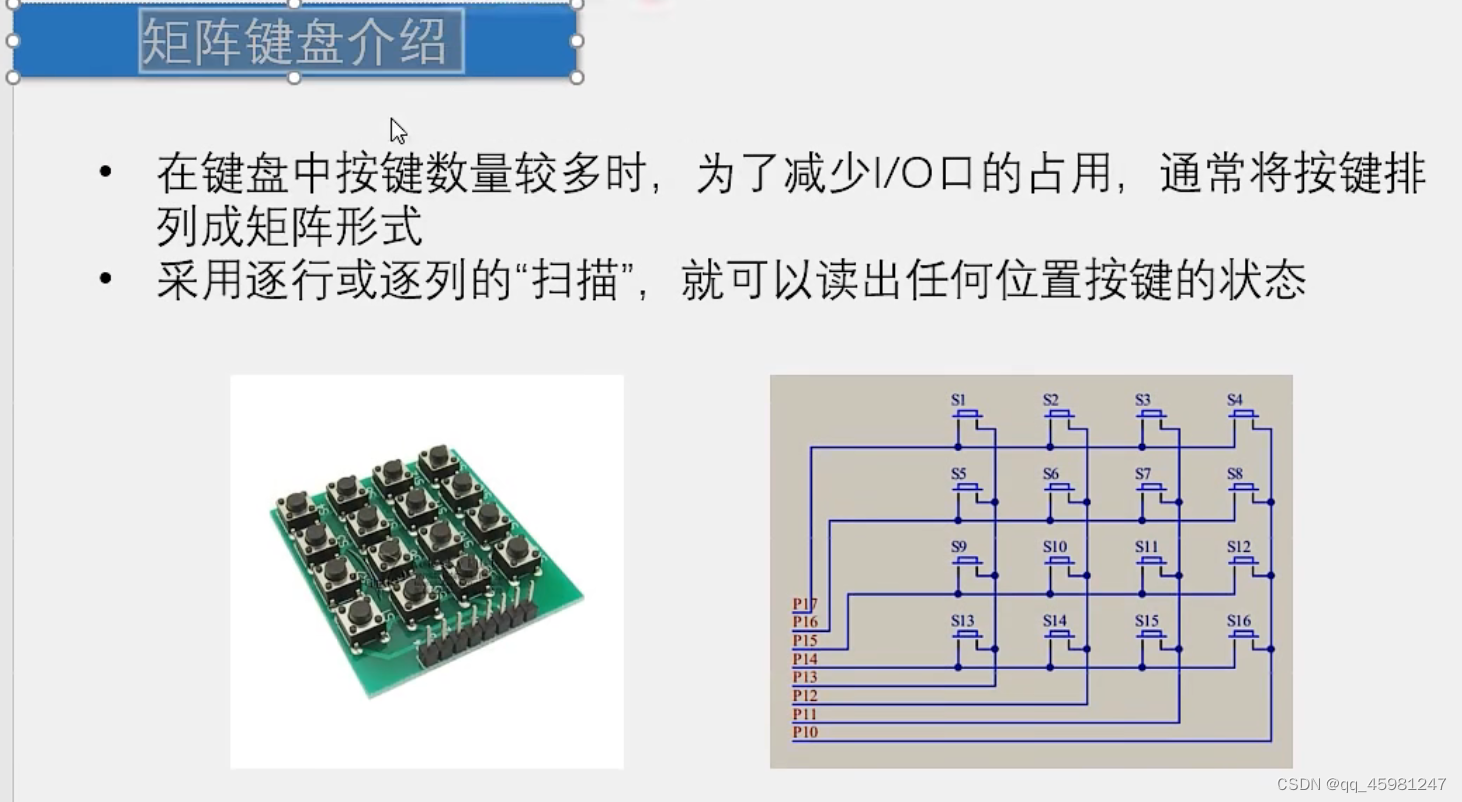

矩阵键盘显示数据
MatrixKey.h
#ifndef __MATRIXKEY__H__
#define __MATRIXKEY__H__unsigned char MatrixKey();#endif
MatrixKey.c
#include <REGX52.H>
#include "Delay.h"
/*** @brief  矩阵键盘读取按键键码* @param  无* @retval  KeyNum	按下按键的键码值* 	  如果按键按下不放,则程序会停留在此函数,*		  松手一瞬间,返回按键码,没有按键按下时,返回0*/unsigned char MatrixKey(){unsigned char KeyNum = 0;P1 = 0xff;//将按键全部置于高电平P1_3 = 0;//选中第一列if( P1_7 == 0 ){ Delay(20); while( P1_7 == 0) Delay(20); KeyNum = 1;}//s1的检测if( P1_6 == 0 ){ Delay(20); while( P1_6 == 0) Delay(20); KeyNum = 5;}//s5的检测if( P1_5 == 0 ){ Delay(20); while( P1_5 == 0) Delay(20); KeyNum = 9;}//s9的检测if( P1_4 == 0 ){ Delay(20); while( P1_4 == 0) Delay(20); KeyNum = 13;}//s13的检测P1 = 0xff;//将按键全部置于高电平P1_2 = 0;//选中第二列if( P1_7 == 0 ){ Delay(20); while( P1_7 == 0) Delay(20); KeyNum = 2;}//s2的检测if( P1_6 == 0 ){ Delay(20); while( P1_6 == 0) Delay(20); KeyNum = 6;}//s6的检测if( P1_5 == 0 ){ Delay(20); while( P1_5 == 0) Delay(20); KeyNum = 10;}//s10的检测if( P1_4 == 0 ){ Delay(20); while( P1_4 == 0) Delay(20); KeyNum = 14;}//s14的检测P1 = 0xff;//将按键全部置于高电平P1_1 = 0;//选中第三列if( P1_7 == 0 ){ Delay(20); while( P1_7 == 0) Delay(20); KeyNum = 3;}//s3的检测if( P1_6 == 0 ){ Delay(20); while( P1_6 == 0) Delay(20); KeyNum = 7;}//s7的检测if( P1_5 == 0 ){ Delay(20); while( P1_5 == 0) Delay(20); KeyNum = 11;}//s11的检测if( P1_4 == 0 ){ Delay(20); while( P1_4 == 0) Delay(20); KeyNum = 15;}//s15的检测P1 = 0xff;//将按键全部置于高电平P1_0 = 0;//选中第四列if( P1_7 == 0 ){ Delay(20); while( P1_7 == 0) Delay(20); KeyNum = 4;}//s4的检测if( P1_6 == 0 ){ Delay(20); while( P1_6 == 0) Delay(20); KeyNum = 8;}//s8的检测if( P1_5 == 0 ){ Delay(20); while( P1_5 == 0) Delay(20); KeyNum = 12;}//s12的检测if( P1_4 == 0 ){ Delay(20); while( P1_4 == 0) Delay(20); KeyNum = 16;}//s16的检测return KeyNum;
}
主函数调用
#include <REGX52.H>
#include "LCD1602.h"
#include "Delay.h"
#include "MatrixKey.h"unsigned char KeyNum ;void main(){LCD_Init();LCD_ShowString(1,1,"MatrixKey:");//打印while(1){KeyNum = MatrixKey();if( KeyNum ) {//延迟刷新LCD_ShowNum(2,1,KeyNum,2);}}}
矩阵键盘密码锁
主函数内容
#include <REGX52.H>
#include "LCD1602.h"
#include "Delay.h"
#include "MatrixKey.h"unsigned char KeyNum ;
unsigned int Password,Count;void main(){LCD_Init();LCD_ShowString(1,1,"Password:");//打印while(1){KeyNum = MatrixKey();if( KeyNum ) {//延迟刷新if( KeyNum <= 10){//如果s1-s10按键按下,输入密码if(Count < 4){//控制只能输入四个数Password *= 10;//密码左移一位Password += KeyNum % 10;//获取一位密码并加到密码中Count ++;//计次加一}LCD_ShowNum(2,1,Password,4);//刷新显示}if( KeyNum == 11){//如果s11被按下,进行确认操作if( Password == 2345){//进行密码比对,2345为正确密码LCD_ShowString(1,14,"OK ");//显示okPassword = 0;//密码清零Count = 0;//计次清零LCD_ShowNum(2,1,Password,4);//刷新显示}else{//否则LCD_ShowString(1,14,"ERR");//显示ERRPassword = 0;//密码清零Count = 0;//计次清零LCD_ShowNum(2,1,Password,4);//刷新显示}}if( KeyNum == 12){//如果s12被按下,进行取消操作LCD_ShowString(1,14,"   ");//显示空Password = 0;//密码清零Count = 0;//计次清零LCD_ShowNum(2,1,Password,4);//刷新显示}}}}