Three.js高级应用--利用Three.js+WebGL实现fbx和obj格式模型的自定义加载
通过对webgl和three.js的不断学习与实践,在三维应用场景建设过程中,利用Three.js与webgl配合可以实现大部分三维场景的应用需求,这一篇主要讲述如何利用Three.js加载已有的模型,支持的三维模型格式有.fbx和.obj,同时.obj格式记得将对应的mtl文件放在与obj文件同目录下,名称一致即可。这样就可以加载我们已经建设好的各类三维模型,目前100M之内的模型加载都没问题。Three.js的基础代码请参考其他三篇文章,一般利用Three.js实现三维场景的代码主要内容有:
1.获取canvas元素
2.创建场景scene
3.创建相机camera
4.添加相机控件OrbitControls
5.添加灯光-环境光AmbientLight
6.创建渲染器renderer并设置像素比和场景背景色
7.添加三维物体,一般在另一个js中完成。
8.添加动画函数实现场景的动态循环渲染、添加浏览器窗口变化事件,用于设置随着浏览器窗口大小进行画布大小的调整。
开发环境:vue-2.5.2,Three.js-0.142.0,开发工具webstorm2021.2.3, 前端用chrome109.0.5414.120,其他默认。
以下是实现三维模型加载示例的功能描述和关键代码。
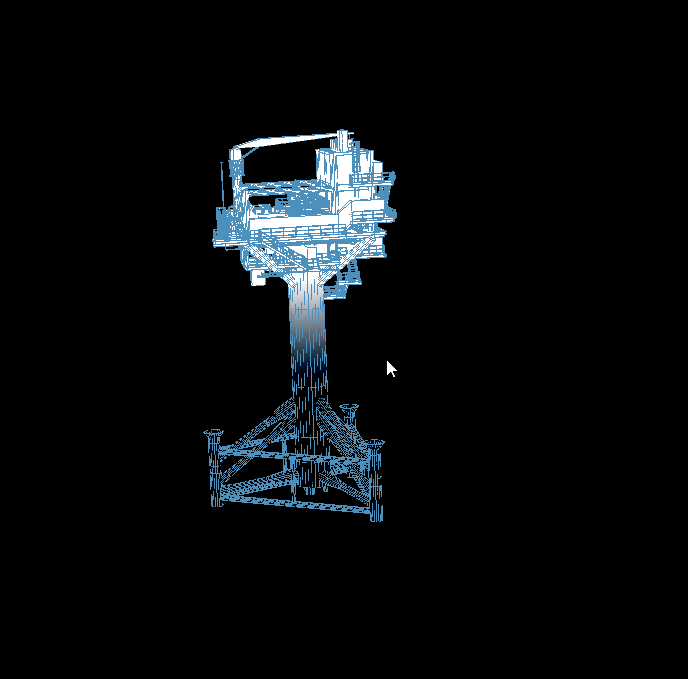
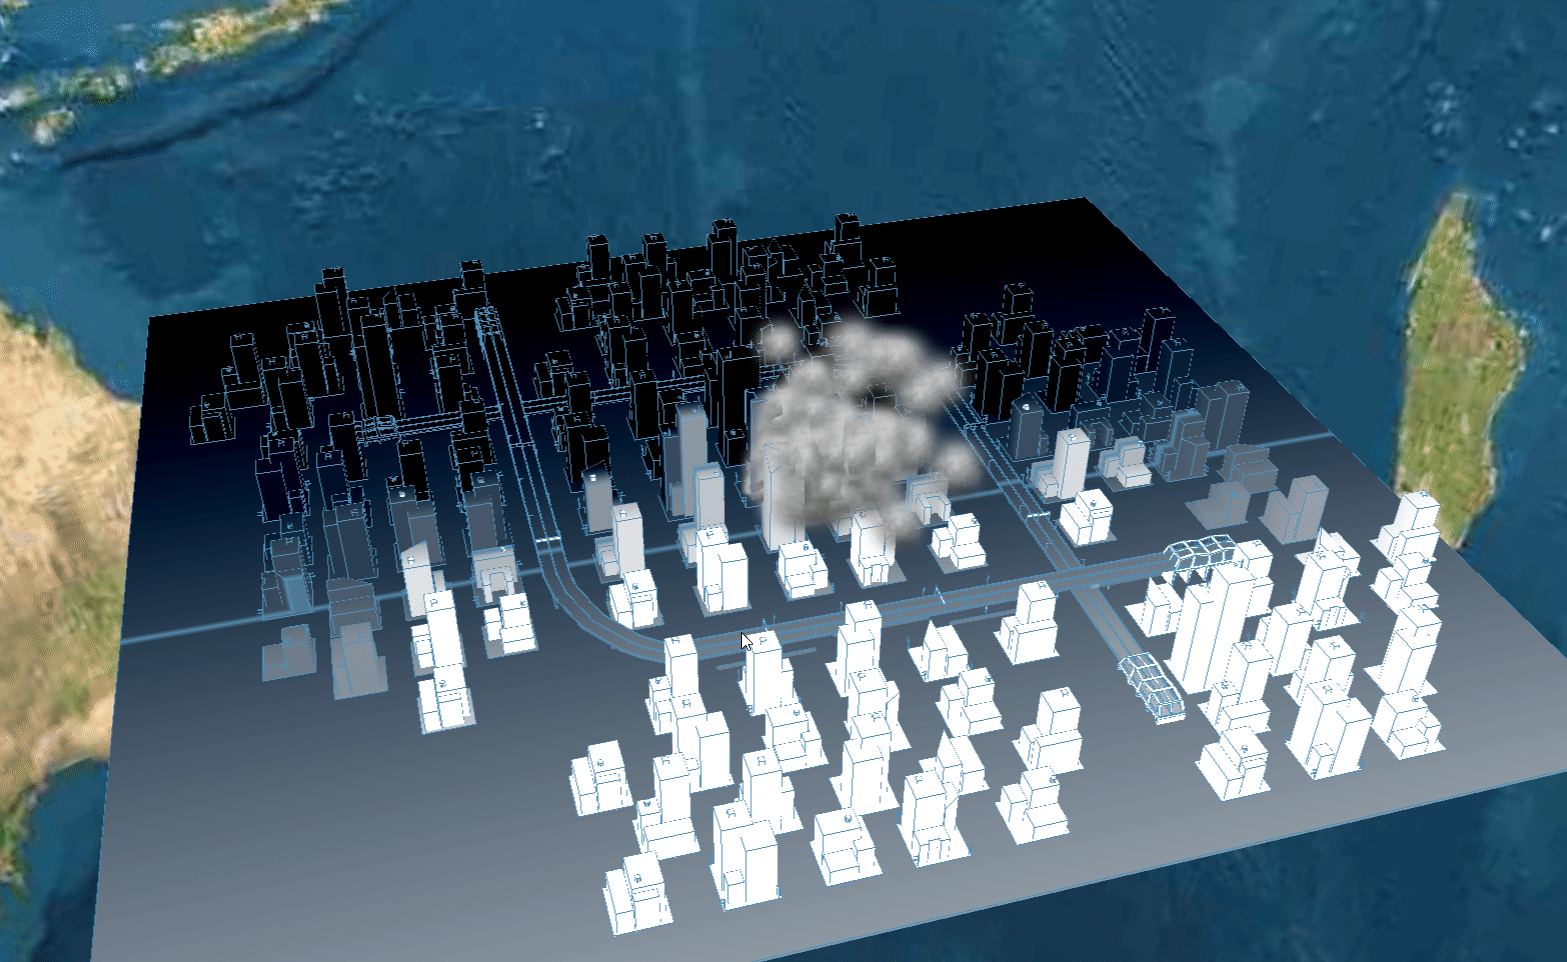
一、功能简述:在浏览器中实现已有三维模型文件的动态加载,不需要安装插件,支持旋转、放大缩小、移动,场景扫描和烟雾预警等。
二、实现效果:
三、关键代码如下(相机platform下的src/enter目录下的index.js和addComponent.js文件):
1.index.js文件中需要引入加载各个三维组件对应的js。
import { AddComponent } from './addComponent.js'
export const initPlatform = () => {//添加三维场景的各个组件,相当于加载各种三维模型const plat = new AddComponent(scene, camera, controls);const clock = new THREE.Clock();const start = () => {plat.start(clock.getDelta());//记得更新相机位置controls.update();// 渲染场景renderer.render(scene, camera)requestAnimationFrame(start)}start();//设置随着浏览器窗口大小进行画布大小的调整window.addEventListener('resize', () => {// 更新宽高比camera.aspect = window.innerWidth / window.innerHeight// 更新相机的投影矩阵camera.updateProjectionMatrix()renderer.setSize(window.innerWidth, window.innerHeight)// 设置像素比renderer.setPixelRatio(Math.min(window.devicePixelRatio, 2))})
}
2.addComponent.js文件中引入加载模型后的处理js和加载fbx和obj文件的js,每个组件是一个类。
import { SurroundLine } from '../effect/surroundLine.js'
import { loadFBX } from '../utils'
import { loadOBJ } from '../utils'
export class AddComponent {constructor(scene, camera, controls) {this.scene = scene;this.camera = camera;this.controls = controls;this.loadModel('fbx');}// 加载模型,并且渲染到画布上loadModel(fileType) {if(fileType=='fbx'){loadFBX('/src/model/NB352-3D.fbx').then(object => {object.rotation.z = Math.PI / 2;//模型旋转90度object.traverse((child) => {if (child.isMesh) {new SurroundLine(this.scene, child, this.height, this.time);}})this.initEffect();})}else if(fileType=='obj'){loadOBJ('/src/model/factory.obj').then(object => {object.traverse((child) => {if (child.isMesh) {new SurroundLine(this.scene, child, this.height, this.time);}})// this.initEffect();})}}
}
3.surroundLine.js完整文件如下:
import * as THREE from "three";export class SurroundLine {constructor(scene, child, height, time) {this.height = height;this.scene = scene;this.child = child;this.time = time;this.createMesh();}computedMesh() {this.child.geometry.computeBoundingBox();this.child.geometry.computeBoundingSphere();}createMesh() {this.computedMesh();const { max, min } = this.child.geometry.boundingBox// 高度差const size = max.z - min.z//利用webgl原始的顶点和片元着色器对模型进行设置。const material = new THREE.ShaderMaterial({uniforms: {// 当前扫描的高度u_height: this.height,// 扫描线条的颜色是什么u_up_color: {value: new THREE.Color({color:'#5588AA'}),},u_city_color: {// 得需要一个模型颜色 最底部显示的颜色value: new THREE.Color(color.mesh)},u_head_color: {// 要有一个头部颜色 最顶部显示的颜色value: new THREE.Color(color.head)},u_size: {value: size,},u_time: this.time,},//顶点着色器vertexShader: `uniform float u_time;varying vec3 v_position;void main() {// 变化的时间float uMax = 4.0;v_position = position;// 变化的比例float rate = u_time / uMax * 2.0;// 边界条件if (rate > 1.0) {rate = 1.0;}float z = position.z * rate;gl_Position = projectionMatrix * modelViewMatrix * vec4(vec2(position), z, 1.0);}`,//片元着色器fragmentShader: `varying vec3 v_position;uniform vec3 u_city_color;uniform vec3 u_head_color;uniform float u_size;uniform vec3 u_up_color;uniform float u_height;void main() {vec3 base_color = u_city_color;base_color = mix(base_color, u_head_color, v_position.z / u_size);// 上升线条的高度是多少if (u_height > v_position.z && u_height < v_position.z + 6.0) {float f_index = (u_height - v_position.z) / 3.0;base_color = mix(u_up_color, base_color, abs(f_index - 1.0));}gl_FragColor = vec4(base_color, 1.0);}`,})const mesh = new THREE.Mesh(this.child.geometry, material);// 让mesh 继承 child 的旋转、缩放、平移mesh.position.copy(this.child.position)mesh.rotation.copy(this.child.rotation)mesh.scale.copy(this.child.scale)this.scene.add(mesh);}
}