spring整合mybatis和Junit
该项目使用spring纯注解方式开发,用配置类取代spring的配置文件
一、导入依赖
整合Junit需要导入spring-test
整合mybatis需要导入spring-jdbc、mybatis-spring
<dependencies><!-- https://mvnrepository.com/artifact/org.springframework/spring-context --><dependency><groupId>org.springframework</groupId><artifactId>spring-context</artifactId><version>5.3.18</version></dependency><!-- https://mvnrepository.com/artifact/com.alibaba/druid --><dependency><groupId>com.alibaba</groupId><artifactId>druid</artifactId><version>1.2.8</version></dependency><!-- https://mvnrepository.com/artifact/junit/junit --><dependency><groupId>junit</groupId><artifactId>junit</artifactId><version>4.13.2</version><scope>test</scope></dependency><!-- https://mvnrepository.com/artifact/org.springframework/spring-test --><dependency><groupId>org.springframework</groupId><artifactId>spring-test</artifactId><version>5.3.19</version><scope>test</scope></dependency><dependency><groupId>mysql</groupId><artifactId>mysql-connector-java</artifactId><version>5.1.48</version></dependency><!-- https://mvnrepository.com/artifact/org.mybatis/mybatis-spring --><dependency><groupId>org.mybatis</groupId><artifactId>mybatis-spring</artifactId><version>1.3.1</version></dependency><dependency><groupId>org.mybatis</groupId><artifactId>mybatis</artifactId><version>3.5.7</version></dependency><dependency><groupId>org.springframework</groupId><artifactId>spring-jdbc</artifactId><version>5.3.19</version></dependency></dependencies>
二、创建目录结构
- 配置类
- mapper接口
- service和serviceimpl
- pojo
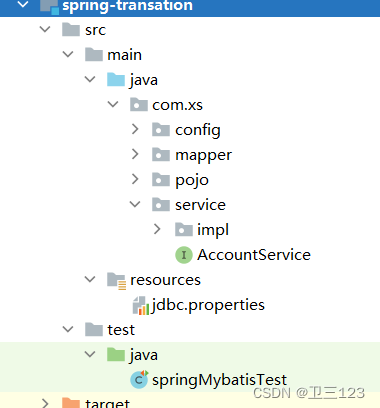 5.在resource创建jdbc.properties
jdbc.driver=com.mysql.jdbc.Driver
jdbc.url=jdbc:mysql://localhost:3306/mybatis01
jdbc.username=root
jdbc.password=root
三、创建spring配置类、mybatis配置类、jdbc配置类
SpringConfig.java
该配置类需要在类上方添加注解@Configuration表名自己是spring的配置类,还需要扫描添加了注解的包,即扫描bean@ComponentScan,以及导入properties配置文件跟别的配置类
@Configuration
@ComponentScan({"com.xs.mapper","com.xs.service"})
@Import({JDBCConfig.class,MyBatisConfig.class})
@PropertySource("classpath:jdbc.properties")
public class SpringConfig {}
MybatisConfig.java替代了mybatis的配置文件
导入第三方bean只需要在方法上方添加@Bean注解,这样就会将方法的返回值作为一个Bean。如果需要传别的bean的话,只需要在方法中写形参即可。
public class MyBatisConfig {/*** 配置sqlSessionFactory* 设置数据源* 设置别名* @param dataSource* @return*/@Beanpublic SqlSessionFactoryBean sqlSessionFactoryBean(DataSource dataSource){SqlSessionFactoryBean sqlSessionFactory = new SqlSessionFactoryBean();sqlSessionFactory.setDataSource(dataSource);sqlSessionFactory.setTypeAliasesPackage("com.xs.pojo");return sqlSessionFactory;}/*** 扫描mapper接口* @return*/@Beanpublic MapperScannerConfigurer mapperScanner(){MapperScannerConfigurer msc = new MapperScannerConfigurer();msc.setBasePackage("com.xs.mapper");return msc;}}JdbcConfig.java
public class JDBCConfig {@Value("${jdbc.driver}")private String  driver;@Value("${jdbc.url}")private String url;@Value("${jdbc.username}")private String username;@Value("${jdbc.password}")private String password;@Beanpublic DataSource dataSource(){DruidDataSource druidDataSource = new DruidDataSource();druidDataSource.setDriverClassName(driver);druidDataSource.setUrl(url);druidDataSource.setUsername(username);druidDataSource.setPassword(password);return druidDataSource;}
}
四、创建pojo类和service、serviceimpl、mapper接口
其中需要注意的是serviceImpl中需要引入mapper接口。使用@AutoWire注解引入。这个注解是按类型匹配
Account.java类
public class Account {private Integer id;private String name;private Double money;get/set方法...有参无参构造函数...}
AccountMapper.java
注意:当传入多个参数时,需要添加@Param注解。该注解会用它的值作为传入mybatis’中的参数的值的名称。
@Repository
public interface AccountMapper {@Select("select * from t_account")public List<Account> accounts();@Select("select * from t_account where id=#{id}")public Account findById(Integer id);@Insert("insert into t_account(name,money) values(#{name},#{money})")public int addAccount(@Param("name") String name,@Param("money") double money);@Insert("insert into t_account(name,money) values(#{name},#{money})")public int addAccount2(Account account);@Update("update t_account set name=#{name},money=#{money} where id=#{id}")public int updateAccount(Account account);@Delete("delete from t_account where id=#{id}")public int delAccount(Integer id);
}
AccountService.java
public interface AccountService {
//    查询全部public List<Account> accounts();
//    按id查询public Account findById(Integer id);
//    增public int addAccount(String name,double money);
//    传入对象public int addAccount2(Account account);
//    改public int updateAccount(Account account);
//    删public int delAccount(Integer id);
}
AccountServiceImpl.java
该类继承了AccountService.java
@Service
public class AccountServiceImpl implements AccountService {
//    注入AccountMapper@Autowiredpublic AccountMapper accountMapper;public List<Account> accounts() {return accountMapper.accounts();}public Account findById(Integer id) {return accountMapper.findById(id);}public int addAccount(String name,double money) {return accountMapper.addAccount(name,money);}@Overridepublic int addAccount2(Account account) {return accountMapper.addAccount2(account);}public int updateAccount(Account account) {return accountMapper.updateAccount(account);}public int delAccount(Integer id) {return accountMapper.delAccount(id);}
}
五、进行测试
//设置类运行器
@RunWith(SpringJUnit4ClassRunner.class)
// 设置spring环境对应的配置类
@ContextConfiguration(classes = SpringConfig.class)
public class springMybatisTest {@Autowiredprivate AccountService accountService;
//    查询所有@Testpublic void accountsTest(){List<Account> accounts = accountService.accounts();accounts.forEach(account-> System.out.println(account));}
//    增加@Testpublic void addAccountTest(){
//        int i = accountService.addAccount("卫三",1000);int i = accountService.addAccount2(new Account(null, "应星决", 20000.0));System.out.println(i);}//    修改@Testpublic void updatrAccountTest(){Account account = new Account(9,"花花",10000.0);
//        account.setMoney(10000.0);
//        account.setName("熊二");int i = accountService.updateAccount(account);System.out.println(i);}//    根据id查询@Testpublic void selAccountTest(){Account i = accountService.findById(7);System.out.println(i);}
//    删@Testpublic void delAccount(){accountService.delAccount(8);}
}