【多线程】认识Thread类及其常用方法
📄前言:
本文是对以往多线程学习中 Thread类 的介绍,以及对其中的部分细节问题进行总结。
文章目录
- 一. 线程的 创建和启动
- 🍆1. 通过继承 Thread 类创建线程
- 🍅2. 通过实现 Runnable 接口创建线程
- 🥦3. 其他方法创建线程(本质上为上面两种写法的变形)
- 🥑3.1 使用 Thread 的匿名内部类
- 🥬3.2 使用匿名内部类实现 Runnable 接口
- 🥒3.3 使用 lambda 表达式实现 Runnable 接口 (推荐,更加简洁!!!)
- 🍉4. 线程的启动(关于 start方法 和 run方法 的思考)
- 二. Thread类的属性和常用方法
- 🍚1. Thread类的主要属性
- 🍥2. 线程休眠
- 🍭3. 线程等待
- 🍦 4. 获取线程实例
- 🧊5. 线程的中断 (关于线程中断的细节!!!)
之前的文章介绍过线程的引入能够更好地处理程序的并发执行问题。在Java中,线程的创建方式之一是通过 Thead类 (Thead封装了操作系统提供的API,使我们创建的线程能够系统的调度)。接下来我们先了解一下线程的创建方法。
一. 线程的 创建和启动
通过 Thread类 创建线程的方式总体来说可以分为以下两种:
- 继承 Thread类,重写类中的 run() 方法
- 实例化Thread类,实现 Runnable 接口,重写接口中的 run() 方法(通过Thread的构造方法传参 间接重写run() 方法)
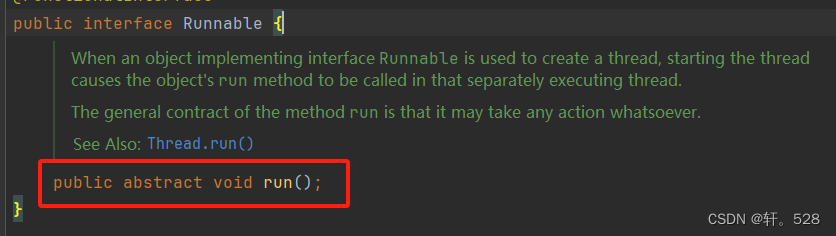
这里我们应该可以发现一个共同点,这两种方法都需要重写 run() 方法,毫无疑问 run() 方法就是线程创建后执行代码逻辑的 “入口”方法,通过查看源码我们发现 Thread类 继承了Runnable,而 run() 方法就是该接口中的抽象方法。(如下)

🍆1. 通过继承 Thread 类创建线程
class MyThread extends Thread {@Overridepublic void run() {for (int i = 0; i < 5; i++) {System.out.println("hello thread!");}System.out.println("线程结束!");}
}
🍅2. 通过实现 Runnable 接口创建线程

class MyRunnable implements Runnable {@Overridepublic void run() {for (int i = 0; i < 5; i++) {System.out.println("hello thread !");}System.out.println("线程结束 !");}
}public class Demo2 {public static void main(String[] args) throws InterruptedException {Thread t = new Thread(new MyRunnable());}}
🥦3. 其他方法创建线程(本质上为上面两种写法的变形)
🥑3.1 使用 Thread 的匿名内部类
Thread t = new Thread(){@Overridepublic void run() {for (int i = 0; i < 5; i++) {System.out.println("hello thread !");}System.out.println("线程结束 !");}
};
🥬3.2 使用匿名内部类实现 Runnable 接口
Thread t = new Thread(new Runnable() {@Overridepublic void run() {while(true) {System.out.println("hello thread !");}System.out.println("线程结束 !");}
});
🥒3.3 使用 lambda 表达式实现 Runnable 接口 (推荐,更加简洁!!!)
Thread t = new Thread(() -> {while(true) {System.out.println("hello thread !");}System.out.println("线程结束 !");
});
🍉4. 线程的启动(关于 start方法 和 run方法 的思考)
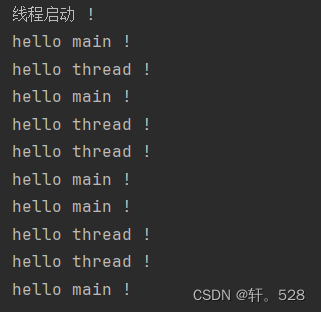
其实线程的启动方式很简单,直接调用 Thread类中的 start()方法 即可启动线程,为了观察新创建的线程和 “主线程main” 的并发执行效果,代码中调用 Thread类的类方法 sleep(), 让每次语句执行后休眠 1s。(代码及程序运行效果如下)
public static void main(String[] args) throws InterruptedException {Thread t = new Thread(() -> {for(int i = 0; i < 5; i++) {System.out.println("hello thread !");try {Thread.sleep(1000);} catch (InterruptedException e) {throw new RuntimeException(e);}}});System.out.println("线程启动 !");t.start();// 主线程for(int i = 0; i < 5; i++) {System.out.println("hello main !");Thread.sleep(1000);}
}
通过上面代码的执行结果我们容易知道:创建的线程执行的代码其实就是 run() 方法中的代码,那么我们是否可以通过执行 t.run() 来代替 t.start() 呢?
答案很明显是否定的,因为直接调用 run() 方法本质上与一个自定义函数的调用并无任何差异。我们都知道,在程序的某处调用一个函数,程序会在该函数执行结束后才继续执行后面的代码,因此不能使用 t.run() 来代替 t.start()。
总结:调用run() 方法只是一次简单的函数调用,程序依旧是顺序执行;只有调用 start() 才能在操作系统真正创建一个主线程并发执行的线程。
二. Thread类的属性和常用方法
🍚1. Thread类的主要属性

注意:所有创建的线程默认为前台线程,只有当所有前台线程运行结束后,程序才会结束,主线程main运行结束,不会影响其他前台线程的运行。(可以通过setDaemon()方法将线程设置为后台线程)
🍥2. 线程休眠

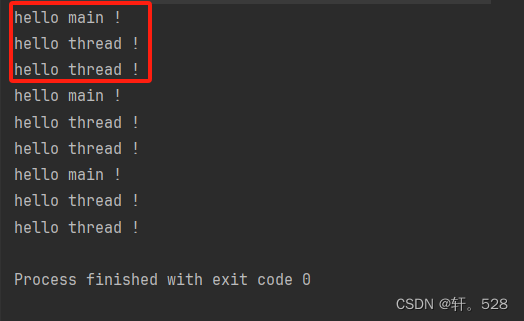
代码示例及程序运行结果如下:让新线程每1s进行一次打印,主线程每2s进行一次打印(注意:使用sleep()方法需要处理可能抛出的异常)
public static void main(String[] args) {Thread t = new Thread(() -> {for (int i = 0; i < 6; i++) {System.out.println("hello thread !");try {Thread.sleep(1000);} catch (InterruptedException e) {e.printStackTrace();}}});t.start();for (int i = 0; i < 3; i++) {System.out.println("hello main !");try {Thread.sleep(2000);} catch (InterruptedException e) {e.printStackTrace();}}
}
🍭3. 线程等待

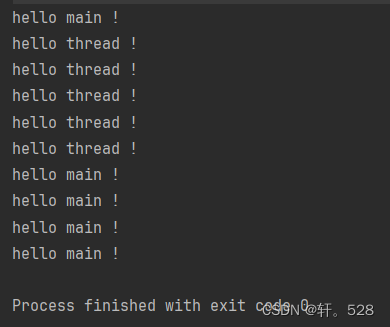
代码实例和程序运行结果如下:让主线程进行一次打印后,等待新线程结束再继续运行。
public static void main(String[] args) {Thread t = new Thread(() -> {for (int i = 0; i < 5; i++) {System.out.println("hello thread !");}});t.start();for (int i = 0; i < 5; i++) {System.out.println("hello main !");if(i == 0) {try {t.join();} catch (InterruptedException e) {throw new RuntimeException(e);}}}
}
🍦 4. 获取线程实例
在线程的创建过程中,由于 Thread类 还没有被实例化,因此不能通过类对象的引用变量直接得到该对象,而应该使用 Thread类提供的方法得到该对象的引用。

🧊5. 线程的中断 (关于线程中断的细节!!!)
在正式了解线程中断的方法之前,我们需要知道一个基本的事实:
Java中线程的中断方式并不是让一个正在运行的线程直接中止,而是以一种 “通知的方式” 告诉线程,“你当前应该结束线程了”,而具体是否立即结束当前该线程,由线程接收通知后的代码处理逻辑决定。
==========
关于线程的中断方法,Thread类 提供了以下三个方法:

Thread类收到通知的方式有以下两种情况:
- 当前线程因 sleep/join/wait 等方法引起阻塞而挂起,以 InterruptedException 异常的形式通知,并清除中断标志,此时线程的阻塞状态立即结束,而是否立即结束由 try/catch 中catch的处理逻辑决定。(注意:线程是否有后续的处理权,取决于该线程是否有能引起阻塞状态的代码)
- 当前线程处于正常运行状态,将中断标志位设置为true。
==========
- 当线程处于阻塞状态时,存在以下三种对应的处理方式:
1)不管这个通知,继续运行。 2)直接结束线程。 3)进行一些特定的收尾工作再结束线程
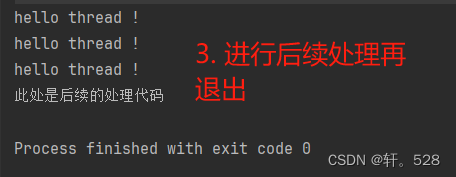
public static void main(String[] args) {Thread t = new Thread(() -> {while (!Thread.currentThread().isInterrupted()) {System.out.println("hello thread !");try {Thread.sleep(1000);} catch (InterruptedException e) {// 1. 无视通知e.printStackTrace();// 2. 直接退出// break;// 3. 进行收尾工作,再退出// System.out.println("此处是后续的处理代码");// break;}}});t.start();try {Thread.sleep(3000);} catch (InterruptedException e) {e.printStackTrace();}t.interrupt();
}
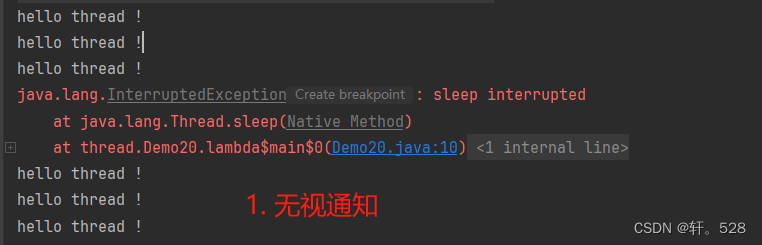

看到第一个程序运行的结果,不知道大家会不会有一个疑惑,使用 isInterrupted()方法是不会清除标志位的,那 3s过后该线程不应该只打印3次 “hello thread !”,接着由于循环的判断条件为 false 而直接退出吗?
其实 isInterrupted() 方法调用后确实不会清除标志位,程序继续运行的原因是因为3s后主线程调用interrupt()方法,解除了 t线程 的阻塞状态,同时 sleep() 引起的异常会顺便清除标志位。
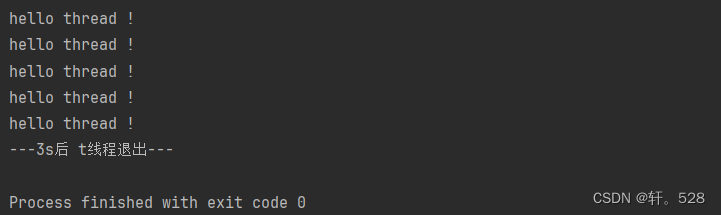
因此,如果将代码改为下面的写法,线程会在当前代码逻辑执行完毕 或 进入下一次循环判断后直接退出。
public static void main(String[] args) {Thread t = new Thread(() -> {while (!Thread.currentThread().isInterrupted()) {System.out.println("hello thread !");}System.out.println("---3s后 t线程退出---");});t.start();try {Thread.sleep(3000);} catch (InterruptedException e) {e.printStackTrace();}t.interrupt();
}
程序运行结果如下:
======
- 当前线程处于正常运行状态,将中断标志位置为true。
从前面我们可以知道:Thread.interrupted() 判断后会清除标志位,isInterrupted() 不会清除标志位,现有以下代码:
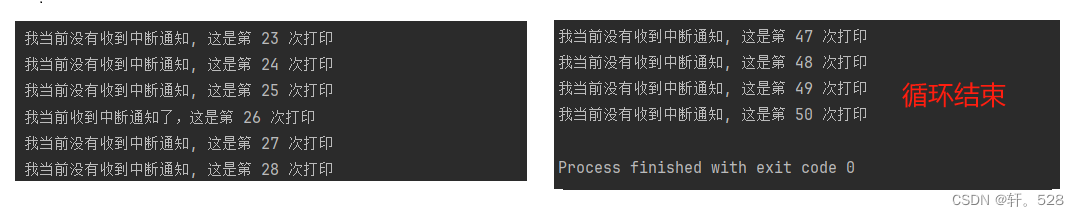
private static int count = 100;public static void main(String[] args) {Thread t = new Thread(() -> {for (int i = 1; count > 0 || Thread.currentThread().isInterrupted(); i++) {if(Thread.currentThread().isInterrupted()) {System.out.println("我当前收到中断通知了,这是第 " + i + " 次打印");} else {System.out.println("我当前没有收到中断通知, 这是第 " + i + " 次打印");}count--;if(i == 150) break;}});t.start();try {Thread.sleep(2);} catch (InterruptedException e) {e.printStackTrace();}t.interrupt();
}
程序的运行结果如下:

这段代码的运行结果是:程序在第58次打印时标志位发生了改变,并且后续的打印不再发生改变,可以预见的是:如果没有使用 i 的值判断使循环退出,程序将会无终止地进行打印。原因就是 isInterrupted()方法 不会清除标志位,因此判断条件永远为真。
若把循环中的方法修改为 Thread.interrupted(),程序的运行结果就发生了改变:
private static int count = 50;public static void main(String[] args) {Thread t = new Thread(() -> {for (int i = 0; count > 0 || Thread.interrupted(); i++) {if(Thread.interrupted()) {System.out.println("我当前收到中断通知了,这是第 " + i + " 次打印");} else {System.out.println("我当前没有收到中断通知, 这是第 " + i + " 次打印");}count--;}});t.start();try {Thread.sleep(2);} catch (InterruptedException e) {e.printStackTrace();}t.interrupt();
}
可以看到在第27次打印时标志位发生了改变,说明此时线程收到了中断通知,但后面的打印内容为“没有收到通知”,且程序最终打印了50次便结束了,这都说明了调用 Thread,interrupted()方法 后标志位被清除了。
以上就是本篇文章的全部内容了,如果这篇文章对你有些许帮助,你的点赞、收藏和评论就是对我最大的支持。
另外,文章可能存在许多不足之处,也希望你可以给我一点小小的建议,我会努力检查并改进。