Unity中URP下实现能量罩(扭曲流光花纹)
文章目录
- 前言
- 一、能量罩花纹
- 1、在属性面板接收能量罩花纹纹理
- 2、申明 纹理 和 采样器
- 3、在顶点着色器,应用 Tilling 和 Offset
- 4、在片元着色器,纹理采样后,与之前的结果相乘输出
- 二、能量罩流光
- 1、在顶点着色器,记录原uv值
- 2、在片元着色器,使用 uv 的 y 值,乘以一个系数 加上_Time.y实现流动的效果
- 三、抓屏扭曲
- 1、在URP设置中,开启抓屏
- 2、申明 抓屏纹理 和 采样器
- 3、在片元着色器
- 四、测试代码
前言
在上一篇文章中,我们实现了能量罩外发光的效果。但是,这样看我们的能量罩十分单调不好看。在这篇文章中,我们给能量罩加上花纹、扭曲流光,使其变好看。
- Unity中URP下实现能量罩(外发光)
一、能量罩花纹
1、在属性面板接收能量罩花纹纹理
_MainTex(“MainTex”,2D) = “white”{}
2、申明 纹理 和 采样器
TEXTURE2D(_MainTex);SAMPLER(sampler_MainTex);float4 _MainTex_ST;
3、在顶点着色器,应用 Tilling 和 Offset
o.uv.zw = TRANSFORM_TEX(v.uv,_MainTex);
4、在片元着色器,纹理采样后,与之前的结果相乘输出
float4 mainTex = SAMPLE_TEXTURE2D(_MainTex,sampler_MainTex,i.uv.zw);
col *= mainTex;
二、能量罩流光
1、在顶点着色器,记录原uv值
o.uv.xy = v.uv;
2、在片元着色器,使用 uv 的 y 值,乘以一个系数 加上_Time.y实现流动的效果
col *= frac(i.uv.y * _Flow + _Time.y);

三、抓屏扭曲
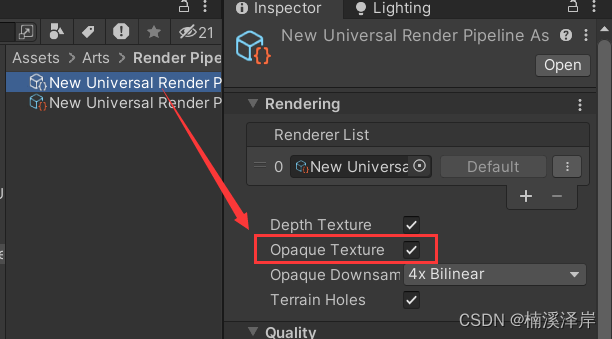
1、在URP设置中,开启抓屏
2、申明 抓屏纹理 和 采样器
TEXTURE2D(_CameraOpaqueTexture);SAMPLER(sampler_CameraOpaqueTexture);
3、在片元着色器
- 对花纹纹理,进行 y 方向上的流动采样,得到扰动纹理
float4 distortTex = SAMPLE_TEXTURE2D(_MainTex,sampler_MainTex,i.uv.zw + float2(0,_Time.x));
- 线性差值得到 扰动采样UV
float2 distortUV = lerp(uv,distortTex.rr,_Distort);
- 对抓屏纹理进行纹理采样
half4 opaqueTex = SAMPLE_TEXTURE2D(_CameraOpaqueTexture,sampler_CameraOpaqueTexture,distortUV);
- 与之前的输出结果,相乘输出
half4 distort = opaqueTex;
col *= distort;
return col;
四、测试代码
//流光扭曲花纹
Shader "MyShader/URP/P4_3_7"
{Properties {[Header(MainTex)]_MainTex("MainTex",2D) = "white"{}[Header(HighLight)]_HighLightColor("HighLightColor",Color) = (0,0,0,0)_HighLightFade("HighLight",Float) = 1.0[Header(Fresnel)]_FresnelIntensity("FresnelIntensity",Range(1,15)) = 1.0_FresnelColor("FresnelColor",Color) = (0,0,0,0)[Header(Flow)]_Flow("Flow",Float)=0_Distort("Distort",Range(0,1)) = 0.3}SubShader{Tags{//告诉引擎,该Shader只用于 URP 渲染管线"RenderPipeline"="UniversalPipeline"//渲染类型"RenderType"="Transparent"//渲染队列"Queue"="Transparent"}Pass{Blend One OneZWrite OffName "Unlit"HLSLPROGRAM#pragma vertex vert#pragma fragment frag// Pragmas#pragma target 2.0// Includes#include "Packages/com.unity.render-pipelines.core/ShaderLibrary/Color.hlsl"#include "Packages/com.unity.render-pipelines.universal/ShaderLibrary/Core.hlsl"#include "Packages/com.unity.render-pipelines.universal/ShaderLibrary/Input.hlsl"CBUFFER_START(UnityPerMaterial)half4 _HighLightColor;half _HighLightFade;half _FresnelIntensity;half4 _FresnelColor;half _Flow;half _Distort;CBUFFER_ENDTEXTURE2D(_MainTex);SAMPLER(sampler_MainTex);float4 _MainTex_ST;TEXTURE2D(_CameraDepthTexture);SAMPLER(sampler_CameraDepthTexture);TEXTURE2D(_CameraOpaqueTexture);SAMPLER(sampler_CameraOpaqueTexture);//struct appdata//顶点着色器的输入struct Attributes{float3 positionOS : POSITION;float2 uv : TEXCOORD0;half3 normalOS : NORMAL;};//struct v2f//片元着色器的输入struct Varyings{float4 positionCS : SV_POSITION;float4 uv : TEXCOORD0;float4 screenPos : TEXCOORD1;float3 positionWS : TEXCOORD2;float3 positionVS : TEXCOORD3;half3 normalWS : TEXCOORD4;};//v2f vert(Attributes v)//顶点着色器Varyings vert(Attributes v){Varyings o = (Varyings)0;o.positionWS = TransformObjectToWorld(v.positionOS);o.positionVS = TransformWorldToView(o.positionWS);o.positionCS = TransformWViewToHClip(o.positionVS);o.screenPos = ComputeScreenPos(o.positionCS);o.normalWS = TransformObjectToWorldNormal(v.normalOS);o.uv.xy = v.uv;o.uv.zw = TRANSFORM_TEX(v.uv,_MainTex);return o;}//fixed4 frag(v2f i) : SV_TARGET//片元着色器half4 frag(Varyings i) : SV_TARGET{half4 col=0;//深度图//float2 uv = i.screenPos.xy / i.screenPos.w;float2 uv = i.positionCS.xy/ _ScreenParams.xy;float4 cameraDepthTex = SAMPLE_TEXTURE2D(_CameraDepthTexture,sampler_CameraDepthTexture,uv);float depthTex = LinearEyeDepth(cameraDepthTex.r,_ZBufferParams);float depth = depthTex + i.positionVS.z;float4 highLight = 1 - depth;highLight = pow(saturate(highLight),_HighLightFade);highLight *= _HighLightColor;col += saturate(highLight);//fresnel外发光//pow(max(0,dot(N,V)),Intensity)half3 N = normalize(i.normalWS);half3 V = normalize(_WorldSpaceCameraPos - i.positionWS);half NdotV = dot(N,V);half4 fresnel = pow(max(0,1 - NdotV),_FresnelIntensity);fresnel *= _FresnelColor;col += fresnel;//能量罩花纹float4 mainTex = SAMPLE_TEXTURE2D(_MainTex,sampler_MainTex,i.uv.zw);col += mainTex * 0.15;//流光half flowMask = frac(i.uv.y * _Flow + _Time.y);col *= flowMask;//抓屏流光扭曲float4 distortTex = SAMPLE_TEXTURE2D(_MainTex,sampler_MainTex,i.uv.zw + float2(0,_Time.x));float2 distortUV = lerp(uv,distortTex.rr,_Distort);half4 opaqueTex = SAMPLE_TEXTURE2D(_CameraOpaqueTexture,sampler_CameraOpaqueTexture,distortUV);half4 distort = opaqueTex;col *= distort;return col;}ENDHLSL}}
}