八、QLayout 用户基本资料修改(Qt5 GUI系列)

目录
一、设计需求
二、实现代码
三、代码解析
四、总结
一、设计需求
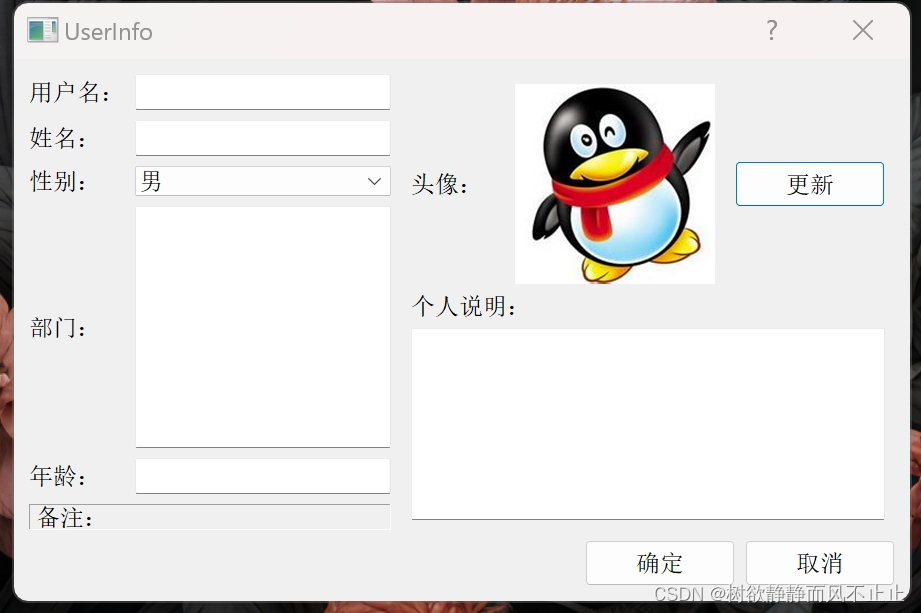
在很多应用程序中会有用户注册或用户编辑信息等界面。本文就设计一个用户信息编辑界面。要求包含用户名、姓名、性别、部门、年龄、头像、个人说明等信息。
二、实现代码
#ifndef DIALOG_H
#define DIALOG_H#include <QDialog>
#include <QLabel>
#include <QLineEdit>
#include <QComboBox>
#include <QTextEdit>
#include <QGridLayout>class Dialog : public QDialog
{Q_OBJECTpublic:Dialog(QWidget *parent = 0);~Dialog();
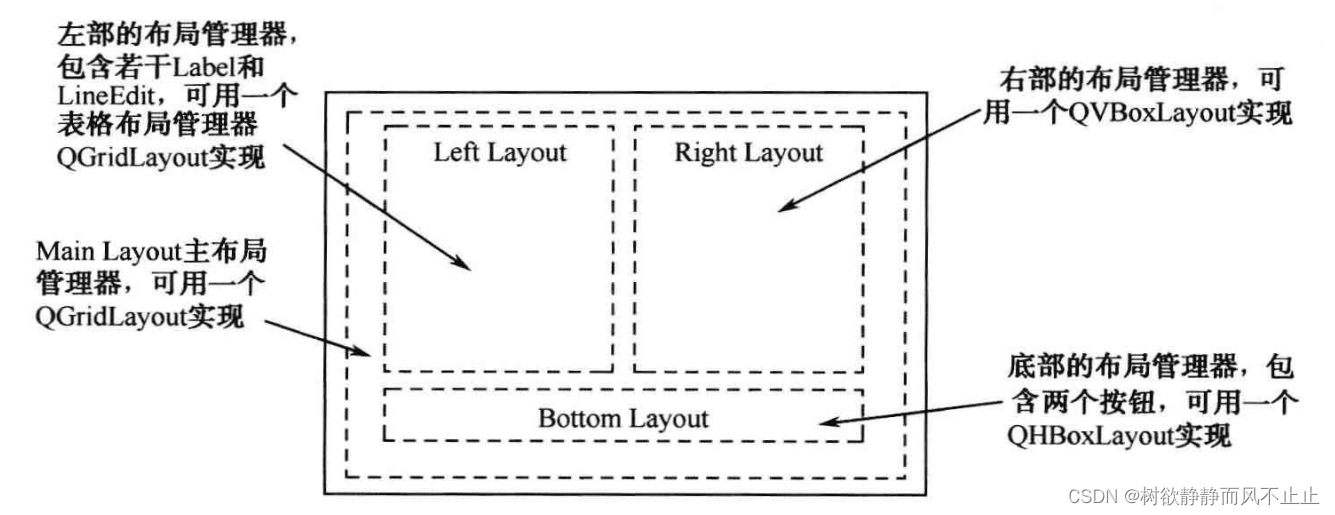
private://左侧QLabel *UserNameLabel;QLabel *NameLabel;QLabel *SexLabel;QLabel *DepartmentLabel;QLabel *AgeLabel;QLabel *OtherLabel;QLineEdit *UserNameLineEdit;QLineEdit *NameLineEdit;QComboBox *SexComboBox;QTextEdit *DepartmentTextEdit;QLineEdit *AgeLineEdit;QGridLayout *LeftLayout;//右侧QLabel *HeadLabel; //右上角部分QLabel *HeadIconLabel;QPushButton *UpdateHeadBtn;QHBoxLayout *TopRightLayout;QLabel *IntroductionLabel;QTextEdit *IntroductionTextEdit;QVBoxLayout *RightLayout;//底部QPushButton *OkBtn;QPushButton *CancelBtn;QHBoxLayout *ButtomLayout;
};#endif // DIALOG_H
#include "dialog.h"
#include <QLabel>
#include <QLineEdit>
#include <QComboBox>
#include <QPushButton>
#include <QFrame>
#include <QGridLayout>
#include <QPixmap>
#include <QHBoxLayout>
#include <QCoreApplication>
#include <QDebug>Dialog::Dialog(QWidget *parent): QDialog(parent)
{//设置标题setWindowTitle(tr("UserInfo"));/************** 左侧 ******************************/UserNameLabel =new QLabel(tr("用户名:"));UserNameLineEdit =new QLineEdit;NameLabel =new QLabel(tr("姓名:"));NameLineEdit =new QLineEdit;SexLabel =new QLabel(tr("性别:"));SexComboBox =new QComboBox;SexComboBox->addItem(tr("女"));SexComboBox->addItem(tr("男"));DepartmentLabel =new QLabel(tr("部门:"));DepartmentTextEdit =new QTextEdit;AgeLabel =new QLabel(tr("年龄:"));AgeLineEdit =new QLineEdit;OtherLabel =new QLabel(tr("备注:"));//设置QLabel控件,使其具有“带边框凹陷”的外观效果OtherLabel->setFrameStyle(QFrame::Panel|QFrame::Sunken);//添加控件LeftLayout =new QGridLayout();LeftLayout->addWidget(UserNameLabel,0,0);     			//用户名LeftLayout->addWidget(UserNameLineEdit,0,1);LeftLayout->addWidget(NameLabel,1,0);                	//姓名LeftLayout->addWidget(NameLineEdit,1,1);LeftLayout->addWidget(SexLabel,2,0);                   	//性别LeftLayout->addWidget(SexComboBox,2,1);LeftLayout->addWidget(DepartmentLabel,3,0);           	//部门LeftLayout->addWidget(DepartmentTextEdit,3,1);LeftLayout->addWidget(AgeLabel,4,0);                    //年龄LeftLayout->addWidget(AgeLineEdit,4,1);//OtherLabel占第五行,两列LeftLayout->addWidget(OtherLabel,5,0,1,2);             	//其他//设置拉伸系数,可以调整 QGridLayout 布局中各列的宽度分配//column 表示要设置的列数,stretch 表示设置的拉伸系数//第1列的宽度是第0列的三倍LeftLayout->setColumnStretch(0,1);LeftLayout->setColumnStretch(1,3);/*********右侧*********/HeadLabel =new QLabel(tr("头像: "));                    //右上角部分HeadIconLabel =new QLabel;//获取图片路径//QCoreApplication::applicationDirPath()程序所在的路径QString iconPath = QString("%1/312.jpg").arg(QCoreApplication::applicationDirPath());//设置图片QPixmap icon(iconPath);HeadIconLabel->setPixmap(icon);HeadIconLabel->resize(icon.width(),icon.height());UpdateHeadBtn =new QPushButton(tr("更新"));TopRightLayout =new QHBoxLayout();TopRightLayout->setSpacing(20);TopRightLayout->addWidget(HeadLabel);TopRightLayout->addWidget(HeadIconLabel);TopRightLayout->addWidget(UpdateHeadBtn);IntroductionLabel =new QLabel(tr("个人说明:"));         //右下角部分IntroductionTextEdit =new QTextEdit;RightLayout =new QVBoxLayout();RightLayout->setMargin(10);RightLayout->addLayout(TopRightLayout);RightLayout->addWidget(IntroductionLabel);RightLayout->addWidget(IntroductionTextEdit);/*--------------------- 底部 --------------------*/OkBtn =new QPushButton(tr("确定"));CancelBtn =new QPushButton(tr("取消"));ButtomLayout =new QHBoxLayout();//在按钮之前插入一个占位符,使两个按钮能//够靠右对齐,并且在整个对话框的大小发生改变时,保证按钮的大小不发生变化。ButtomLayout->addStretch();ButtomLayout->addWidget(OkBtn);ButtomLayout->addWidget(CancelBtn);/*---------------------------------------------*/QGridLayout *mainLayout =new QGridLayout(this);mainLayout->setMargin(15);mainLayout->setSpacing(10);mainLayout->addLayout(LeftLayout,0,0);mainLayout->addLayout(RightLayout,0,1);mainLayout->addLayout(ButtomLayout,1,0,1,2);//设定最优化显示,并且使用户无法改变对话框的大小mainLayout->setSizeConstraint(QLayout::SetFixedSize);
}Dialog::~Dialog()
{}
效果展示:
三、代码解析
(1)void addWidget()
void addWidget()
(QWidget *widget,           //需要插入的控件对象int fromRow,               //插入的行int fromColumn,            //插入的列int rowSpan,               //表示占用的行数int columnspan,            //表示占用的列数Qt::Alignment alignment=0  //描述各个控件的对齐方式
)
(2)void addLayout()
void addLayout
(QLayout *layout,             //表示需要插入的子布局对象int row,                     //插入的起始行inf column,                  //插入的起始列int rowSpan,                 //表示占用的行数int columnSpan,              //表示占用的列数Qt::Alignment alignment=0    //指定对齐方式
)
四、总结
QHBoxLayout 默认采取的是自左向右的方式顺序排列插入控件或子布局,也可通过调用 setDirection()方法设定排列的顺序 ( 如 layout->setDirection(QBoxLayout:: RightToLeft)修改为自右向左 )。QVBoxLayout 默认采取的是自上而下的方式顺序排列插入控件或子布局,也可通过调用setDirection()方法设定排列的顺序。