rk3588 之启动
目录
- uboot
- 版本
- 配置修改
- 编译
- linux
- 版本
- 配置修改
- 编译
- 启动
- sd卡启动制作
- spi 烧录
- 参考
uboot
版本
v2024.01-rc2
https://github.com/u-boot/u-boot
https://github.com/rockchip-linux/rkbin
配置修改
使用这两个配置即可:
orangepi-5-plus-rk3588_defconfig
rock5b-rk3588_defconfig
再设备树 XX-u-boot.dtsi 中添加 spi_nor ,用于 spi 启动
#include "rk3588-u-boot.dtsi"/ {aliases {mmc0 = &sdmmc;};chosen {u-boot,spl-boot-order = "same-as-spl", &spi_nor, &sdmmc;};
};&sfc {bootph-all;u-boot,spl-sfc-no-dma;#address-cells = <1>;#size-cells = <0>;status = "okay";spi_nor: flash@0 {bootph-pre-ram;compatible = "jedec,spi-nor";reg = <0>;spi-max-frequency = <24000000>;spi-rx-bus-width = <4>;spi-tx-bus-width = <1>;};
};
以下为 dts 设备树中添加 gmac0 用于 uboot 种使用网络,可参考 rk3588-evb1-v10.dts 文件,此处使用的 ksz9131
{aliases {mmc0 = &sdmmc;serial2 = &uart2;ethernet0 = &gmac0;};
}
&gmac0 {phy-handle = <&rgmii_phy>;phy-mode = "rgmii-rxid";pinctrl-0 = <&gmac0_miim&gmac0_tx_bus2&gmac0_rx_bus2&gmac0_rgmii_clk&gmac0_rgmii_bus>;pinctrl-names = "default";rxc-skew-ps = <1800>;rxdv-skew-ps = <0>;txc-skew-ps = <1800>;txen-skew-ps = <0>;status = "okay";
};&mdio0 {rgmii_phy: ethernet-phy@1 {reg = <0x1>;pinctrl-names = "default";pinctrl-0 = <&phy_rst>;reset-assert-us = <20000>;reset-deassert-us = <100000>;reset-gpios = <&gpio2 RK_PC4 GPIO_ACTIVE_LOW>;};
};&pinctrl {ksz9131 {phy_rst: phy-rst {rockchip,pins = <2 RK_PC4 RK_FUNC_GPIO &pcfg_pull_none>;};};
};
添加 CONFIG_ROCKCHIP_SPI_IMAGE 配置,会生成 u-boot-rockchip-spi.bin 文件,用于 spi 启动
编译
编译前,需先设置环境变量,不然会报错
export ROCKCHIP_TPL=../rkbin/bin/rk35/rk3588_ddr_lp4_2112MHz_lp5_2736MHz_v1.12.bin
export BL31=../rkbin/bin/rk35/rk3588_bl31_v1.40.elf

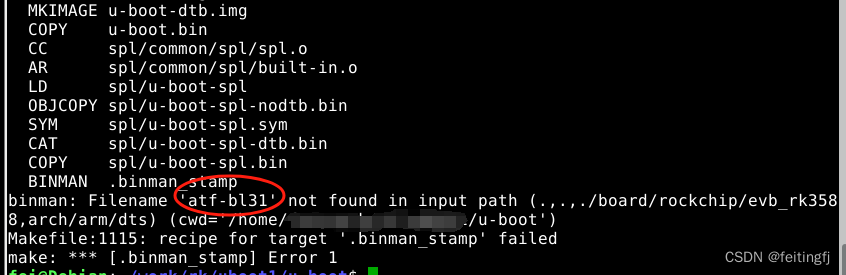
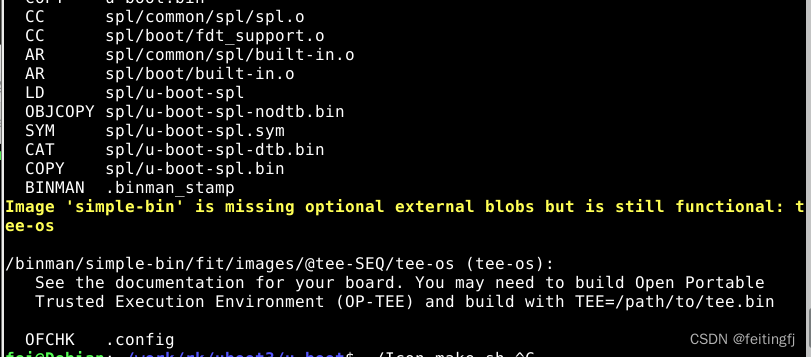
tee-os 无需设置,针对官方提供的 rk3588_bl32_v1.13.bin 文件,这里设置后反而会报错
使用编译命令
make CROSS_COMPILE=aarch64-linux-gnu- -j4
生成 idbloader.img、u-boot.itb、u-boot-rockchip-spi.bin、 u-boot-rockchip.bin 等文件
linux
版本
分支 orange-pi-5.10-rk35xx
https://github.com/orangepi-xunlong/linux-orangepi.git
配置修改
使用 rockchip_defconfig 文件配置即可,其他根据需求增减
使用 rk3588-orangepi-5-plus.dts 设备树,根据实际情况增减,以下为打印串口添加
&uart2 {status = "okay";pinctrl-names = "default";pinctrl-0 = <&uart2m0_xfer>;
};
编译
make ARCH=arm64 CROSS_COMPILE=aarch64-linux-gnu- menuconfig
make ARCH=arm64 CROSS_COMPILE=aarch64-linux-gnu- -j4
启动
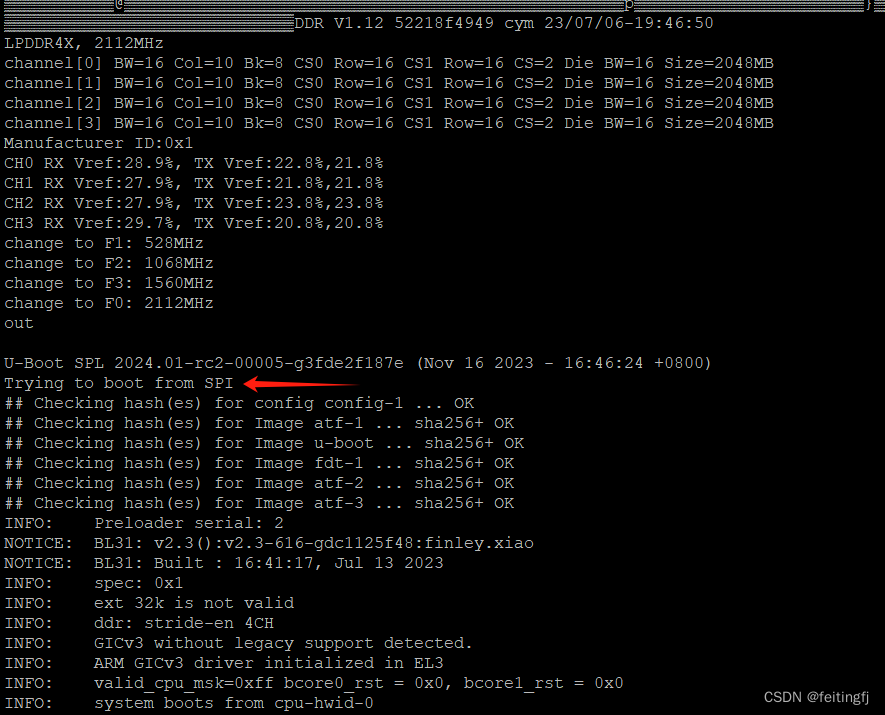
rk3588 启动方式如下:
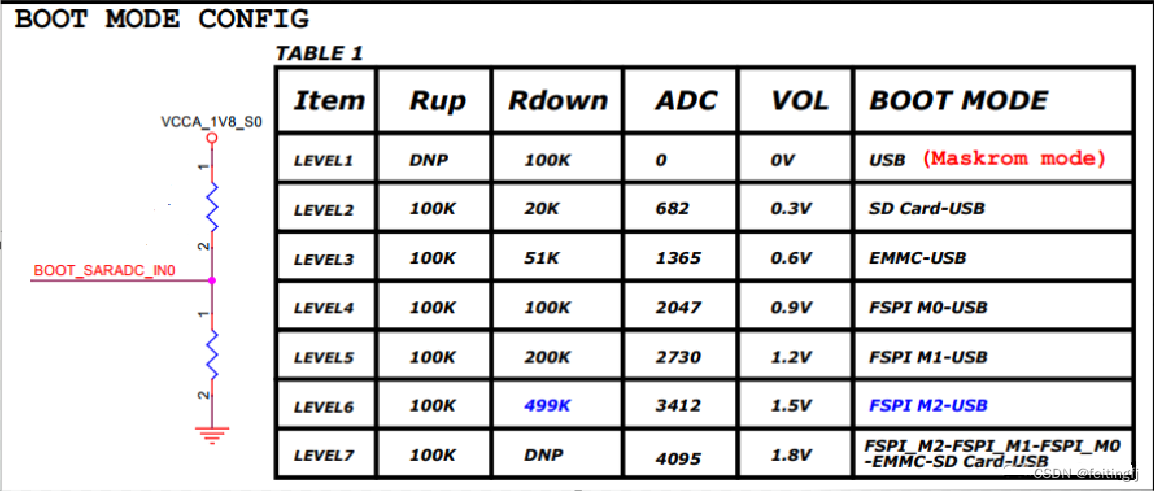
采用 LEVEL7 模式, 100K 上拉,可自动进行多种启动识别
可先使用 sd 卡启动,后可针对其他进行烧录;也可用 usb 驱动,使用 瑞芯微官方软件烧录
sd卡启动制作
将 tf 卡分成 4 个区:
sudo sgdisk -z -og /dev/sdb
sudo sgdisk --resize-table=128 -a 1 \-n 1:64:16383 -c 1:idbloader  \-n 2:16384:32767 -c 2:uboot \-n 3:32768:163839 -c 3:boot \-n 4:163840: -c 4:rootfs \-p /dev/sdb
将u-boot 生成的 idbloader.img 与 u-boot.itb 写入到 sd 卡的 1 和 2 分区
sudo dd if=idbloader.img of=/dev/sdb1 bs=512
sudo dd if=u-boot.itb of=/dev/sdb2 bs=512
同时,可以将 3分区格式化成 FAT32 模式,将设备树、内核等放进里面用于启动,或者通过 tftpboot 启动。
mmc dev 0 && load mmc 0:3 0x02080000 Image.gz &&load mmc 0:3 0x0a100000 rk3588-orangepi-5-plus.dtb&&load mmc 0:3 0x0a200000 uramdisk.image.gz&&setenv bootargs "root=/dev/ram0 rw init=/linuxrc console=ttyS2,1500000 " && booti 0x02080000 0x0a200000 0x0a100000
格式化 4分区,格式为 ext4 , 用于存放文件系统,启动命令
mmc dev 0
load mmc 0:3 0x02080000 Image.gz
load mmc 0:3 0x0a100000  rk3588-orangepi-5-plus.dtb
setenv bootargs "root=/dev/mmcblk0p4 rw rootfstype=ext4 rootwait init=/sbin/init console=ttyS2,1500000"
booti 0x02080000 - 0x0a100000
spi 烧录
spi 通过 tftp 加载进行烧录,先配置 ip,而后加载 bin 文件,最后写入
setenv ipaddr 192.168.1.100
setenv serverip 192.168.1.163
tftpboot 0x02080000 u-boot-rockchip-spi.bin
sf probe 5:0 8000000 0
sf update 0x02080000 0 ${filesize}
烧录完成重启即可
参考
http://www.orangepi.cn/orangepiwiki/index.php/Orange_Pi_5_Plus
https://blog.csdn.net/qq_41544116/article/details/131863063
https://www.cnblogs.com/yangdinshan/p/17592105.html
https://opensource.rock-chips.com/wiki_Boot_option
https://gitlab.collabora.com/hardware-enablement/rockchip-3588/notes-for-rockchip-3588/-/blob/main/upstream_uboot.md
https://github.com/axlrose/rkdocs