go原生http开发简易blog(一)项目简介与搭建
文章目录
- 一、项目简介
- 二、项目搭建前置知识
- 三、首页- - -前端文件与后端结构体定义
- 四、配置文件加载
- 五、构造假数据- - -显示首页内容
代码地址:https://gitee.com/lymgoforIT/goblog
一、项目简介
使用Go原生http开发一个简易的博客系统,包含一下功能:
- 文章增删改查,文章列表分页显示
- 评论系统
- 文章分类、归档
学习本项目能学到什么?
- 使用Go开发web项目基本思路,初步具有工程思维,如路由分组、目录组织,代码封装等。
- 博客基本功能开发套路,如博客与评论的查询、分类、归档、分页等。
循序渐进,掌握编程思维和思路。这一点是最重要的,会不断优化代码,而不是一步给出最终代码,这样更能培养编程思维和思路。
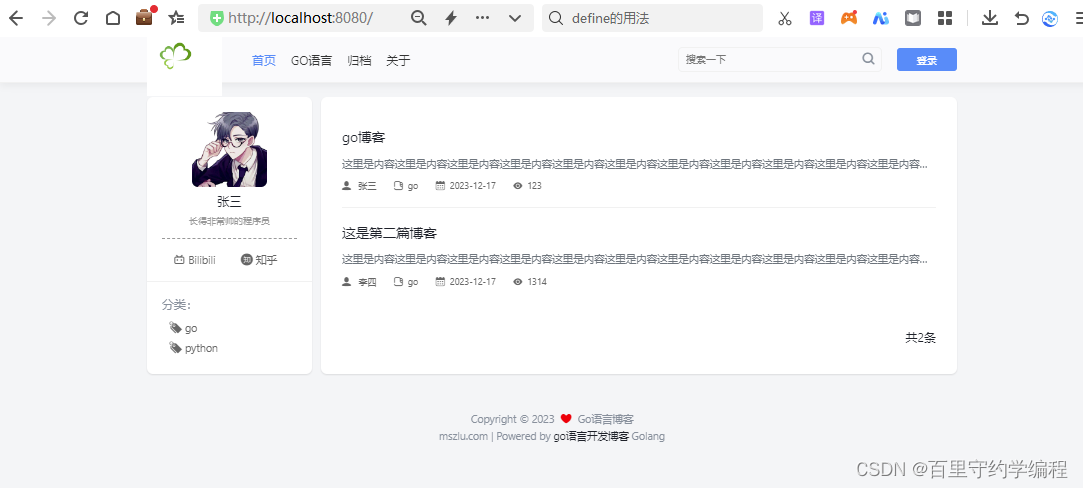
页面效果

二、项目搭建前置知识
接下来,我们会一步一步实现博客首页,开始我们可能会把代码都写到main.go中,后期再不断调整,优化,形成工程化的目录结构。
首先是启动一个http服务的代码,如下:
package mainimport ("log""net/http"
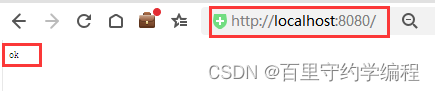
)func main(){server := http.Server{Addr: "127.0.0.1:8080",}http.HandleFunc("/", func(writer http.ResponseWriter, request *http.Request) {writer.Write([]byte("ok"))})if err := server.ListenAndServe();err != nil {log.Println(err)}
}启动后,浏览器访问,可以看到ok字样
这里返回给前端的不过是一个字符串而已,实际工作中一般前后端交互都是使用的JSON数据或者protoc协议的,那么想要返回JSON字符串给前端,又该如何做呢?
其实也简单,设置好请求头即可,如下:
package mainimport ("encoding/json""log""net/http"
)type IndexData struct {Title string `json:"title"`Desc  string `json:"desc"`
}func index(w http.ResponseWriter, r *http.Request) {// 设置请求头,指明返回的是JSON数据w.Header().Set("Content-Type", "application/json")var indexData IndexDataindexData.Title = "go博客"indexData.Desc = "入门学习笔记"jsonStr, _ := json.Marshal(indexData)w.Write(jsonStr)
}func main() {server := http.Server{Addr: "127.0.0.1:8080",}http.HandleFunc("/", index)if err := server.ListenAndServe(); err != nil {log.Println(err)}
}
目前浏览器得到的响应结果都是后端直接返回的数据,但我们前端是给用户使用的,需要有一定页面才行。
在Go中渲染html页面,可以使用Go自带的html/template库,使用方式如下:
首先建立template/index.html文件
<!DOCTYPE html>
<html lang="en">
<head><meta charset="UTF-8"><title>Title</title>
</head>
<body>
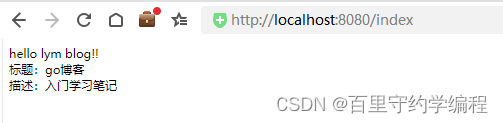
hello lym blog!!
<br>
标题:{{.Title}}
<br>
描述:{{.Desc}}
</body>
</html>
package mainimport ("encoding/json""fmt""html/template""log""net/http""os"
)type IndexData struct {Title string `json:"title"`Desc  string `json:"desc"`
}func index(w http.ResponseWriter, r *http.Request) {// 设置请求头,指明返回的是JSON数据w.Header().Set("Content-Type", "application/json")var indexData IndexDataindexData.Title = "go博客"indexData.Desc = "入门学习笔记"jsonStr, _ := json.Marshal(indexData)w.Write(jsonStr)
}func indexHtml(w http.ResponseWriter, r *http.Request) {// 使用给定的名字分配一个html模板t := template.New("index.html")viewPath, _ := os.Getwd()// 将html文件关联到模板上t, _ = t.ParseFiles(viewPath + "/template/index.html")var indexData IndexDataindexData.Title = "go博客"indexData.Desc = "入门学习笔记"// 使用给定的数据结构解析模板,并将结果写入werr := t.Execute(w, indexData)fmt.Println(err)
}func main() {server := http.Server{Addr: "127.0.0.1:8080",}http.HandleFunc("/", index)http.HandleFunc("/index", indexHtml)if err := server.ListenAndServe(); err != nil {log.Println(err)}
}此时访问index路径,便会看到是页面展示了,不过还没有css,js等静态文件渲染,后期会慢慢加上。
三、首页- - -前端文件与后端结构体定义
有了前面的基础知识,我们现在就可以搭建首页啦!
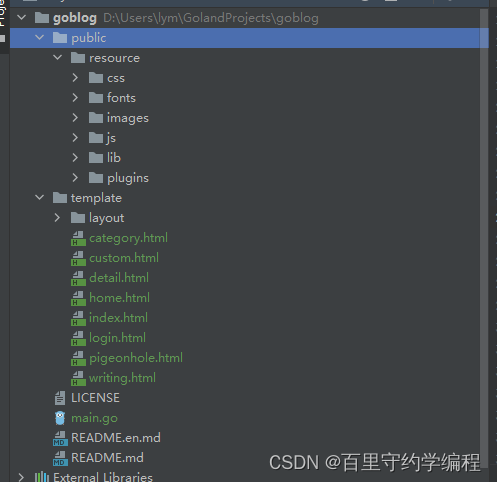
因为本学习笔记主要注重的是后端逻辑,所以前端页面和静态文件等是直接用的已有的,放到项目目录下即可。如果有需要,可以到码云上取:https://gitee.com/lymgoforIT/goblog
首页展示时,有很多数据是从后端获取的,所以我们首先需要定义一些结构体,用于数据渲染,其中有一些通用数据,且基本不怎么变的,我们可以放到配置文件中,而不用存DB,比如博客系统的标题、标签以及相关系统变量等。
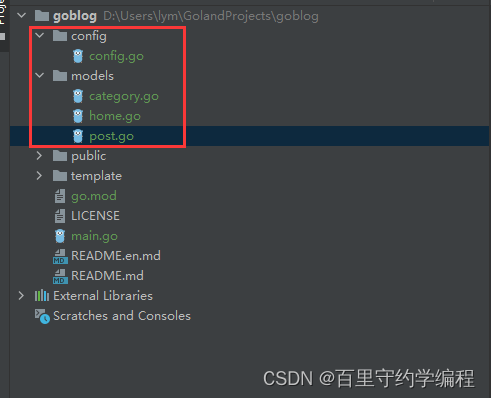
config/config.go
package configtype Viewer struct {Title       string   // 首页标题Description string   // 首页描述Logo        string   // 博客系统logoNavigation  []string // 导航栏Bilibili    string   // bilibiliAvatar      string   // 头像UserName    string   // 用户名UserDesc    string   // 用户描述
}// 系统相关配置
type SystemConfig struct {AppName         stringVersion         float32CurrentDir      string // 项目路径CdnURL          string // cdn地址,用户缓存静态资源QiniuAccessKey  string // 使用七牛云存储图片资源QiniuSecretKey  stringValine          bool // 评论系统用的ValineValineAppid     stringValineAppkey    stringValineServerURL string
}其余数据基本是从DB获取的,与DB交互的结构体,我们一般会单独建立model文件夹存放。
models/post.go
package modelsimport ("goblog/config""html/template""time"
)// 用于与DB交互,与DB中字段一一对应
type Post struct {Pid        int       `json:"pid"`        // 文章IDTitle      string    `json:"title"`      // 文章标题Slug       string    `json:"slug"`       // 自定义页面 pathContent    string    `json:"content"`    // 文章的htmlMarkdown   string    `json:"markdown"`   // 文章的MarkdownCategoryId int       `json:"categoryId"` //分类idUserId     int       `json:"userId"`     //用户idViewCount  int       `json:"viewCount"`  //查看次数Type       int       `json:"type"`       //文章类型 0 普通,1 自定义文章CreateAt   time.Time `json:"createAt"`   // 创建时间UpdateAt   time.Time `json:"updateAt"`   // 更新时间
}// 用于给前端响应,所以有了分类名称和用户名等信息,而不是分类id或者用户id
type PostMore struct {Pid          int           `json:"pid"`          // 文章IDTitle        string        `json:"title"`        // 文章标题Slug         string        `json:"slug"`         // 自定义页面 pathContent      template.HTML `json:"content"`      // 文章的htmlCategoryId   int           `json:"categoryId"`   // 文章的MarkdownCategoryName string        `json:"categoryName"` // 分类名UserId       int           `json:"userId"`       // 用户idUserName     string        `json:"userName"`     // 用户名ViewCount    int           `json:"viewCount"`    // 查看次数Type         int           `json:"type"`         // 文章类型 0 普通,1 自定义文章CreateAt     string        `json:"createAt"`UpdateAt     string        `json:"updateAt"`
}type PostReq struct {Pid        int    `json:"pid"`Title      string `json:"title"`Slug       string `json:"slug"`Content    string `json:"content"`Markdown   string `json:"markdown"`CategoryId int    `json:"categoryId"`UserId     int    `json:"userId"`Type       int    `json:"type"`
}type SearchResp struct {Pid   int    `orm:"pid" json:"pid"` // 文章IDTitle string `orm:"title" json:"title"`
}type PostRes struct {config.Viewerconfig.SystemConfigArticle PostMore
}
models/home.go
用于封装前端需要的首页数据
package modelsimport "goblog/config"type HomeResponse struct {config.ViewerCategorys []CategoryPosts     []PostMoreTotal     intPage      intPages     []intPageEnd   bool // 当前页是否是最后一页,决定分页那里是否显示左右箭头
}
四、配置文件加载
这里配置文件我们用的toml,实际工作中可能yaml用的更多一点。
config/config.toml
[viewer]Title = "Go语言博客"Description = "Go语言博客"Logo = "/resource/images/logo.png"Navigation = ["首页","/", "GO语言","/golang", "归档","/pigeonhole", "关于","/about"]Bilibili = "https://space.bilibili.com/473844125"Zhihu = "https://www.zhihu.com/people/ma-shen-zhi-lu"Avatar = "https://gimg2.baidu.com/image_search/src=http%3A%2F%2Finews.gtimg.com%2Fnewsapp_bt%2F0%2F13147603927%2F1000.jpg&refer=http%3A%2F%2Finews.gtimg.com&app=2002&size=f9999,10000&q=a80&n=0&g=0n&fmt=jpeg?sec=1647242040&t=c6108010ed46b4acebe18955acdd2d24"UserName = "张三"UserDesc = "长得非常帅的程序员"
[system]CdnURL = "https://static.mszlu.com/goblog/es6/md-assets"QiniuAccessKey = "替换自己的"QiniuSecretKey = "替换自己的"Valine = trueValineAppid = "替换自己的"ValineAppkey = "替换自己的"ValineServerURL = "替换自己的"
toml文件我们可以使用github.com/BurntSushi/toml包,获取
go get github.com/BurntSushi/toml
配置文件加载,常规套路是定义全局变量,使用init加载
config/config.go
package configimport ("os""github.com/BurntSushi/toml"
)var Cfg *TomlConfigfunc init() {Cfg = new(TomlConfig)var err errorCfg.System.CurrentDir, err = os.Getwd()if err != nil {panic(any(err))}Cfg.System.AppName = "lym-go-blog"Cfg.System.Version = 1.0_, err = toml.DecodeFile("config/config.toml", &Cfg)if err != nil {panic(any(err))}
}type TomlConfig struct {Viewer ViewerSystem SystemConfig
}type Viewer struct {Title       string   // 首页标题Description string   // 首页描述Logo        string   // 博客系统logoNavigation  []string // 导航栏Bilibili    string   // bilibiliAvatar      string   // 头像UserName    string   // 用户名UserDesc    string   // 用户描述
}// 系统相关配置
type SystemConfig struct {AppName         stringVersion         float32CurrentDir      string // 项目路径CdnURL          string // cdn地址,用户缓存静态资源QiniuAccessKey  string // 使用七牛云存储图片资源QiniuSecretKey  stringValine          bool // 评论系统用的ValineValineAppid     stringValineAppkey    stringValineServerURL string
}
五、构造假数据- - -显示首页内容
main.go
注意看代码注释
package mainimport ("goblog/config""goblog/models""html/template""log""net/http""time"
)type IndexData struct {Title string `json:"title"`Desc  string `json:"desc"`
}// 前端html页面中使用了一些函数,所以这里需要定义一下
// 是否偶数
func IsODD(num int) bool {return num%2 == 0
}func GetNextName(strs []string, index int) string {return strs[index+1]
}// 日期按指定格式转换
func Date(layout string) string {return time.Now().Format(layout)
}func index(w http.ResponseWriter, r *http.Request) {t := template.New("index.html")// 拿到当前的路径path := config.Cfg.System.CurrentDir//访问博客首页模板的时候,因为有多个模板的嵌套,解析文件的时候,需要将其涉及到的所有模板都进行解析home := path + "/template/home.html"header := path + "/template/layout/header.html"footer := path + "/template/layout/footer.html"personal := path + "/template/layout/personal.html"post := path + "/template/layout/post-list.html"pagination := path + "/template/layout/pagination.html" // 页码// 定义模板中需要用到的函数t.Funcs(template.FuncMap{"isODD": IsODD, "getNextName": GetNextName, "date": Date})t, err := t.ParseFiles(path+"/template/index.html", home, header, footer, personal, post, pagination)if err != nil {log.Println(err)}//页面上涉及到的所有的数据,必须有定义var categorys = []models.Category{{Cid:  1,Name: "go",},{Cid:  2,Name: "python",},}var posts = []models.PostMore{{Pid:          1,Title:        "go博客",Content:      "这里是内容这里是内容这里是内容这里是内容这里是内容这里是内容这里是内容这里是内容这里是内容这里是内容这里是内容这里是内容这里是内容这里是内容这里是内容这里是内容这里是内容这里是内容这里是内容这里是内容",UserName:     "张三",ViewCount:    123,CreateAt:     "2023-12-17",CategoryId:   1,CategoryName: "go",Type:         0,},{Pid:          2,Title:        "这是第二篇博客",Content:      "这里是内容这里是内容这里是内容这里是内容这里是内容这里是内容这里是内容这里是内容这里是内容这里是内容这里是内容这里是内容这里是内容这里是内容这里是内容这里是内容这里是内容这里是内容这里是内容这里是内容",UserName:     "李四",ViewCount:    1314,CreateAt:     "2023-12-17",CategoryId:   1,CategoryName: "go",Type:         0,},}var hr = &models.HomeResponse{Viewer:    config.Cfg.Viewer,Categorys: categorys,Posts:     posts,Total:     2,Page:      1,Pages:     []int{1},PageEnd:   true,}t.Execute(w, hr)
}func main() {//程序入口,一个项目 只能有一个入口//web程序,http协议 ip portserver := http.Server{Addr: "127.0.0.1:8080",}http.HandleFunc("/", index)// 因为静态文件放到了public/resource目录下,但是页面中写路径的时候都写的resource,所以这里转一下http.Handle("/resource/", http.StripPrefix("/resource/", http.FileServer(http.Dir("public/resource/"))))if err := server.ListenAndServe(); err != nil {log.Println(err)}
}此时通过流量器访问8080端口,便可看到如下界面了