如何快速搭建一个大模型?简单的UI实现

🔥博客主页:真的睡不醒
🚀系列专栏:深度学习环境搭建、环境配置问题解决、自然语言处理、语音信号处理、项目开发
💘每日语录:相信自己,一路风景一路歌,人生之美,正在于此。
🎉感谢大家点赞👍收藏⭐指正✍️

前言:本文章纯属是自己无聊,调用了星火认知大模型的接口,并封装成一个脚本。但测试感觉星火认知大模型也不算太智能,但奈何人家提供了免费的token,当然,也可以根据自己的需要,去调用国内的一些大模型。
目录
一、申请免费的token
二、设置UI界面
三、运行效果
四、封装成exe文件
一、申请免费的token
这里我使用的是星火认知大模型,前往官网:星火认知大模型
网上有很多的教程,这里不再赘述。
申请后,你需要保存的有三个
① appid
② api_secret
③ api_key
二、设置UI界面
需要用到wxpython:GUI图形库,网上有很多安装wxpython的教程,这里不再赘述。
wxpython依赖的whl文件(网上下载很慢,cp36对应python3.6):下载地址

这里我直接把UI界面的代码附上。
需要更改① appid ②api_secret ③ api_key
import tkinter as tk
from tkinter import scrolledtext, filedialog, messagebox
import SparkApiclass ChatApp:def __init__(self, master):self.master = mastermaster.title("是dream-星火大模型UI界面")self.dialog_text = scrolledtext.ScrolledText(self.master, wrap=tk.WORD, width=50, height=20, font=("Microsoft YaHei UI", 12))self.dialog_text.grid(row=0, column=0, padx=10, pady=10, sticky="nsew")self.dialog_text.grid_propagate(False)  # 阻止自动调整大小self.label_input = tk.Label(self.master, text="请您在下方输入:", font=("Microsoft YaHei UI", 12))self.label_input.grid(row=1, column=0, padx=3, pady=3, sticky="w")input_frame = tk.Frame(master)input_frame.grid(row=2, column=0, pady=10, sticky="nsew")input_frame.grid_columnconfigure(0, weight=3)self.input_entry = tk.Entry(input_frame, bd=2, relief=tk.GROOVE, font=("Microsoft YaHei UI", 12),borderwidth=4, highlightthickness=1, width=20)self.input_entry.grid(row=0, column=0, padx=10, pady=10, sticky="nsew")self.input_entry.grid_propagate(False)  # 阻止自动调整大小self.input_entry.bind("<Return>", self.send_on_enter)button_frame = tk.Frame(master)button_frame.grid(row=3, column=0, pady=10, sticky="nsew")self.send_button = tk.Button(button_frame, text="发送", command=self.send_message,font=("Microsoft YaHei UI", 12))self.send_button.grid(row=0, column=0, padx=5, sticky="nsew")self.file_button = tk.Button(button_frame, text="选择文本", command=self.load_file,font=("Microsoft YaHei UI", 12))self.file_button.grid(row=0, column=1, padx=5, sticky="nsew")self.save_button = tk.Button(button_frame, text="保存对话内容", command=self.save_to_text, font=("Microsoft YaHei UI", 12))self.save_button.grid(row=0, column=2, padx=5, sticky="nsew")button_frame.grid_columnconfigure(0, weight=1)button_frame.grid_columnconfigure(1, weight=1)button_frame.grid_columnconfigure(2, weight=1)master.grid_rowconfigure(0, weight=1)master.grid_rowconfigure(1, weight=0)master.grid_rowconfigure(3, weight=1)master.grid_columnconfigure(0, weight=1)initial_text = "提前告诉星火大模型的内容,让其更关注你问的方向。"# sparkAPI(initial_text)   # 如果要提前送内容给模型,请取消注释self.dialog_text.insert(tk.END,"你好!作者:“是dream”!CSDN主页:https://blog.csdn.net/qq_63159704?spm=1000.2115.3001.5343\n\n")def send_on_enter(self, event):self.send_message()def send_message(self):user_input = self.input_entry.get()if user_input.strip():assistant_response = sparkAPI(user_input)self.dialog_text.insert(tk.END, f"你: {user_input}\n")self.dialog_text.insert(tk.END, f"星火: {assistant_response}\n")self.input_entry.delete(0, tk.END)self.dialog_text.see(tk.END)else:messagebox.showinfo("提示", "请输入消息!")def load_file(self):file_path = filedialog.askopenfilename(filetypes=[("Text files", "*.txt"), ("All files", "*.*")])if file_path:with open(file_path, 'r', encoding='utf-8') as file:content = file.read()self.input_entry.insert(tk.END, content)def save_to_text(self):content = self.dialog_text.get("1.0", tk.END)file_path = filedialog.asksaveasfilename(defaultextension=".txt", filetypes=[("Text files", "*.txt"), ("All files", "*.*")])if file_path:with open(file_path, 'w', encoding='utf-8') as file:file.write(content)messagebox.showinfo("保存成功", "对话内容已保存为文本文件!")def sparkAPI(input_text):text.clear()questions = checklen(getText("user", input_text))SparkApi.answer = ""SparkApi.main(appid, api_key, api_secret, Spark_url, domain, questions)assistant_answer = SparkApi.answertext.append({"role": "assistant", "content": assistant_answer})return assistant_answerdef getText(role, content):jsoncon = {"role": role, "content": content}text.append(jsoncon)return textdef getlength(text):length = 0for content in text:temp = content["content"]leng = len(temp)length += lengreturn lengthdef checklen(text):while getlength(text) > 8000:del text[0]return textif __name__ == "__main__":appid = ""api_secret = ""api_key = ""domain = "generalv2"Spark_url = "ws://spark-api.xf-yun.com/v2.1/chat"text = []root = tk.Tk()root.geometry("800x750")chat_app = ChatApp(root)root.mainloop()
还需要在相同目录下创建一个 SparkApi.py文件,并将下面的代码复制进去。
import _thread as thread
import base64
import datetime
import hashlib
import hmac
import json
from urllib.parse import urlparse
import ssl
from datetime import datetime
from time import mktime
from urllib.parse import urlencode
from wsgiref.handlers import format_date_timeimport websocket  # 使用websocket_clientanswer = ""class Ws_Param(object):# 初始化def __init__(self, APPID, APIKey, APISecret, Spark_url):self.APPID = APPIDself.APIKey = APIKeyself.APISecret = APISecretself.host = urlparse(Spark_url).netlocself.path = urlparse(Spark_url).pathself.Spark_url = Spark_url# 生成urldef create_url(self):# 生成RFC1123格式的时间戳now = datetime.now()date = format_date_time(mktime(now.timetuple()))# 拼接字符串signature_origin = "host: " + self.host + "\n"signature_origin += "date: " + date + "\n"signature_origin += "GET " + self.path + " HTTP/1.1"# 进行hmac-sha256进行加密signature_sha = hmac.new(self.APISecret.encode('utf-8'), signature_origin.encode('utf-8'),digestmod=hashlib.sha256).digest()signature_sha_base64 = base64.b64encode(signature_sha).decode(encoding='utf-8')authorization_origin = f'api_key="{self.APIKey}", algorithm="hmac-sha256", headers="host date request-line", signature="{signature_sha_base64}"'authorization = base64.b64encode(authorization_origin.encode('utf-8')).decode(encoding='utf-8')# 将请求的鉴权参数组合为字典v = {"authorization": authorization,"date": date,"host": self.host}# 拼接鉴权参数,生成urlurl = self.Spark_url + '?' + urlencode(v)# 此处打印出建立连接时候的url,参考本demo的时候可取消上方打印的注释,比对相同参数时生成的url与自己代码生成的url是否一致return url# 收到websocket错误的处理
def on_error(ws, error):print("### error:", error)# 收到websocket关闭的处理
def on_close(ws, one, two):print(" ")# 收到websocket连接建立的处理
def on_open(ws):thread.start_new_thread(run, (ws,))def run(ws, *args):data = json.dumps(gen_params(appid=ws.appid, domain=ws.domain, question=ws.question))ws.send(data)# 收到websocket消息的处理
def on_message(ws, message):# print(message)data = json.loads(message)code = data['header']['code']if code != 0:print(f'请求错误: {code}, {data}')ws.close()else:choices = data["payload"]["choices"]status = choices["status"]content = choices["text"][0]["content"]print(content, end="")global answeranswer += content# print(1)if status == 2:ws.close()def gen_params(appid, domain, question):"""通过appid和用户的提问来生成请参数"""data = {"header": {"app_id": appid,"uid": "1234"},"parameter": {"chat": {"domain": domain,"temperature": 0.5,"max_tokens": 2048}},"payload": {"message": {"text": question}}}return datadef main(appid, api_key, api_secret, Spark_url, domain, question):# print("星火:")wsParam = Ws_Param(appid, api_key, api_secret, Spark_url)websocket.enableTrace(False)wsUrl = wsParam.create_url()ws = websocket.WebSocketApp(wsUrl, on_message=on_message, on_error=on_error, on_close=on_close, on_open=on_open)ws.appid = appidws.question = questionws.domain = domainws.run_forever(sslopt={"cert_reqs": ssl.CERT_NONE})
注意:调用星火大模型用到的是 websocket == 0.57.0,如果websocket的错,请更改版本。
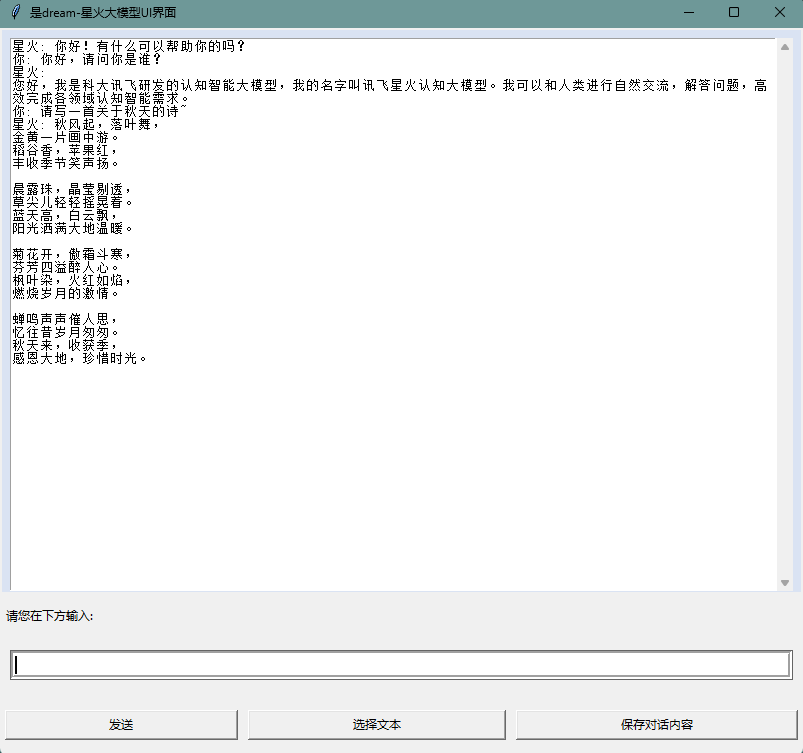
三、运行效果
效果如下:

四、封装成exe文件
这里用到的是pyinstaller进行封装,运行以下代码进行安装:
pip install pyinstaller运行下代码进行封装:
pyinstaller -F -w GUI.py在`GUI.py`相同目录下会新增`dist`文件夹,内部放有`GUI.exe`文件。 GUI.py就是UI界面的代码,封装前,请保证代码能够正常运行。
这样,你就可以将这个exe文件发送给你的好盆友,无需配置环境就可以对话。


🚀🚀🚀感谢关注我的CSDN博客,更多小技巧,请持续关注!
