【axios】拦截器:axios.interceptors.request.use|axios.interceptors.response.use
文章目录
- 概述
- 设置拦截器
- Axios 拦截器的实现
- 任务注册
- 任务编排
- 任务调度
- 来源
概述
axios有请求拦截器(request)、响应拦截器(response)、axios自定义回调处理(这里就是我们常用的地方,会将成功和失败的回调函数写在这里)
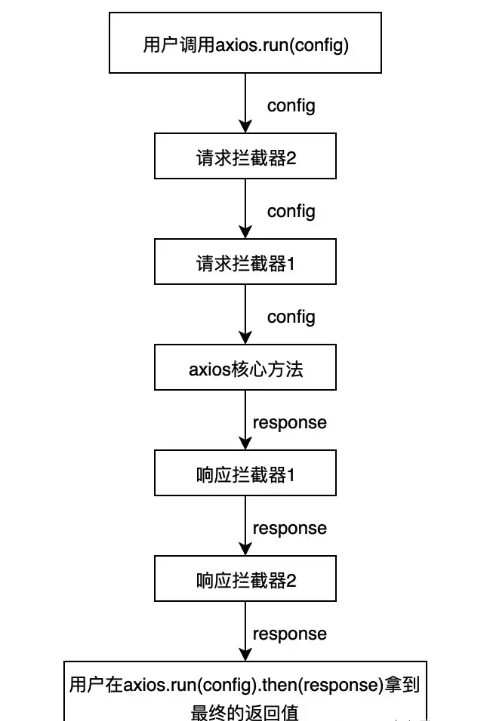
执行顺序: 请求拦截器 -> api请求 -> 响应拦截器->自定义回调。 axios实现这个拦截器机制如下:

假设我们定义了 请求拦截器1号(r1)、请求拦截器2号(r2)、响应拦截器1号(s1)、响应拦截器2号(s2)、自定义回调处理函数(my)
那么执行结果是:r2 r1 s1 s2 my
设置拦截器
在 Axios 中设置拦截器很简单,通过 axios.interceptors.request 和 axios.interceptors.response 对象提供的 use 方法,就可以分别设置请求拦截器和响应拦截器:
axios.interceptors.request.use(function (config) {config.headers.token = 'added by interceptor';return config;
});// 添加响应拦截器 —— 处理响应对象
axios.interceptors.response.use(function (data) {data.data = data.data + ' - modified by interceptor';return data;
});axios({url: '/hello',method: 'get',
}).then(res =>{console.log('axios res.data: ', res.data)
})
Axios 拦截器的实现
任务注册
要搞清楚任务是如何注册的,就需要了解 axios 和 axios.interceptors 对象。
/*** Create an instance of Axios** @param {Object} defaultConfig The default config for the instance* @return {Axios} A new instance of Axios*/
function createInstance(defaultConfig) {var context = new Axios(defaultConfig);var instance = bind(Axios.prototype.request, context);// Copy axios.prototype to instanceutils.extend(instance, Axios.prototype, context);// Copy context to instanceutils.extend(instance, context);return instance;
}// Create the default instance to be exported
var axios = createInstance(defaults);// Expose Axios class to allow class inheritance
axios.Axios = Axios;
bind函数:
module.exports = function bind(fn, thisArg) {return function wrap() {var args = new Array(arguments.length);for (var i = 0; i < args.length; i++) {args[i] = arguments[i];}return fn.apply(thisArg, args);};
};
在 Axios 的源码中,我们找到了 axios 对象的定义,很明显默认的 axios 实例是通过 createInstance 方法创建的,该方法最终返回的是Axios.prototype.request 函数对象。同时,我们发现了 Axios的构造函数:
/*** Create a new instance of Axios** @param {Object} instanceConfig The default config for the instance*/
function Axios(instanceConfig) {this.defaults = instanceConfig;this.interceptors = {request: new InterceptorManager(),response: new InterceptorManager()};
}
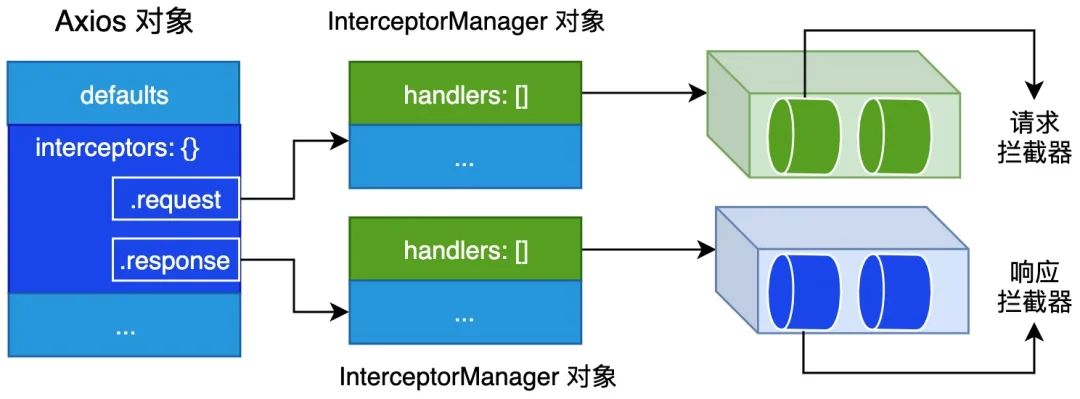
在构造函数中,我们找到了 axios.interceptors 对象的定义,也知道了 interceptors.request 和 interceptors.response 对象都是 InterceptorManager 类的实例。因此接下来,进一步分析InterceptorManager 构造函数及相关的 use 方法就可以知道任务是如何注册的:
function InterceptorManager() {this.handlers = [];
}/*** Add a new interceptor to the stack** @param {Function} fulfilled The function to handle `then` for a `Promise`* @param {Function} rejected The function to handle `reject` for a `Promise`** @return {Number} An ID used to remove interceptor later*/
InterceptorManager.prototype.use = function use(fulfilled, rejected) {this.handlers.push({fulfilled: fulfilled,rejected: rejected});return this.handlers.length - 1;
};
通过观察 use 方法,我们可知注册的拦截器都会被保存到 InterceptorManager 对象的 handlers 属性中。下面我们用一张图来总结一下 Axios 对象与 InterceptorManager 对象的内部结构与关系:

任务编排
现在我们已经知道如何注册拦截器任务,但仅仅注册任务是不够,我们还需要对已注册的任务进行编排,这样才能确保任务的执行顺序。这里我们把完成一次完整的 HTTP 请求分为处理请求配置对象、发起 HTTP 请求和处理响应对象 3 个阶段。
接下来我们来看一下 Axios 如何发请求的:
axios({url: '/hello',method: 'get',
}).then(res =>{console.log('axios res: ', res)console.log('axios res.data: ', res.data)
})
通过前面的分析,我们已经知道 axios 对象对应的是 Axios.prototype.request 函数对象,该函数的具体实现如下:
Axios.prototype.request = function request(config) {/*eslint no-param-reassign:0*/// Allow for axios('example/url'[, config]) a la fetch APIif (typeof config === 'string') {config = arguments[1] || {};config.url = arguments[0];} else {config = config || {};}config = mergeConfig(this.defaults, config);// Set config.methodif (config.method) {config.method = config.method.toLowerCase();} else if (this.defaults.method) {config.method = this.defaults.method.toLowerCase();} else {config.method = 'get';}// Hook up interceptors middlewarevar chain = [dispatchRequest, undefined];var promise = Promise.resolve(config);this.interceptors.request.forEach(function unshiftRequestInterceptors(interceptor) {//成对压入chain数组中,这里的成对是一个关键点,从代码处可以看出请求拦截器向chain中压入的时候使用的是unshift方法,也就是每次添加函数方法队都是从数组最前面添加,这也是为什么请求拦截器输出的时候是r2 r1。chain.unshift(interceptor.fulfilled, interceptor.rejected);});this.interceptors.response.forEach(function pushResponseInterceptors(interceptor) {//与unshift不同的是,push函数一直被push到最尾部,那么形成的就是s1 s2的顺序,这也就解释响应拦截器函数是顺序执行的了。chain.push(interceptor.fulfilled, interceptor.rejected);});while (chain.length) {promise = promise.then(chain.shift(), chain.shift());}return promise;
};
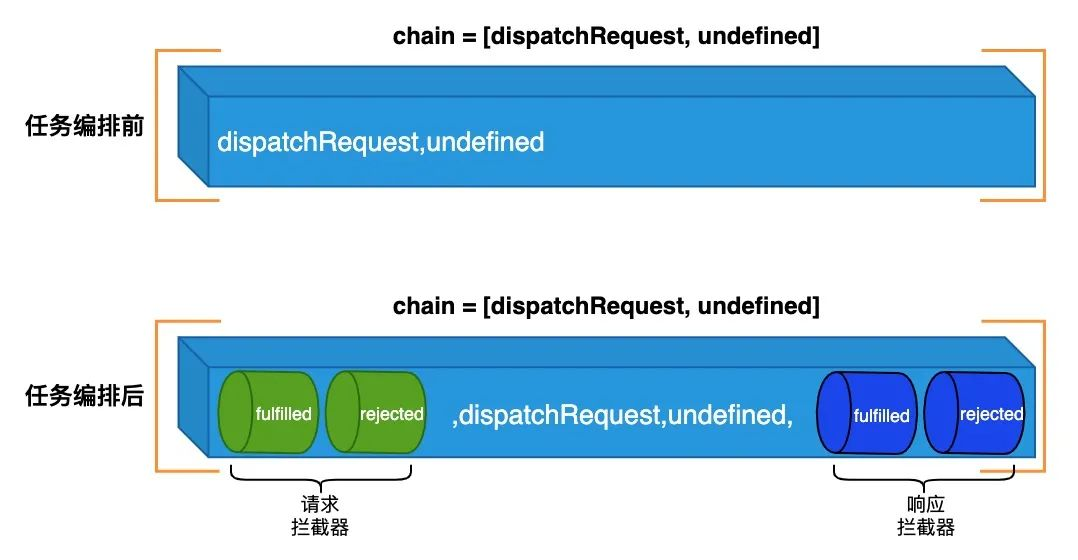
任务编排的代码比较简单,我们来看一下任务编排前和任务编排后的对比图:

任务调度
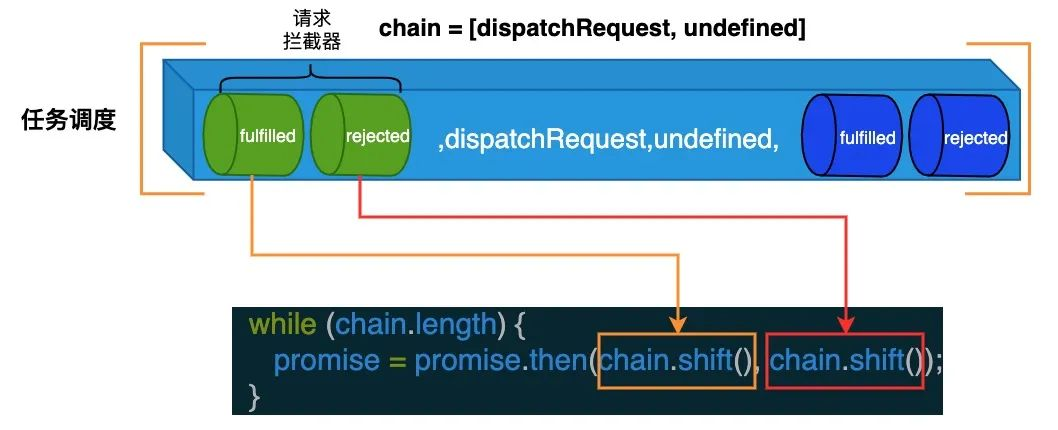
任务编排完成后,要发起 HTTP 请求,我们还需要按编排后的顺序执行任务调度。在 Axios 中具体的调度方式很简单,具体如下所示:
while (chain.length) {promise = promise.then(chain.shift(), chain.shift());}return promise;
因为 chain 是数组,所以通过 while 语句我们就可以不断地取出设置的任务,然后组装成 Promise 调用链从而实现任务调度,对应的处理流程如下图所示:

来源
浅谈axios.interceptors拦截器
axios 拦截器分析
axios部分工作原理及常见重要问题的探析:
