Ubuntu使用Nginx部署前端项目——记录
安装nginx
依次执行以下两条命令进行安装:
sudo apt-get update
sudo apt-get install nginx
通过查看版本号查看是否安装成功:
nginx -v
补充卸载操作:
sudo apt-get remove nginx nginx-common
sudo apt-get purge nginx nginx-common
sudo apt-get autoremove
sudo apt-get remove nginx-full nginx-common
补充Ubuntu的包管理器的用法:
sudo apt-get update:更新软件源
sudo apt-get upgrade:升级系统
sudo apt-get install package_name:安装软件包
sudo apt-get remove package_name:卸载软件包
sudo apt-get autoremove:自动清除无用依赖项
sudo apt-get purge package_name:卸载软件及其相关配置文件
nginx的配置文件
nginx的配置文件和静态资源文件分布位置:
/usr/sbin/nginx:主程序
/etc/nginx:存放配置文件(nginx.conf)
/usr/share/nginx:存放静态文件
/var/log/nginx:存放日志
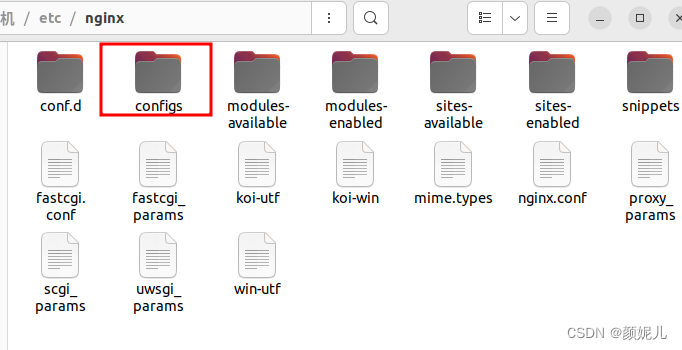
本次实验将配置文件放到/etc/nginx/configs下:
为了操作方便我将切换到了超级用户:
sudo su
cd /etc/nginx
mkdir configs
最初的/etc/nginx目录下的文件状态如下:

创建文件夹configs用于存放nginx的配置文件:
配置文件相关注释:
以下是学习项目的一个配置:
#user  nobody;
worker_processes  1;#error_log  logs/error.log;
#error_log  logs/error.log  notice;
#error_log  logs/error.log  info;#pid        logs/nginx.pid;events {worker_connections  1024;
}http {include       mime.types;default_type  application/octet-stream;#log_format  main  '$remote_addr - $remote_user [$time_local] "$request" '#                  '$status $body_bytes_sent "$http_referer" '#                  '"$http_user_agent" "$http_x_forwarded_for"';#access_log  logs/access.log  main;sendfile        on;#tcp_nopush     on;#keepalive_timeout  0;keepalive_timeout  65;#gzip  on;map $http_upgrade $connection_upgrade{default upgrade;'' close;}upstream webservers{server 127.0.0.1:8080 weight=90 ;#server 127.0.0.1:8088 weight=10 ;}server {listen       80;server_name  localhost;#charset koi8-r;#access_log  logs/host.access.log  main;location / {root   html/sky;index  index.html index.htm;}#error_page  404              /404.html;# redirect server error pages to the static page /50x.html#error_page   500 502 503 504  /50x.html;location = /50x.html {root   html;}# 反向代理,处理管理端发送的请求location /api/ {proxy_pass   http://localhost:8080/admin/;#proxy_pass   http://webservers/admin/;}# 反向代理,处理用户端发送的请求location /user/ {proxy_pass   http://webservers/user/;}# WebSocketlocation /ws/ {proxy_pass   http://webservers/ws/;proxy_http_version 1.1;proxy_read_timeout 3600s;proxy_set_header Upgrade $http_upgrade;proxy_set_header Connection "$connection_upgrade";}# pass the PHP scripts to FastCGI server listening on 127.0.0.1:9000##location ~ \.php$ {#    root           html;#    fastcgi_pass   127.0.0.1:9000;#    fastcgi_index  index.php;#    fastcgi_param  SCRIPT_FILENAME  /scripts$fastcgi_script_name;#    include        fastcgi_params;#}# deny access to .htaccess files, if Apache's document root# concurs with nginx's one##location ~ /\.ht {#    deny  all;#}}# another virtual host using mix of IP-, name-, and port-based configuration##server {#    listen       8000;#    listen       somename:8080;#    server_name  somename  alias  another.alias;#    location / {#        root   html;#        index  index.html index.htm;#    }#}# HTTPS server##server {#    listen       443 ssl;#    server_name  localhost;#    ssl_certificate      cert.pem;#    ssl_certificate_key  cert.key;#    ssl_session_cache    shared:SSL:1m;#    ssl_session_timeout  5m;#    ssl_ciphers  HIGH:!aNULL:!MD5;#    ssl_prefer_server_ciphers  on;#    location / {#        root   html;#        index  index.html index.htm;#    }#}}
创建并写入配置文件:
cd configs
touch test.conf
gedit test.conf
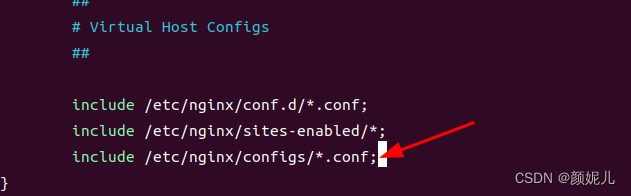
将我们添加的配置导入到nginx的配置中:
cd /etc/nginx
vim nginx.conf
添加:include /etc/nginx/configs/*.conf;
nginx相关命令
启动:
systemctl start nginx
停止:
systemctl stop nginx
重启:
systemctl reload nginx
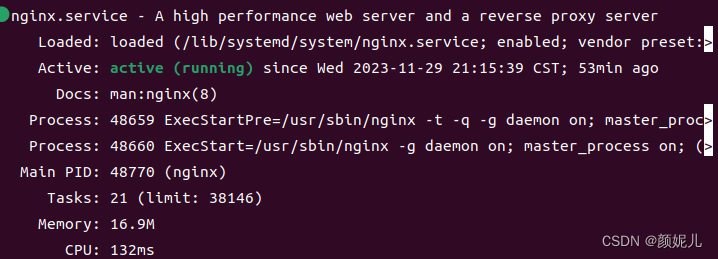
查看nginx的启停状态:(如果正常启动,会看到绿色的Runing)
systemctl status nginx
如:
访问localhost(默认80端口)

部署前端项目
我第二天重启nginx的时候,发现它报错如work_process,events相关的错误,应该是configs下的test.conf与/etc/nginx/nginx.conf中的内容发生了冲突,所以我直接将test.conf的内容(见上面)复制在nginx.conf中,才重启成功。
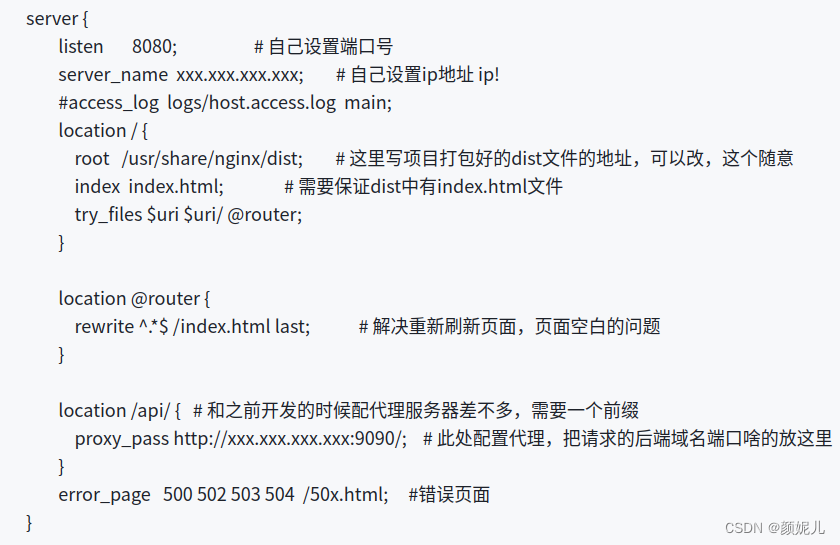
路径相关配置:在配置文件中将以下路径改为你自己的打包好后的前端代码所在路径:
location / {root /path/webcode;index index.html index.htm;}修改路径后,重启nginx。
按理说,这时我们访问localhost的时候就会访问前端代码的index文件。但是我的是403 Forbidden。
我修改了以下两个配置才能正常访问:
一、使nginx的启动用户和nginx的工作用户一致:
查看当前nginx的启动用户
ps aux|grep nginx

发现nginx的工作用户为nobody,所以再次修改配置文件中的启动文件:

再次查看:

二、修改用户对前端文件的访问权限:
chmod -R 755 /path/webcode

最后终于能正常访问了,暂时就踩了这些坑,完美撒花~