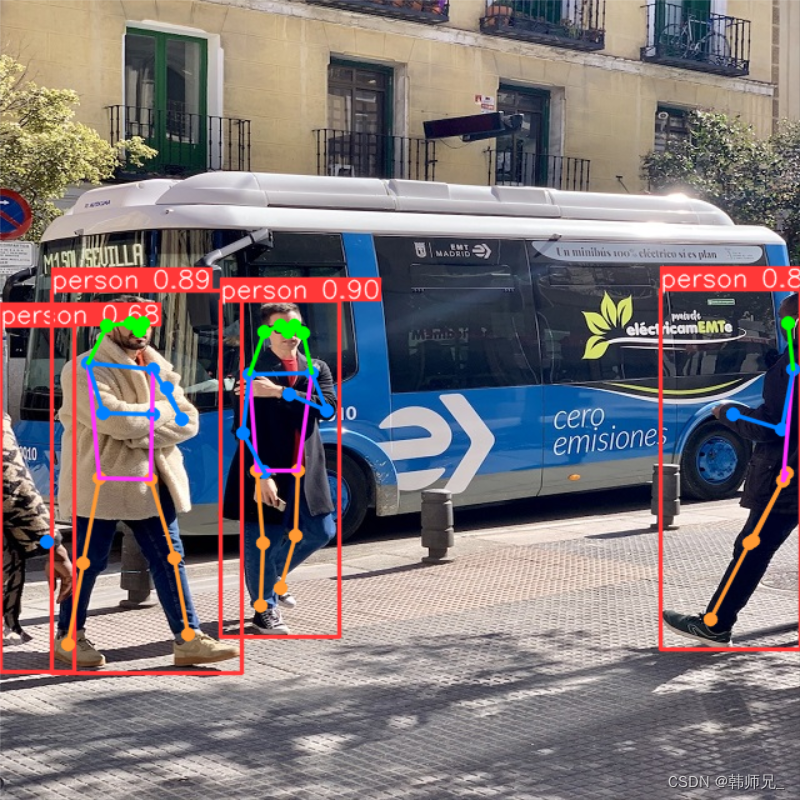
yolov8-pose 推理流程
目录
一、关键点预测
二、图像预处理
二、推理
三、后处理与可视化
3.1、后处理
3.2、特征点可视化
四、完整pytorch代码
yolov8-pose tensorrt
一、关键点预测
注:本篇只是阐述推理流程,tensorrt实现后续跟进。
yolov8-pose的tensorrt部署代码稍后更新,还是在仓库:GitHub - FeiYull/TensorRT-Alpha: 🔥🔥🔥TensorRT-Alpha supports YOLOv8、YOLOv7、YOLOv6、YOLOv5、YOLOv4、v3、YOLOX、YOLOR...🚀🚀🚀CUDA IS ALL YOU NEED.🍎🍎🍎It also supports end2end CUDA C acceleration and multi-batch inference.
也可以关注:TensorRT系列教程-CSDN博客
以下是官方预测代码:
from ultralytics import YOLO
model = YOLO(model='yolov8n-pose.pt')
model.predict(source="d:/Data/1.jpg", save=True)
推理过程无非是:图像预处理 -> 推理 -> 后处理 + 可视化,这三个关键步骤在文件大概247行:D:\CodePython\ultralytics\ultralytics\engine\predictor.py,代码如下:
# Preprocess
with profilers[0]:im = self.preprocess(im0s) # 图像预处理# Inference
with profilers[1]:preds = self.inference(im, *args, **kwargs) # 推理# Postprocess
with profilers[2]:self.results = self.postprocess(preds, im, im0s) # 后处理
二、图像预处理
通过debug,进入上述self.preprocess函数,看到代码实现如下。处理流程大概是:padding(满足矩形推理),图像通道转换,即:BGR装RGB,检查图像数据是否连续,存储顺序有HWC转为CHW,然后归一化。需要注意,原始pytorch框架图像预处理的时候,会将图像缩放+padding为HxW的图像,其中H、W为32倍数,而导出tensorrt的时候,为了高效推理,H、W 固定为640x640。
def preprocess(self, im):"""Prepares input image before inference.Args:im (torch.Tensor | List(np.ndarray)): BCHW for tensor, [(HWC) x B] for list."""not_tensor = not isinstance(im, torch.Tensor)if not_tensor:im = np.stack(self.pre_transform(im))im = im[..., ::-1].transpose((0, 3, 1, 2)) # BGR to RGB, BHWC to BCHW, (n, 3, h, w)im = np.ascontiguousarray(im) # contiguousim = torch.from_numpy(im)img = im.to(self.device)img = img.half() if self.model.fp16 else img.float() # uint8 to fp16/32if not_tensor:img /= 255 # 0 - 255 to 0.0 - 1.0return img二、推理
图像预处理之后,直接推理就行了,这里是基于pytorch推理。
def inference(self, im, *args, **kwargs):visualize = increment_path(self.save_dir / Path(self.batch[0][0]).stem,mkdir=True) if self.args.visualize and (not self.source_type.tensor) else Falsereturn self.model(im, augment=self.args.augment, visualize=visualize)三、后处理与可视化
3.1、后处理
网络推理输出特征图维度为:56x8400,其中:
- 8400表示候选目标数量,
- 56 = xywhc + points * 17,points的长度为3,分别为:xyc,即:特征点的坐标和置信度
尽管推理输出特征图中,每一行既有bbox,还有keypoints,但是NMS的时候,依然只作用于bbox,下面代码作了NMS之后,将筛选之后的目标中bbox、keypoints进行坐标值缩放(缩放到原图尺寸坐标系)。
def postprocess(self, preds, img, orig_imgs):"""Return detection results for a given input image or list of images."""preds = ops.non_max_suppression(preds,self.args.conf,self.args.iou,agnostic=self.args.agnostic_nms,max_det=self.args.max_det,classes=self.args.classes,nc=len(self.model.names))results = []for i, pred in enumerate(preds):orig_img = orig_imgs[i] if isinstance(orig_imgs, list) else orig_imgsshape = orig_img.shapepred[:, :4] = ops.scale_boxes(img.shape[2:], pred[:, :4], shape).round()pred_kpts = pred[:, 6:].view(len(pred), *self.model.kpt_shape) if len(pred) else pred[:, 6:]pred_kpts = ops.scale_coords(img.shape[2:], pred_kpts, shape)path = self.batch[0]img_path = path[i] if isinstance(path, list) else pathresults.append(Results(orig_img=orig_img,path=img_path,names=self.model.names,boxes=pred[:, :6],keypoints=pred_kpts))return results3.2、特征点可视化
bbox可视化没什么好说的,说下17个特征点的可视化,在文件:D:\CodePython\ultralytics_fire_smoke\ultralytics\utils\plotting.py171行,绘制特征点需要注意,需要按照预定义的顺序绘制,其中特征点置信度需要足够大。
def kpts(self, kpts, shape=(640, 640), radius=5, kpt_line=True):"""Plot keypoints on the image.Args:kpts (tensor): Predicted keypoints with shape [17, 3]. Each keypoint has (x, y, confidence).shape (tuple): Image shape as a tuple (h, w), where h is the height and w is the width.radius (int, optional): Radius of the drawn keypoints. Default is 5.kpt_line (bool, optional): If True, the function will draw lines connecting keypointsfor human pose. Default is True.Note: `kpt_line=True` currently only supports human pose plotting."""if self.pil:# Convert to numpy firstself.im = np.asarray(self.im).copy()nkpt, ndim = kpts.shapeis_pose = nkpt == 17 and ndim == 3kpt_line &= is_pose # `kpt_line=True` for now only supports human pose plotting# 绘制特征点for i, k in enumerate(kpts):color_k = [int(x) for x in self.kpt_color[i]] if is_pose else colors(i)x_coord, y_coord = k[0], k[1]if x_coord % shape[1] != 0 and y_coord % shape[0] != 0:if len(k) == 3:conf = k[2]if conf < 0.5:continuecv2.circle(self.im, (int(x_coord), int(y_coord)), radius, color_k, -1, lineType=cv2.LINE_AA)# 绘制线段if kpt_line:ndim = kpts.shape[-1]for i, sk in enumerate(self.skeleton):pos1 = (int(kpts[(sk[0] - 1), 0]), int(kpts[(sk[0] - 1), 1]))pos2 = (int(kpts[(sk[1] - 1), 0]), int(kpts[(sk[1] - 1), 1]))if ndim == 3:conf1 = kpts[(sk[0] - 1), 2]conf2 = kpts[(sk[1] - 1), 2]if conf1 < 0.5 or conf2 < 0.5:continueif pos1[0] % shape[1] == 0 or pos1[1] % shape[0] == 0 or pos1[0] < 0 or pos1[1] < 0:continueif pos2[0] % shape[1] == 0 or pos2[1] % shape[0] == 0 or pos2[0] < 0 or pos2[1] < 0:continuecv2.line(self.im, pos1, pos2, [int(x) for x in self.limb_color[i]], thickness=2, lineType=cv2.LINE_AA)if self.pil:# Convert im back to PIL and update drawself.fromarray(self.im)这里给一张特征点顺序图:

四、完整pytorch代码
将以上流程合并起来,并加以修改,完整代码如下:
import torch
import cv2 as cv
import numpy as np
from ultralytics.data.augment import LetterBox
from ultralytics.utils import ops
from ultralytics.engine.results import Results
import copy# path = 'd:/Data/1.jpg'
path = 'd:/Data/6406402.jpg'
device = 'cuda:0'
conf = 0.25
iou = 0.7# preprocess
im = cv.imread(path)
# letterbox
im = [im]
orig_imgs = copy.deepcopy(im)
im = [LetterBox([640, 640], auto=True, stride=32)(image=x) for x in im]
im = im[0][None] # im = np.stack(im)
im = im[..., ::-1].transpose((0, 3, 1, 2))  # BGR to RGB, BHWC to BCHW, (n, 3, h, w)
im = np.ascontiguousarray(im)  # contiguous
im = torch.from_numpy(im)
img = im.to(device)
img = img.float()
img /= 255
# load model pt
ckpt = torch.load('yolov8n-pose.pt', map_location='cpu')
model = ckpt['model'].to(device).float()  # FP32 model
model.eval()# inference
preds = model(img)
prediction = ops.non_max_suppression(preds, conf, iou, agnostic=False, max_det=300, classes=None, nc=len(model.names))results = []
for i, pred in enumerate(prediction):orig_img = orig_imgs[i] if isinstance(orig_imgs, list) else orig_imgsshape = orig_img.shapepred[:, :4] = ops.scale_boxes(img.shape[2:], pred[:, :4], shape).round()pred_kpts = pred[:, 6:].view(len(pred), *model.kpt_shape) if len(pred) else pred[:, 6:]pred_kpts = ops.scale_coords(img.shape[2:], pred_kpts, shape)img_path = pathresults.append(Results(orig_img=orig_img,path=img_path,names=model.names,boxes=pred[:, :6],keypoints=pred_kpts))# show
plot_args = {'line_width': None,'boxes': True,'conf': True, 'labels': True}
plot_args['im_gpu'] = img[0]
result = results[0]
plotted_img = result.plot(**plot_args)
cv.imshow('plotted_img', plotted_img)
cv.waitKey(0)
cv.destroyAllWindows()
print()