锐捷练习-ospf虚链路及rip路由相互引入
一、相关知识补充
1、ospf基本概述
OSPF(Open Shortest Path First)是一种链路状态路由协议,用于在计算机网络中进行路由选择。它是内部网关协议(IGP)之一,常用于大规模企业网络或互联网服务提供商的网络中。
OSPF通过交换链路状态信息来维护网络拓扑,并使用Dijkstra算法计算出最短路径。它支持可变长度子网掩码(VLSM)和类别无关路由(CIDR),能够适应复杂的网络结构。
OSPF具有以下特点:
- 支持分层设计:网络可以被划分为不同的区域(Area),每个区域有各自的路由器和链路状态数据库。
- 使用分层的设计来减少链路状态数据库的大小,提高路由计算效率。
- 支持路由器间的动态邻居关系建立和链路状态信息的交换。
- 提供快速收敛:当网络发生变化时,只需要更新受影响的区域,而不是整个网络。
OSPF可以通过配置路由器的OSPF进程,并在不同的区域中进行连接,以实现网络的路由功能。它被广泛应用于企业网络和互联网骨干网等复杂网络环境中。
2、虚链路
OSPF虚链路(Virtual Link)是一种在OSPF网络中创建逻辑链路的方法,用于连接两个非相邻的OSPF区域。当存在两个区域无法直接相连时,可以通过建立虚链路来维持连通性。
虚链路的创建需要满足以下条件:
- 两个不相邻的OSPF区域必须有一个共同的区域,称为转发区域(Transit Area)。该区域将作为虚链路的传输媒介。
- 在转发区域中,需要有两个具有OSPF邻居关系的Area Border Router(ABR)。一个ABR位于一个区域内,另一个ABR位于另一个区域内。
虚链路的配置包含以下步骤:
- 在两个ABR上配置虚链路的端点地址。这些地址通常是ABR在转发区域上的接口地址。
- 在两个ABR上配置虚链路的Area ID,这是两个区域之间的共同区域ID。
- 在两个ABR上启用虚链路。
虚链路的创建使得两个非相邻的OSPF区域变得相连,就好像它们直接相连一样。这样,OSPF可以通过虚链路传递路由信息,并实现跨越非直接相邻区域的连通性。虚链路在复杂的OSPF网络环境中起到了重要的作用,帮助构建灵活可靠的网络架构。
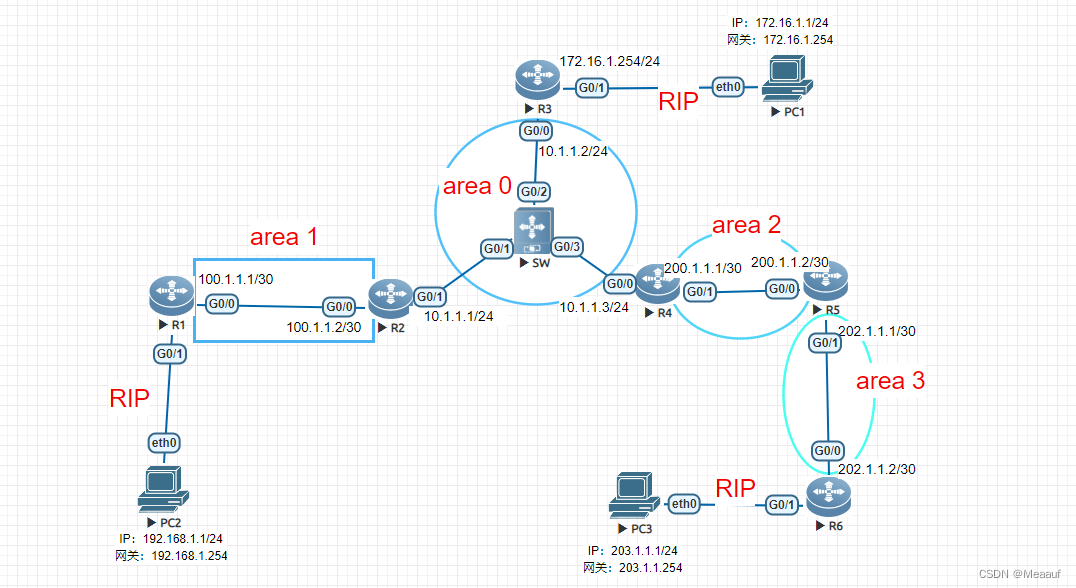
二、配置需求及拓扑图
实现全网互通,其中路由器与PC间配置RIPv2协议,属于链路配置OSPF,进程号为1,Router-id为x.x.x.x/32(x为设备号),需要宣告Loopback网段;在R1、R3、R6配置路由重分发,将ospf与rip相互重发布。
三、配置步骤
基本配置不做描述
1、ospf路由的配置
R1
R1(config)#router ospf 1
R1(config-router)#router-id 1.1.1.1
Change router-id and update OSPF process! [yes/no]:y
R1(config-router)#network 1.1.1.1 0.0.0.0 area 1
R1(config-router)#network 100.1.1.1 0.0.0.3 area 1
R1(config-router)#exit
R2
R2(config)#router ospf 1
R2(config-router)#router-id 2.2.2.2
Change router-id and update OSPF process! [yes/no]:y
R2(config-router)#network 2.2.2.2 0.0.0.0 area 0
R2(config-router)#network 10.1.1.0 0.0.0.255 area 0
R2(config-router)#network 100.1.1.2 0.0.0.3 area 1
R2(config-router)#exit
R3
R3(config)#router ospf 1
R3(config-router)#router-id 3.3.3.3
Change router-id and update OSPF process! [yes/no]:y
R3(config-router)#network 3.3.3.3 0.0.0.0 area 0
R3(config-router)#network 10.1.1.0 0.0.0.255 area 0
R3(config-router)#exit
R4
R4(config)#router ospf 1
R4(config-router)#router-id 4.4.4.4
Change router-id and update OSPF process! [yes/no]:y
R4(config-router)#network 4.4.4.4 0.0.0.0 area 0
R4(config-router)#network 10.1.1.0 0.0.0.255 area 0
R4(config-router)#network 200.1.1.1 0.0.0.3 area 2
R4(config-router)#exit
R5
R5(config)#router ospf 1
R5(config-router)#rou
R5(config-router)#router-id 5.5.5.5
Change router-id and update OSPF process! [yes/no]:y
R5(config-router)#network 5.5.5.5 0.0.0.0 area 2
R5(config-router)#network 200.1.1.2 0.0.0.3 area 2
R5(config-router)#network 202.1.1.1 0.0.0.3 area 3
R5(config-router)#exit
R6
R6(config)#router ospf 1
R6(config-router)#router-id 6.6.6.6
Change router-id and update OSPF process! [yes/no]:y
R6(config-router)#network 6.6.6.6 0.0.0.0 area 3
R6(config-router)#network 202.1.1.2 0.0.0.3 area 3
R6(config-router)#exit
2、虚链路的配置
R4
R5(config)#router ospf 1
R5(config-router)#area 2 virtual-link 4.4.4.4
R5(config-router)#exit
R5
R5(config)#router ospf 1
R5(config-router)#area 2 virtual-link 4.4.4.4
R5(config-router)#exit
3、RIP路由协议的配置
R1
R1(config)#router rip
R1(config-router)#version 2
R1(config-router)#no auto-summary
R1(config-router)#network 192.168.1.0
R1(config-router)#exit
R3
R3(config)#router rip
R3(config-router)#version 2
R3(config-router)#no auto-summary
R3(config-router)#network 172.16.1.0
R3(config-router)#exit
R6
R6(config)#router rip
R6(config-router)#version 2
R6(config-router)#no auto-summary
R6(config-router)#network 203.1.1.0
R6(config-router)#exit
4、路由重发布
R1
R1(config)#router ospf 1
R1(config-router)#redistribute rip subnets    // 重分发具体网段
R1(config-router)#exit
R1(config)#router rip
R1(config-router)#redistribute ospf 1
R1(config-router)#exit
R3
R3(config)#router ospf 1
R3(config-router)#redistribute rip subnets
R3(config-router)#exit
R3(config)#router rip
R3(config-router)#redistribute ospf 1
R3(config-router)#exit
R6
R6(config)#router ospf 1
R6(config-router)#redistribute rip subnets
R6(config-router)#exit
R6(config)#router rip
R6(config-router)#redistribute ospf 1
R6(config-router)#exit
四、效果验证
1、查看R2的邻居关系

2、查看R5的邻居关系

3、查看R6路由表中的OSPF条目

4、PC间连通性测试
