Typora +Picgo 搭建个人笔记
文章目录
- Typora +Picgo 搭建个人笔记
- 一、Picgo +Github 搭建图床
- 1.基础设置
- 2. 将配置导出,方便下次使用
- 二、Typora:设置 :
- 1. 基本设置
- 2. 导出自动提交
- 3. 备份图片
Typora +Picgo 搭建个人笔记
- typora 下载地址: https://zahui.fan/posts/64b52e0d
- Picgo 下载地址:https://github.com/Molunerfinn/PicGo/releases
- 笔记搭建全过程:https://blog.csdn.net/Netceor/article/details/119705826
一、Picgo +Github 搭建图床
背景:
我们在项目中,有的时候写一套笔记需要在多个平台进行同步,基于这种需求,所以我们需要搭建一套属于我们个人的图床,方便在多平台进行项目同步,同步过来之后,不会因图片不存在而导致不能观看,这里主要演示的github图床,因为目前是免费的,up主我喜欢免费。
1.基础设置

具体配置如下:
{"repo": "alex-oos/picture-bed", // 仓库名,格式是username/reponame"branch": "main", // 分支名,默认是main"token": "****************************************", // github token"path": "img/", // 自定义存储路径,比如img/"customUrl": "https://cdn.jsdelivr.net/gh/alex-oos/picture-bed" // 自定义域名,注意要加 http:// 或者 https://}
配置成功之后,上传图片进行测试,在相册中发现上传的图片
2. 将配置导出,方便下次使用
打开Picgo配置,将该配置文件全部复制过去,然后关闭Picgo,重新启动,该配置就会自动生效
{"picBed": {"current": "github","uploader": "github","smms": {"token": "","_configName": "Default","_id": "2cf5bda7-7484-4dd1-8553-0754baf69e32","_createdAt": 1695105202858,"_updatedAt": 1695105202858},"tcyun": {"_configName": "Default","_id": "0d1dd38d-23d6-4d2f-8354-16ba581a6d86","_createdAt": 1695105201786,"_updatedAt": 1695105201786},"aliyun": {"_configName": "Default","_id": "e1c58205-e480-47ce-afd2-e45e14fe6f46","_createdAt": 1695105203259,"_updatedAt": 1695105203259},"github": {"_configName": "github","_id": "e7adf864-ee9d-48d1-aa7e-488a680ec76d","_createdAt": 1695105203731,"_updatedAt": 1697526794411,"repo": "alex-oos/picture-bed","branch": "main","token": "****************************************","path": "img/","customUrl": "https://cdn.jsdelivr.net/gh/alex-oos/picture-bed"},"list": [{"type": "tcyun","name": "腾讯云COS","visible": false},{"type": "aliyun","name": "阿里云OSS","visible": false},{"type": "smms","name": "SM.MS","visible": false},{"type": "github","name": "GitHub","visible": true},{"type": "qiniu","name": "七牛云","visible": false},{"type": "imgur","name": "Imgur","visible": false},{"type": "upyun","name": "又拍云","visible": false}],"vika": {"_configName": "Default","_id": "425a80d1-9484-4ad9-8766-84b541d792bc","_createdAt": 1695118792098,"_updatedAt": 1695118792098}},"settings": {"shortKey": {"picgo:upload": {"enable": true,"key": "CommandOrControl+Shift+P","name": "upload","label": "QUICK_UPLOAD"}},"showUpdateTip": true,"server": {"port": 36677,"host": "127.0.0.1","enable": true},"pasteStyle": "Custom","privacyEnsure": true,"logLevel": ["all"],"logFileSizeLimit": 10,"autoRename": true},"needReload": false,"picgoPlugins": {},"debug": true,"PICGO_ENV": "GUI","uploader": {"tcyun": {"configList": [{"_configName": "Default","_id": "0d1dd38d-23d6-4d2f-8354-16ba581a6d86","_createdAt": 1695105201786,"_updatedAt": 1695105201786}],"defaultId": "0d1dd38d-23d6-4d2f-8354-16ba581a6d86"},"smms": {"configList": [{"token": "","_configName": "Default","_id": "2cf5bda7-7484-4dd1-8553-0754baf69e32","_createdAt": 1695105202858,"_updatedAt": 1695105202858}],"defaultId": "2cf5bda7-7484-4dd1-8553-0754baf69e32"},"aliyun": {"configList": [{"_configName": "Default","_id": "e1c58205-e480-47ce-afd2-e45e14fe6f46","_createdAt": 1695105203259,"_updatedAt": 1695105203259}],"defaultId": "e1c58205-e480-47ce-afd2-e45e14fe6f46"},"github": {"configList": [{"_configName": "github","_id": "e7adf864-ee9d-48d1-aa7e-488a680ec76d","_createdAt": 1695105203731,"_updatedAt": 1697526794411,"repo": "alex-oos/picture-bed","branch": "main","token": "****************************************","path": "img/","customUrl": "https://cdn.jsdelivr.net/gh/alex-oos/picture-bed"}],"defaultId": "e7adf864-ee9d-48d1-aa7e-488a680ec76d"},"vika": {"configList": [{"_configName": "Default","_id": "425a80d1-9484-4ad9-8766-84b541d792bc","_createdAt": 1695118792098,"_updatedAt": 1695118792098}],"defaultId": "425a80d1-9484-4ad9-8766-84b541d792bc"}}
}
二、Typora:设置 :
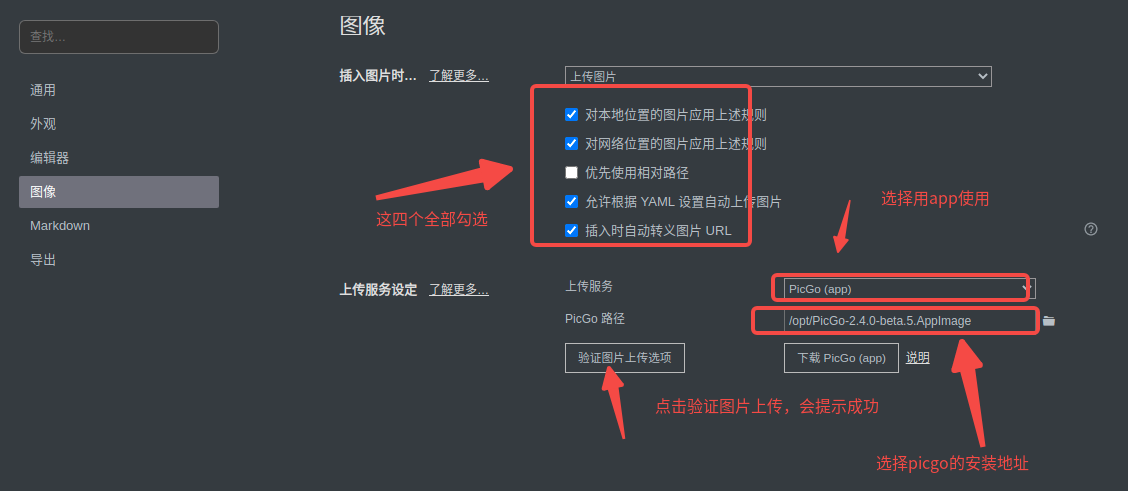
1. 基本设置
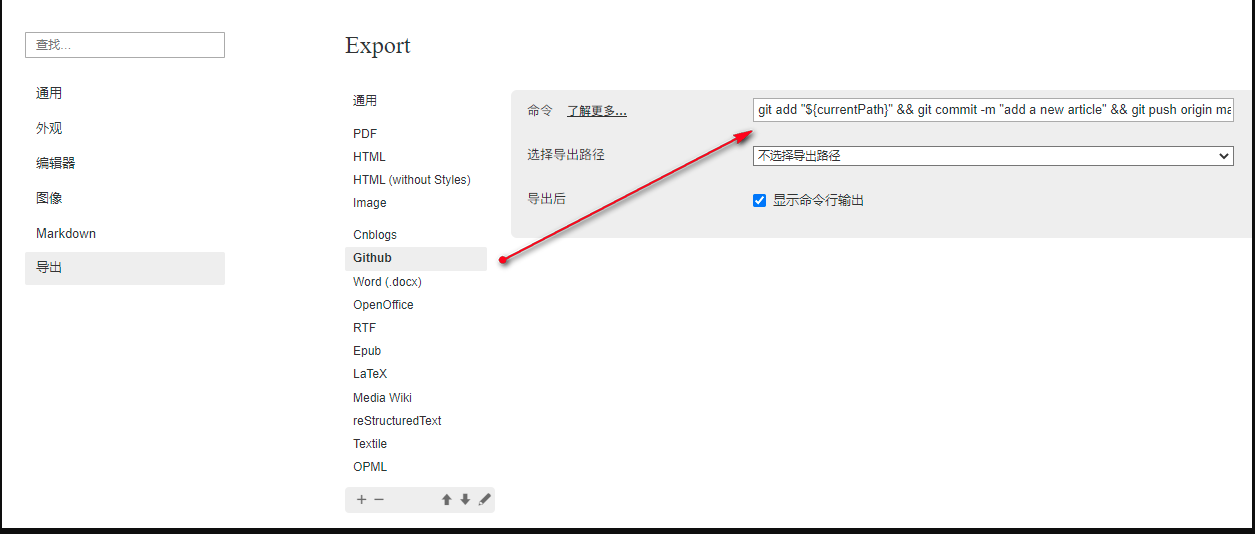
2. 导出自动提交
可以通过设置Typora将写好的博客备份到Github. 指令如下:
git add -A && git commit -m"saved new edits" && git push origin main
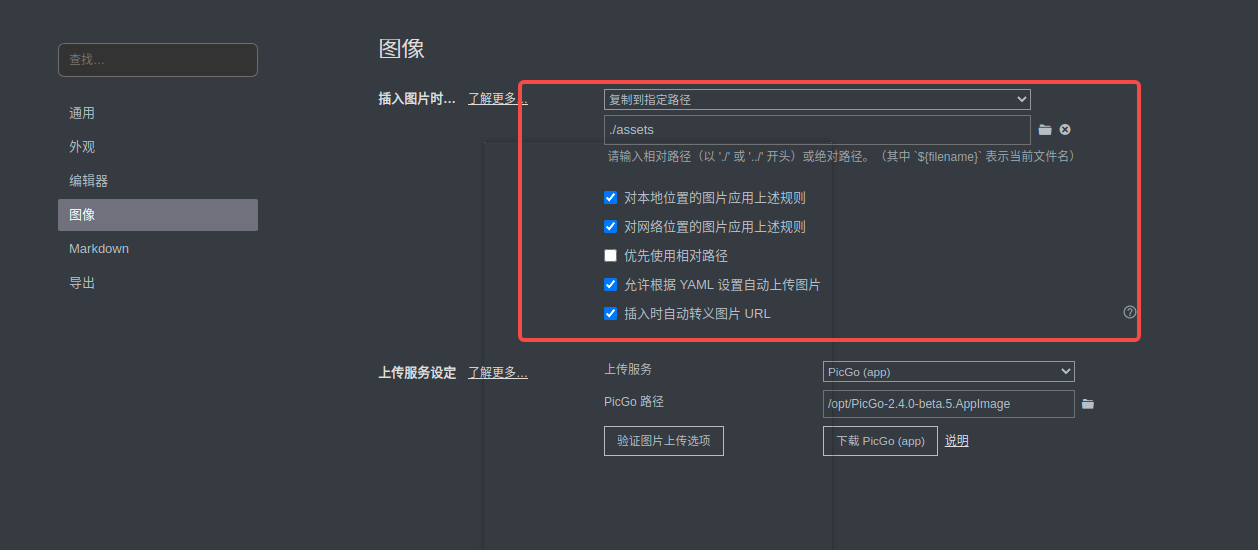
3. 备份图片
设置路径为: ./assets ,会自动在当前目录下创建assets 目录,如果图床服务不能使用,直接修改为相对路径,项目也就可以愉快的访问了
参考地址:https://www.cnblogs.com/yongdaimi/p/16386277.html