【学习笔记】RabbitMQ02:交换机,以及结合springboot快速开始
参考资料
- RabbitMQ官方网站
- RabbitMQ官方文档
- 噼咔噼咔-动力节点教程
文章目录
- 四、RabbitMQ :Exchange 交换机
- 4.1 交换机类型
- 4.2 扇形交换机 Fanout Exchange
- 4.2.1 概念
- 4.2.1 实例:生产者
- 4.2.1.1 添加起步依赖
- 4.2.1.2 配置文件
- 4.2.1.3 JavaBean进行配置
- 4.2.1.4 创建一个发送消息的业务
- 4.2.1.5 查看mq后台
- 4.2.1.6 如何在后台查看队列中的消息
- 4.2.2 实例: 消费者
- 4.2.2.1 依赖导入
- 4.2.2.2 配置文件
- 4.2.2.3 添加消费者(接受者)类
- 4.3 直连交换机 Direct Exchange
- 4.3.1 介绍
- 4.3.2 实例:生产者
- 4.3.2.1 配置交换机和队列
- 4.3.2.2 发送消息
- 4.3.2.3 测试接口并查看后台
- 4.3.3 接收消息
- 4.4 主题交换机 Topic Exchange
- 4.4.1 介绍
- 4.4.2 实例
- 4.4.2.1 配置
- 4.4.2.3 接口
- 4.4.2.4 测试
- 4.4.3 消费者实例(略
- 4.5 头部交换机 Headers Exchanges
- 4.5.1 概述
- 4.5.2 生产者代码
- 4.5.2.1 配置
- 4.5.2.2 测试接口
- 4.5.2.3 接口测试
- 4.5.3 消费者(略
四、RabbitMQ :Exchange 交换机
4.1 交换机类型
Exchange (简称X)翻译为交换机、交换器、路由器…
注意:交换机并不是所有消息中间件都有,但是是一个很好的概念
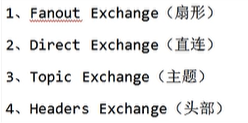
交换机分为以下四个类型
- 扇形交换机:Fanout Exchange
- 直连
- 主题
- 头部
4.2 扇形交换机 Fanout Exchange
4.2.1 概念
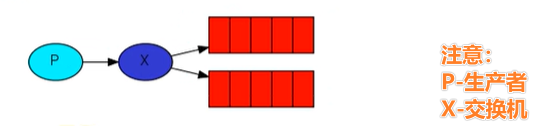
扇形交换机会将生产者的消息投递到所有绑定的队列中,不需要路由键,更不需要路由键匹配,相当于广播群发。
4.2.1 实例:生产者
环境,jdk1.8,ieda2022.3.3,springboot版本2.5.2
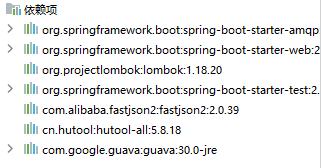
4.2.1.1 添加起步依赖
<dependency><groupId>org.springframework.boot</groupId><artifactId>spring-boot-starter-amqp</artifactId>
</dependency>
项目用到的几个依赖
4.2.1.2 配置文件
application.yml
spring:rabbitmq:host: 192.168.3.10port: 5672username: adminpassword: huiju@2022!virtual-host: hc-test
注意和控制台端口做出区分,控制台是15672,服务器端口是5672
4.2.1.3 JavaBean进行配置
思路整理
- 定义一个扇形交换机 (命名
- 定义一个队列A (命名queueA
- 定义一个队列A (命名queueB
- 核心配置:绑定交换机和队列
具体代码:
import org.springframework.amqp.core.Binding;
import org.springframework.amqp.core.BindingBuilder;
import org.springframework.amqp.core.FanoutExchange;
import org.springframework.amqp.core.Queue;
import org.springframework.context.annotation.Bean;
import org.springframework.context.annotation.Configuration;/*** @Author zhuhuacong* @Date: 2023/10/13/ 17:25* @description rmq交换机配置*/
@Configuration
public class ExchangeConfig {// 定义交换机@Beanpublic FanoutExchange fanoutExchange(){return new FanoutExchange("xcong.fanout");}// 定义两个不同的队列@Beanpublic Queue queueA(){return new Queue("xcong.fanout.A");}@Beanpublic Queue queueB(){return new Queue("xcong.fanout.B");}// 绑定队列,注意参数名称@Beanpublic Binding bindingA(FanoutExchange fanoutExchange , Queue queueA){return BindingBuilder.bind(queueA).to(fanoutExchange);}@Beanpublic Binding bindingB(FanoutExchange fanoutExchange , Queue queueB){return BindingBuilder.bind(queueB).to(fanoutExchange);}
}
注意:
- 绑定队列时注意传入的参数名称要和bean 的名称一致
- 不需要特意到rabbitmq界面里创建队列,只需要发送消息就会自动创建!
- 但是:要求创建好virtual host
4.2.1.4 创建一个发送消息的业务
package com.zhc.rabbitmqdemo.demos.service;import lombok.extern.slf4j.Slf4j;
import org.springframework.amqp.rabbit.core.RabbitTemplate;
import org.springframework.web.bind.annotation.GetMapping;
import org.springframework.web.bind.annotation.PathVariable;
import org.springframework.web.bind.annotation.RequestMapping;
import org.springframework.web.bind.annotation.RestController;import javax.annotation.Resource;
import java.nio.charset.StandardCharsets;/*** @Author zhuhuacong* @Date: 2023/10/13/ 17:39* @description 扇形X*/
@RestController
@Slf4j
@RequestMapping("/fanout")
public class FanoutController {@Resourceprivate RabbitTemplate rabbitTemplate;@GetMapping("/{msg}")public void sendMessage(@PathVariable("msg") String msg){rabbitTemplate.convertAndSend("xcong.fanout","",msg.getBytes(StandardCharsets.UTF_8));log.info("成功发送消息 {} " ,msg);}
}成功启动后访问http://localhost:12378/fanout/jjjj
可以检测是否发送成功:
-
控制台消息如下:
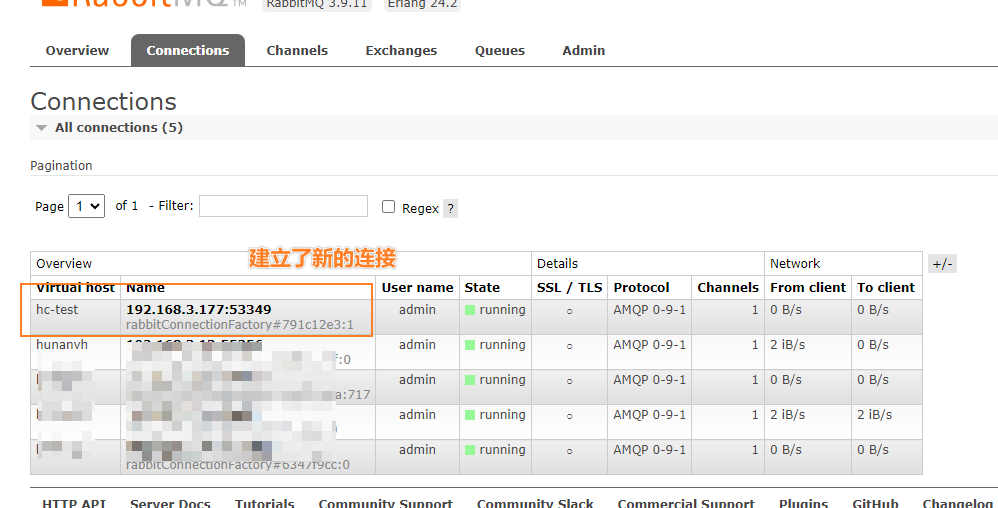
2023-10-13 17:47:53.593  INFO 30476 --- [io-12378-exec-2] o.s.a.r.c.CachingConnectionFactory       : Attempting to connect to: [192.168.3.10:5672]
2023-10-13 17:47:53.608  INFO 30476 --- [io-12378-exec-2] o.s.a.r.c.CachingConnectionFactory       : Created new connection: rabbitConnectionFactory#791c12e3:1/SimpleConnection@69c9eb7c [delegate=amqp://admin@192.168.3.10:5672/hc-test, localPort= 53349]
2023-10-13 17:47:53.675  INFO 30476 --- [io-12378-exec-2] c.z.r.demos.service.FanoutController     : 成功发送消息 jjjj
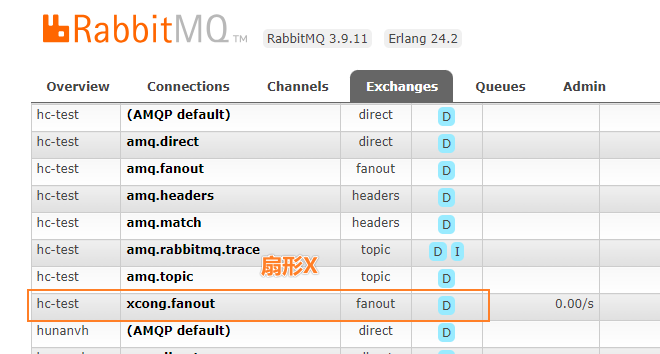
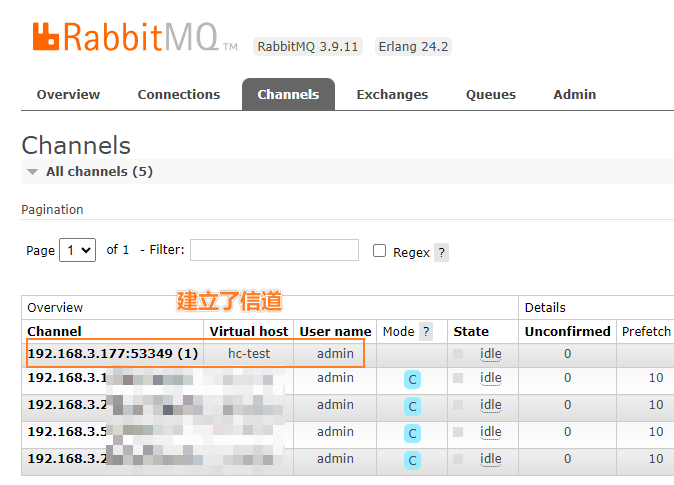
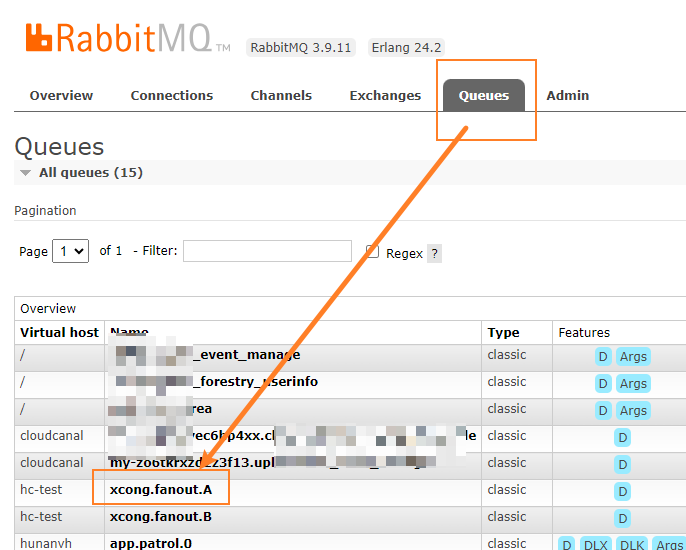
4.2.1.5 查看mq后台
- 使用client发送队列消息后,mq会自动帮我们创建交换机和队列,并进行绑定
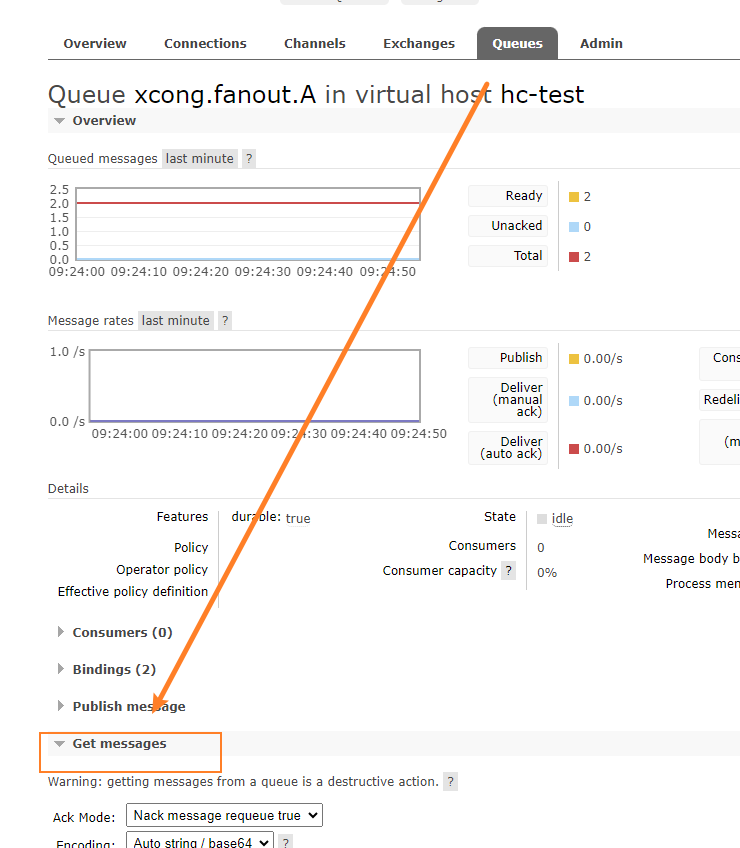
4.2.1.6 如何在后台查看队列中的消息
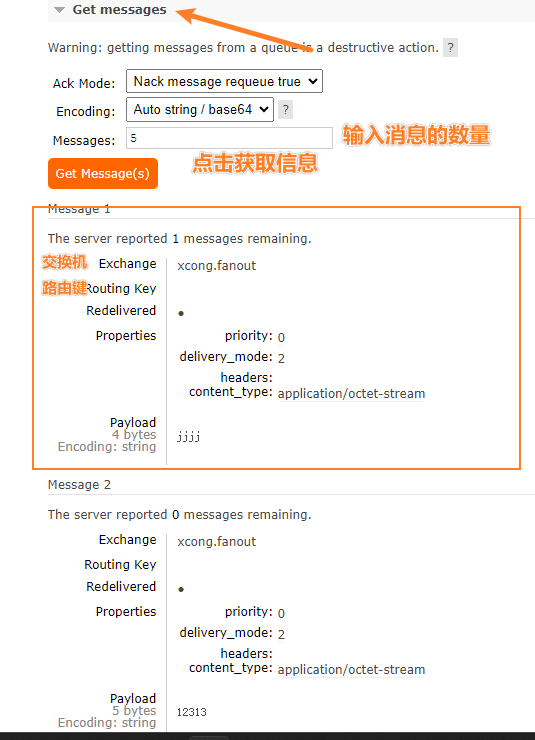
4.2.2 实例: 消费者
4.2.2.1 依赖导入
<dependency><groupId>org.springframework.boot</groupId><artifactId>spring-boot-starter-amqp</artifactId>
</dependency>
4.2.2.2 配置文件
server:port: 12378spring:rabbitmq:host: 192.168.3.10port: 5672username: adminpassword: huiju@2022!virtual-host: hc-test
4.2.2.3 添加消费者(接受者)类
注意使用几个关键注解:
- 在对应的方法上添加
@RabbitListener - 可以传入参数queues,属性为队列名(可以多个
@Service
@Slf4j
public class ConsumerService {@RabbitListener(queues = {"xcong.fanout.A", "xcong.fanout.B"})public void revicerMsg(Message message) {byte[] body = message.getBody();MessageProperties messageProperties = message.getMessageProperties();String consumerQueue = messageProperties.getConsumerQueue();String receivedExchange = messageProperties.getReceivedExchange();log.info("接收到的消息:{} . 消息队列 :{} , 交换机名称:{}",new String(body) , consumerQueue , receivedExchange);}
}
-
为了便于接受消息,设置打印了参数信息
-
在生产者出产生消息,然后控制台输出:
接收到的消息:一个普通的信息 . 消息队列 :xcong.fanout.B , 交换机名称:xcong.fanout
接收到的消息:一个普通的信息 . 消息队列 :xcong.fanout.A , 交换机名称:xcong.fanout
成功接受消息
4.3 直连交换机 Direct Exchange
4.3.1 介绍
根据 路由键 匹配,进行路由消息队列。
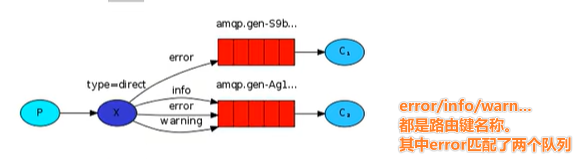
流程梳理如下:
- 生产者将消息发送到交换机X
- 交换机会根据路由键匹配队列
- 并且同一个键也可以匹配多个队列
4.3.2 实例:生产者
具体的依赖和配置都不变,不做赘述了。接下来的示例只会解释不同的部分
4.3.2.1 配置交换机和队列
思路整理
- (可选引入spring提供的注解
@ConfigurationProperties从配置文件中读取属性 - 定义交换机
- 定义队列
- 绑定交换机和队列(注意:需要指定key
package com.zhc.rabbitmqdemo.demos.config;import org.springframework.amqp.core.*;
import org.springframework.boot.context.properties.ConfigurationProperties;
import org.springframework.context.annotation.Bean;
import org.springframework.context.annotation.Configuration;/*** @Author zhuhuacong* @Date: 2023/10/16/ 9:58* @description 直连交换机*/
@Configuration
public class DirectExchangeConfig {public static String exchangeName = "xcong.direct";public static String queueC = "xcong.direct.C";public static String queueD = "xcong.direct.D";// 创建交换机@Beanpublic DirectExchange directExchange(){// 使用建造者模式return ExchangeBuilder.directExchange(exchangeName).build();}// 创建队列@Beanpublic Queue queueC(){return QueueBuilder.durable(queueC).build();}// 创建队列@Beanpublic Queue queueD(){return QueueBuilder.durable(queueD).build();}// 绑定队列@Beanpublic Binding bindingC(DirectExchange directExchange , Queue queueC){return BindingBuilder.bind(queueC).to(directExchange).with("error");}@Beanpublic Binding bindingD1(DirectExchange directExchange , Queue queueD){return BindingBuilder.bind(queueD).to(directExchange).with("error");}@Beanpublic Binding bindingD2(DirectExchange directExchange , Queue queueD){return BindingBuilder.bind(queueD).to(directExchange).with("info");}@Beanpublic Binding bindingD3(DirectExchange directExchange , Queue queueD){return BindingBuilder.bind(queueD).to(directExchange).with("warning");}}
4.3.2.2 发送消息
@RestController
@Slf4j
@RequestMapping("/direct")
public class DirectController {@Resourceprivate RabbitTemplate rabbitTemplate;@GetMapping("/{key}/{msg}")public void sentErrorMsg(@PathVariable("msg") String msg , @PathVariable("key")String key){log.info("准备发送的信息:{} , 路由键 :{}",msg , key);rabbitTemplate.convertAndSend(exchangeName , key , msg.getBytes(StandardCharsets.UTF_8));log.info("成功发送");}
}
4.3.2.3 测试接口并查看后台
小结,发送消息时的路由key和队列的key一致,就可以将消息发送到指定的UI队列
访问接口/direct/info/一个普通的信息:队列D接收到消息
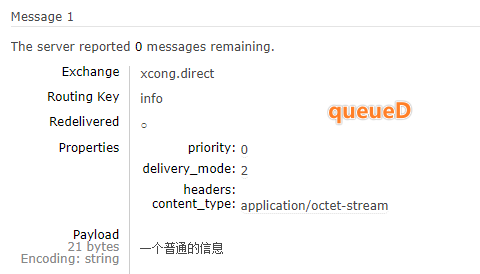
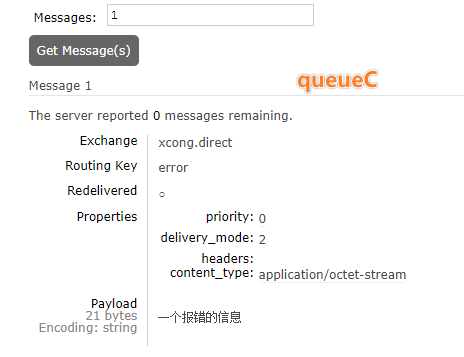
访问接口/direct/error/一个报错的信息:队列CD都接收到消息
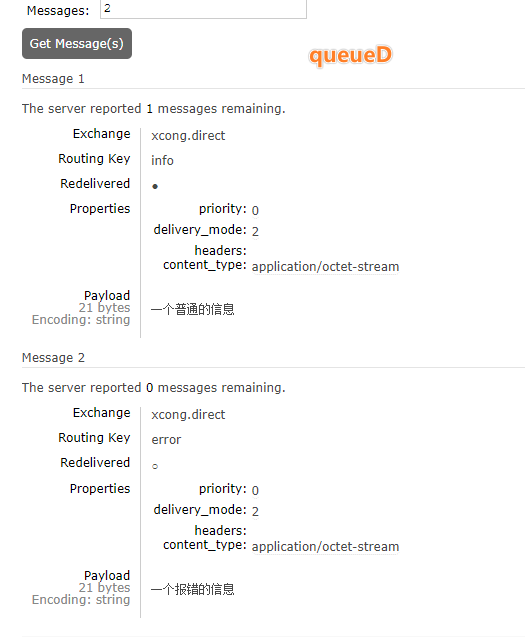
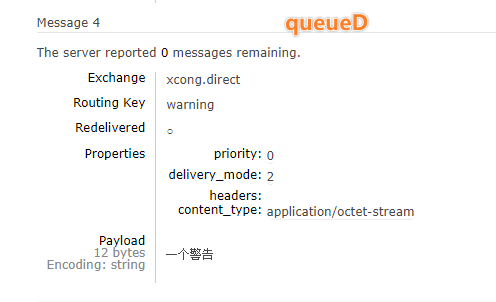
访问接口/direct/warning/一个警告:队列D接收到消息
4.3.3 接收消息
接受消息代码一致,截图展示一下结果

4.4 主题交换机 Topic Exchange
4.4.1 介绍
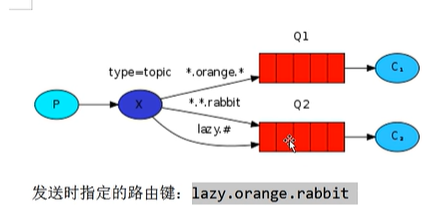
通配符匹配(路由键),相当于模糊查询
-
#匹配多个单词,用来表示任意数量的单词(一个或多个 -
*匹配一个单词(必须且只有一个)- 用
.来隔开为一个单词
- 用
举个例子:左边是队列的路由键,而右边是发送的路由键

4.4.2 实例
4.4.2.1 配置
@Configuration
public class TopicExchangeConfig {public static String exchangeName = "xcong.topic";public static String queue1 = "xcong.queue.1";public static String queue2 = "xcong.queue.2";@Beanpublic TopicExchange topicExchange(){return ExchangeBuilder.topicExchange(exchangeName).build();}@Beanpublic Queue queue1(){return QueueBuilder.durable(queue1).build();}@Beanpublic Queue queue2(){return QueueBuilder.durable(queue2).build();}@Beanpublic Binding binding1(TopicExchange topicExchange , Queue queue1){return BindingBuilder.bind(queue1).to(topicExchange).with("*.orange.*");}@Beanpublic Binding binding2A(TopicExchange topicExchange , Queue queue2){return BindingBuilder.bind(queue2).to(topicExchange).with("*.*.rabbit");}@Beanpublic Binding binding2B(TopicExchange topicExchange , Queue queue2){return BindingBuilder.bind(queue2).to(topicExchange).with("lazy.#");}
}
4.4.2.3 接口
@RestController
@Slf4j
@RequestMapping("/topic")
public class TopicController {@Resourceprivate RabbitTemplate rabbitTemplate;@GetMapping("/{key}/{msg}")public void sendMsg(@PathVariable("key")String key , @PathVariable("msg")String msg){log.info("发送的信息:{},发送的键:{}", msg , key);Message message = MessageBuilder.withBody(msg.getBytes(StandardCharsets.UTF_8)).build();rabbitTemplate.convertAndSend(TopicExchangeConfig.exchangeName , key , message);}
}
4.4.2.4 测试
-
访问接口
/topic/ssss/一条普通的消息:无法再后台查询到接受的消息(无匹配) -
访问接口
/topic/lazy.orange.rabbit/一条普通的消息:队列1和2都可查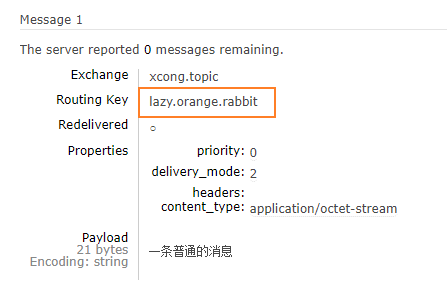
-
访问接口
/topic/A.orange.B/一条普通的消息:只有队列1接收到消息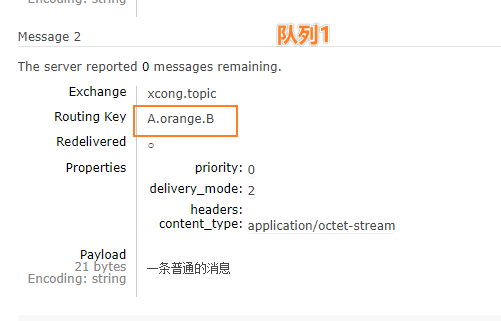
4.4.3 消费者实例(略
4.5 头部交换机 Headers Exchanges
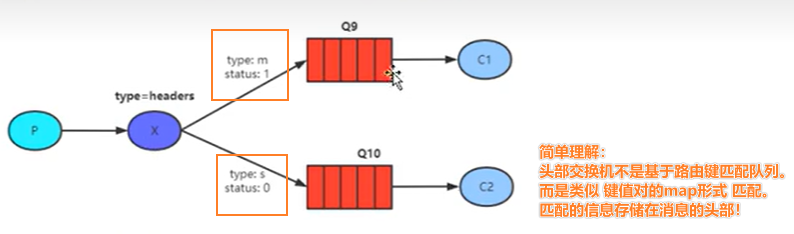
4.5.1 概述
头部交换机使用较少,要知道,每一次消息不只包含body,还有头部信息headers。
4.5.2 生产者代码
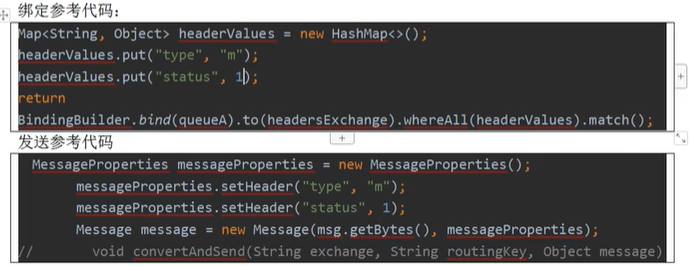
注意:
- 头部交换机的不同之处在于,在绑定交换机时,配置的参数不一样
- 可以是string,也可以是map<Stirng,object>
- 绑定的方法whereAll 和whereAny涉及到两种不同的匹配机制:前者是全匹配,后者是任意一个匹配即可
4.5.2.1 配置
@Configuration
public class HeaderExchangeConfig {public static String exchangeName = "xcong.header";@Beanpublic HeadersExchange headersExchange(){return ExchangeBuilder.headersExchange(exchangeName).build();}@Beanpublic Queue queue9(){return QueueBuilder.durable("xcong.queue.9").build();}@Beanpublic Queue queue10(){return QueueBuilder.durable("xcong.queue.10").build();}@Beanpublic Binding binding9(HeadersExchange headersExchange , Queue queue9){Map<String , Object> headers = new HashMap<>();headers.put("type" , "m");headers.put("status",1);return BindingBuilder.bind(queue9).to(headersExchange).whereAll(headers).match();}@Beanpublic Binding binding10(HeadersExchange headersExchange , Queue queue10){Map<String , Object> headers = new HashMap<>();headers.put("type" , "s");headers.put("status",2);return BindingBuilder.bind(queue10).to(headersExchange).whereAny(headers).match();}
}
访问控制台可以看到匹配规则:
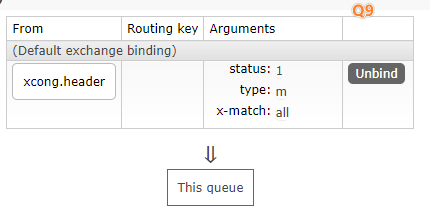
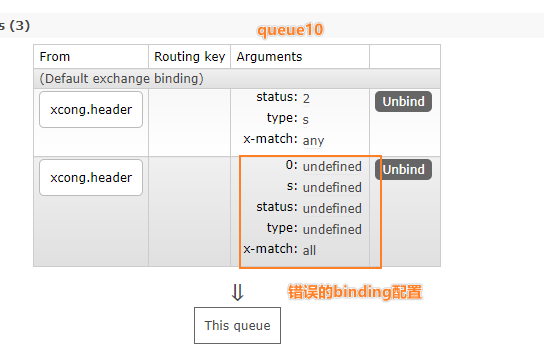
注意看q10是匹配规则就是all ,而q10的规则是any
4.5.2.2 测试接口
@RestController
@Slf4j
@RequestMapping("/header")
public class HeadersController {@Resourceprivate RabbitTemplate rabbitTemplate;@GetMapping("/{type}/{status}/{msg}")public void sendMsg(@PathVariable("type")String type , @PathVariable("status")Integer status , @PathVariable("msg")String msg){log.info("(头部交换器)发送的信息:{},发送的头部为< type : {} , status : {}>", msg , type ,status);MessageProperties messageProperties = new MessageProperties();messageProperties.setHeader("type",type);messageProperties.setHeader("status" , status);Message message = MessageBuilder.withBody(msg.getBytes(StandardCharsets.UTF_8)).andProperties(messageProperties).build();rabbitTemplate.convertAndSend(HeaderExchangeConfig.exchangeName , "" , message);}
}
4.5.2.3 接口测试
- 访问
/header/k/1/一个普通的消息:没有匹配 - 访问
/header/m/1/一个普通的消息:匹配Q9 - 访问
/header/s/1/一个普通的消息:匹配Q10(走了任意匹配