Android Fragment 基本概念和基本使用
Android Fragment 基本概念和基本使用
一、基本概念
Fragment,简称碎片,是Android 3.0(API 11)提出的,为了兼容低版本,support-v4库中也开发了一套Fragment API,最低兼容Android 1.6。
过去support-v4库是一个jar包,24.2.0版本开始,将support-v4库模块化为多个jar包,包含:support-fragment, support-ui, support-media-compat等,这么做是为了减少APK包大小,你需要用哪个模块就引入哪个模块。
Android 官方对Fragment的解释如下:
A Fragment represents a behavior or a portion of user interface in an Activity. You can combine multiple fragments in a single activity to build a multi-pane UI and reuse a fragment in multiple activities. You can think of a fragment as a modular section of an activity, which has its own lifecycle, receives its own input events, and which you can add or remove while the activity is running.
Fragment表示Activity中的行为或user interface的一部分。可以在单个Activity中组合多个Fragment来构建多窗格 UI 并在多个活动中复用Fragment。可以将Fragment视为Activity的模块化部分,它具有自己的生命周期,接收自己的输入事件,并且可以在Activity运行时添加或删除
由此可知
- Fragment是依赖于Activity的,不能独立存在的。
- 一个Activity里可以有多个Fragment。
- 一个Fragment可以被多个Activity重用。
- Fragment有自己的生命周期,并能接收输入事件。
- 我们能在Activity运行时动态地添加或删除Fragment。
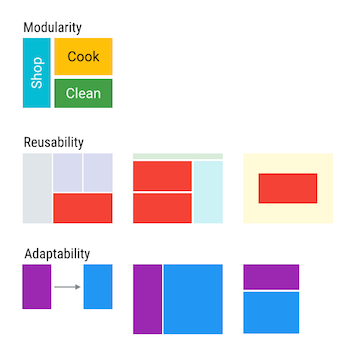
Fragment的优势有以下几点:
- 模块化(Modularity):我们不必把所有代码全部写在Activity中,而是把代码写在各自的Fragment中。
- 可重用(Reusability):多个Activity可以重用一个Fragment。
- 可适配(Adaptability):根据硬件的屏幕尺寸、屏幕方向,能够方便地实现不同的布局,这样用户体验更好。
Fragment核心的类有:
- Fragment:Fragment的基类,任何创建的Fragment都需要继承该类。
- FragmentManager:管理和维护Fragment。他是抽象类,具体的实现类是FragmentManagerImpl。
- FragmentTransaction:对Fragment的添加、删除等操作都需要通过事务方式进行。他是抽象类,具体的实现类是BackStackRecord。
二、基本使用
在res/layout目录下,新建fragment1.xml,其中内容如下:
<?xml version="1.0" encoding="utf-8"?>
<LinearLayout xmlns:android="http://schemas.android.com/apk/res/android"android:layout_width="match_parent"android:layout_height="match_parent"android:background="#FF00FF"><TextViewandroid:id="@+id/fragment1_text"android:layout_width="wrap_content"android:layout_height="wrap_content"android:text="this is fragment1"android:textColor="#000000"android:textSize="25sp"/></LinearLayout>
在res/layout目录下,新建fragment2.xml,其中内容如下:
<?xml version="1.0" encoding="utf-8"?>
<LinearLayout xmlns:android="http://schemas.android.com/apk/res/android"android:layout_width="match_parent"android:layout_height="match_parent"android:background="#FFFF00"><TextViewandroid:id="@+id/fragment2_text"android:layout_width="wrap_content"android:layout_height="wrap_content"android:text="this is fragment2"android:textColor="#000000"android:textSize="25sp" /></LinearLayout>
在res/layout目录下,activity_main.xml内容如下
<?xml version="1.0" encoding="utf-8"?>
<LinearLayout xmlns:android="http://schemas.android.com/apk/res/android"xmlns:app="http://schemas.android.com/apk/res-auto"xmlns:tools="http://schemas.android.com/tools"android:layout_width="match_parent"android:layout_height="match_parent"tools:context=".MainActivity"><fragmentandroid:id="@+id/fragment1"android:name="com.example.fragmentdemo.FragmentOne"android:layout_width="0dip"android:layout_height="match_parent"android:layout_weight="1" /><fragmentandroid:id="@+id/fragment2"android:name="com.example.fragmentdemo.FragmentTwo"android:layout_width="0dip"android:layout_height="match_parent"android:layout_weight="1" /></LinearLayout>
新建的FragmentOne类,继承Fragment,在onCreateView里通过inflate(R.layout.fragment1, container, false)加载刚才写过的fragment1.xml里的布局
package com.example.fragmentdemo;import android.app.Activity;
import android.app.Fragment;
import android.os.Bundle;
import android.util.Log;
import android.view.LayoutInflater;
import android.view.View;
import android.view.ViewGroup;public class FragmentOne extends Fragment {public static final String TAG = "Fragment1";@Overridepublic View onCreateView(LayoutInflater inflater, ViewGroup container, Bundle savedInstanceState) {Log.d(TAG, "onCreateView");return inflater.inflate(R.layout.fragment1, container, false);}
}
新建的FragmentTwo类,继承Fragment,在onCreateView里通过inflate(R.layout.fragment1, container, false)加载刚才写过的fragment2.xml里的布局
package com.example.fragmentdemo;import android.app.Activity;
import android.app.Fragment;
import android.os.Bundle;
import android.util.Log;
import android.view.LayoutInflater;
import android.view.View;
import android.view.ViewGroup;
import android.widget.Button;
import android.widget.TextView;
import android.widget.Toast;public class FragmentTwo extends Fragment {public static final String TAG = "Fragment2";@Overridepublic View onCreateView(LayoutInflater inflater, ViewGroup container, Bundle saveInstanceState) {return inflater.inflate(R.layout.fragment2, container, false);}
}
MainActivity内容如下:
package com.example.fragmentdemo;import androidx.appcompat.app.AppCompatActivity;
import androidx.fragment.app.Fragment;import android.os.Bundle;
import android.view.Display;public class MainActivity extends AppCompatActivity {@Overrideprotected void onCreate(Bundle savedInstanceState) {super.onCreate(savedInstanceState);setContentView(R.layout.activity_main);}
}
整体的目录结构如下:

显示出来的效果如下所示:
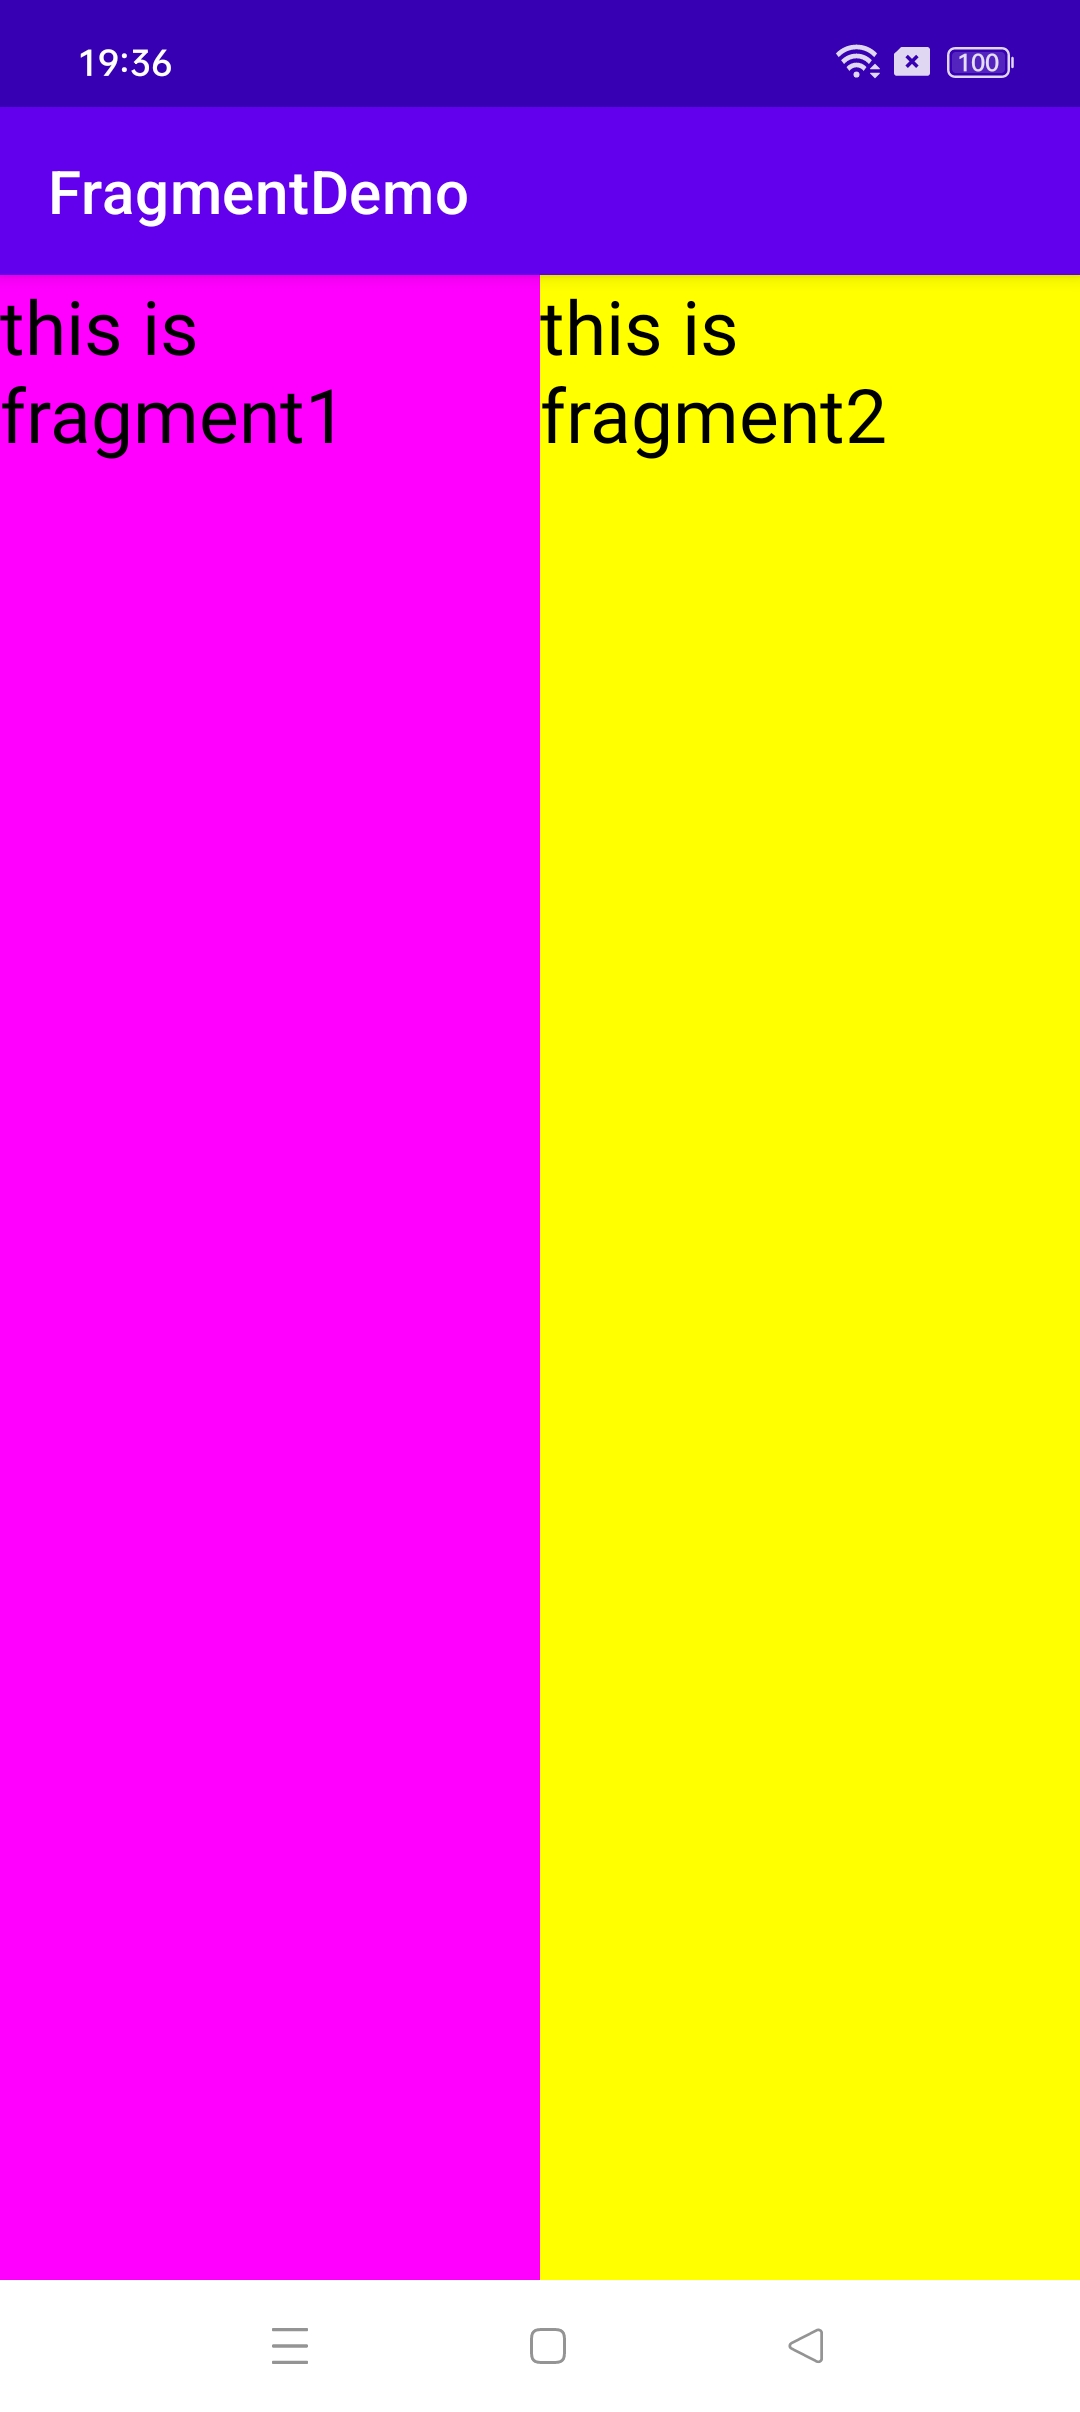
其中如果一个Activity里这种分割开来的片段较多,即可采取多个fragment来组成。
三、Fragment之间如何通信
getActivity方法可以让Fragment获取到关联的Activity,然后再调用Activity的findViewById方法,就可以获取到和这个Activity关联的其它Fragment的视图了。
比如上文中的第二个Fragement需要获取第一个Fragment的文本内容的话,就可以通过
在onActivityCreated方法中,这样来获取
@Overridepublic void onActivityCreated(Bundle savedInstanceState) {super.onActivityCreated(savedInstanceState);TextView textView1= getActivity().findViewById(R.id.fragment1_text);TextView textView2 = getActivity().findViewById(R.id.fragment2_text);// 设置第二个Fragement的文本为第一个Fragment的文本textView2.setText(textView1.getText());Log.d(TAG, "onActivityCreated");}

参考:https://blog.csdn.net/guolin_blog/article/details/8881711