CountDownLatch的原理
使用CountDownLatch可以实现等待多个线程执行完毕的功能,实现线程之间的协调,让它们按照我们期望的顺序执行,从而避免了可能出现的并发问题。
CountDownLatch是如何实现主线程等待子线程全部结束的呢?
代码用例
这里我们使用一段测试代码来理解它的原理,demo 如下:
public static void main(String[] args) throws InterruptedException {int nThreads = 5; // 需要等待的线程数CountDownLatch latch = new CountDownLatch(nThreads);Random random = new Random();for (int i = 0; i < nThreads; i++) {new Thread(() -> {// 执行任务System.out.println(Thread.currentThread().getName() + " is running...");try {Thread.sleep(random.nextInt(5000));} catch (InterruptedException e) {e.printStackTrace();}System.out.println(Thread.currentThread().getName() + " finished...");// 任务完成,计数器减1latch.countDown();}).start();}// 等待所有线程执行完毕latch.await();System.out.println("All threads have finished.");
}
这个例子中,我们创建了一个CountDownLatch实例,并将需要等待的线程数设置为5。然后,我们启动5个线程来执行任务,每个线程执行的时间并不相同,并在每个线程执行完任务后调用 countDown() 方法将计数器减1。
最后,在主线程中我们调用 await() 方法来使当前线程等待,直到所有线程完成任务并计数器减为 0 为止。
原理
关键代码其实就三行。
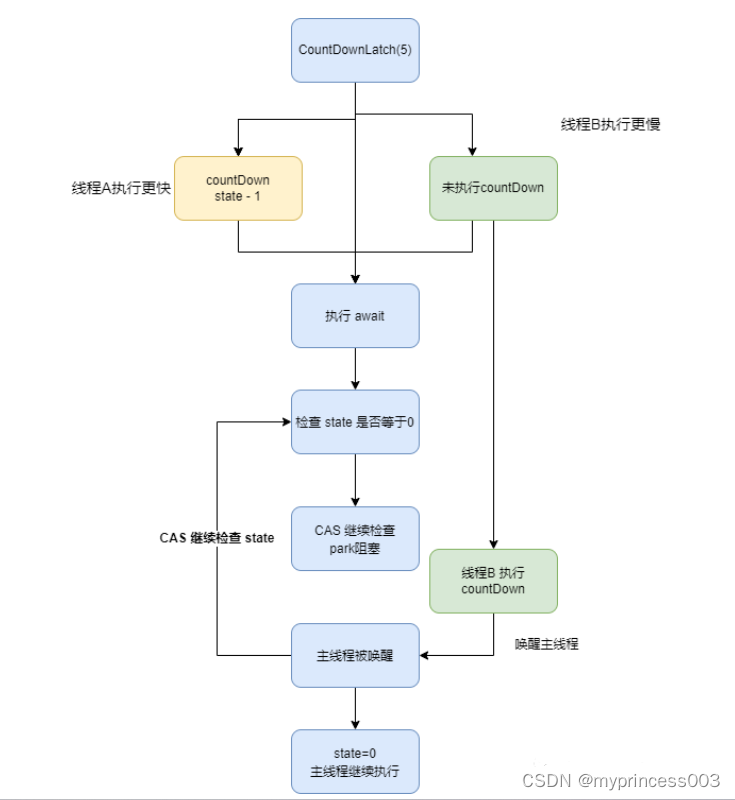
new CountDownLatch(5) 创建 CountDownLatch 实例,设置为state 为 5,相当于是个信号量。
latch.countDown()任务执行完成,分别减少 state。
latch.await()主线程检查其他线程是否全部执行完成,否则等待。
信号量:那是多线程同步用的,一个线程完成了某一个动作就通过信号告诉别的线程,别的线程再进行某些动作。
互斥量:这是多线程互斥用的,比如说,一个线程占用了某一个资源,那么别的线程就无法访问,知道这个线程离开,其他的线程才开始可以利用这个资源。
创建对象
在创建 CountDownLatch 实例的时候,传入一个参数 5。它实现了内部类 Sync, 并且 Sync 继承了 AbstractQueuedSynchronizer(AQS)类。这里设置的 State 其实就是 AQS 中的 state 成员变量。
public CountDownLatch(int count) {if (count < 0) throw new IllegalArgumentException("count < 0");this.sync = new Sync(count);
}
//CountDownLatch.Sync
Sync(int count) {setState(count);
}
执行countDown
设置完线信号量之后,在每个线程执行结束后会执行 latch.countDown()将 state 减一。
private final Sync sync;
public void countDown() {sync.releaseShared(1);
}
public final boolean releaseShared(int arg) {if (tryReleaseShared(arg)) {doReleaseShared();return true;}return false;
}
在 releaseShared 方法中,他会尝试 state 减1,这里是一个死循环,也就是自旋锁。通过CAS的方式线程安全的修改 state的值,如果不成功,就通过自旋锁不断去尝试。
private static final class Sync extends AbstractQueuedSynchronizer {protected int tryAcquireShared(int acquires) {return (getState() == 0) ? 1 : -1;}protected boolean tryReleaseShared(int releases) {// Decrement count; signal when transition to zerofor (;;) {int c = getState();if (c == 0)return false;int nextc = c-1;//CASif (compareAndSetState(c, nextc))return nextc == 0;}}
}
在状态更新后会进入 doReleaseShared ,他会解锁这个队列中的所有线程。正常来说,走到这里都是运行状态的。但是如果主线程先走到了 await方法,这个队列中就会唤醒主线程检查state是否等于0。
子线程执行完后就结束了,不会添加到等待队列和同步队列中。
private void doReleaseShared() {for (;;) {Node h = head;if (h != null && h != tail) {int ws = h.waitStatus;//这里说明了头节点后面是有节点的,需要被唤醒。if (ws == Node.SIGNAL) {//CAS更新状态if (!compareAndSetWaitStatus(h, Node.SIGNAL, 0))continue;            // loop to recheck casesunparkSuccessor(h);}//head.waitStatus=0的情况有两种//1、就是head节点没有及时更新,线程被唤醒之后获取到了锁,在更新head之前,又经过一轮循环执行到这。  但是如果节点没有及时更新就会退出。所以执行到这一步只可能是情况2//2、head节点及时更新了,但是到了最后一个节点,它的head.waitStatus=0else if (ws == 0 &&!compareAndSetWaitStatus(h, 0, Node.PROPAGATE))continue;                // loop on failed CAS}//节点没有及时更新,就退出。if (h == head)                   // loop if head changedbreak;}
}
最后一步:等待
在主线程执行的时候,到达 await方法会检查当前的 state 是否等于0,如果不等于就返回 -1,进入 doAcquireSharedInterruptibly 逻辑。
public void await() throws InterruptedException {sync.acquireSharedInterruptibly(1);
}
public final void acquireSharedInterruptibly(int arg)throws InterruptedException {if (Thread.interrupted())throw new InterruptedException();// 检查 state 是否等于0,不等于返回-1if (tryAcquireShared(arg) < 0)doAcquireSharedInterruptibly(arg);
}
在 doAcquireSharedInterruptibly 方法中,会通过自旋锁不断检查 state。第二次自选检查的时候会被阻塞进入队列,然后等待子线程调用 countDown 方法的时候幻醒主线程,继续自选检查。
rivate void doAcquireSharedInterruptibly(int arg)throws InterruptedException {final Node node = addWaiter(Node.SHARED);boolean failed = true;try {for (;;) {final Node p = node.predecessor();if (p == head) {//自旋不断检查是否state=0int r = tryAcquireShared(arg);if (r >= 0) {setHeadAndPropagate(node, r);p.next = null; // help GCfailed = false;return;}}//第二次自旋,park等待if (shouldParkAfterFailedAcquire(p, node) &&parkAndCheckInterrupt())throw new InterruptedException();}} finally {if (failed)cancelAcquire(node);}
}