离线环境harbor 搭建及使用
一 摘要
本文主要介绍harbor 的安装及使用。
二 环境信息及部署图
2.1 环境信息
| 名称 | 版本 | 备注 |
|---|---|---|
| 操作系统 | centos7.9 | |
| 容器 | docker 23.0.1 | |
| harbor | 2.7 | |
| 代理nginx | 待补充 |
2.2 架构图
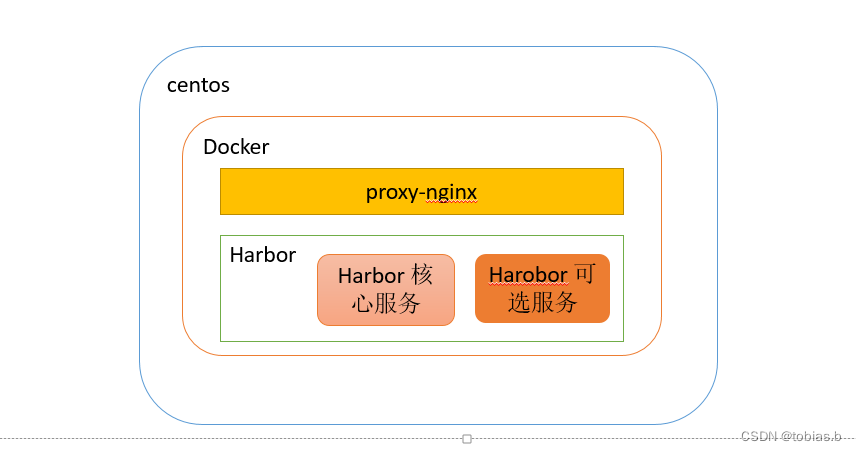 说明:
说明:
1.harbor 核心服务里有个nginx ,也可以用该nginx 做代理
2.proxy-nginx 不是必须安装的,我这里是因为内部已经有个一个专用反向代理服务器,为了方便管理,就在原harbor nginx 上再代理了一层。
2.3 安装目录结构(不包含proxy-nginx)
/data/yunweistg1/harbor/harborsoft: 存放软件解压文件以及配置文件;
/data/yunweistg1/harbor/harbordata: 存放harbor 运行时数据文件
[root@localhost harbor]# pwd
/data/yunweistg1/harbor
[root@localhost harbor]# tree -L 3
.
├── harbordata
│   ├── ca_download
│   ├── database
│   │   └── pg13
│   ├── job_logs
│   │   ├── 14588b0a2d344e858b1a88ee.log
│   │   ├── 60332bdfa0bb84f6d88db945@1695686400.log
│   │   ├── 60332bdfa0bb84f6d88db945@1695772800.log
│   │   ├── 9dffa133c54e1dc2df7c84ba.log
│   │   ├── be5bf53eb57feb447dcf7b2d.log
│   │   └── fa303561c3ca9909d0d3180d.log
│   ├── redis
│   │   └── dump.rdb
│   ├── registry
│   │   └── docker
│   ├── secret
│   │   ├── core
│   │   ├── keys
│   │   └── registry
│   └── trivy-adapter
│       ├── reports
│       └── trivy
└── harborsoft└── harbor├── common├── common.sh├── docker-compose.yml├── harbor.v2.7.1.tar.gz├── harbor.yml├── harbor.yml.tmpl├── install.sh├── LICENSE└── prepare18 directories, 15 files
[root@localhost harbor]#
三 安装
3.1 安装准备
下载安装包,以及安装操作系统和docker\docker-compose
3.1.1 下载安装包
harbor 官网地址:https://goharbor.io/
3.1.2 安装docker 以及docker-compose
具体安装略
3.2 安装harbor核心服务
harbor 的安装思路如下:
harbor.yml 是原始配置文件,根据需要修改,然后执行.prepare 命令,会根据harbor.yml 内容生成各子系统的配置文件,然后运行install.sh 执行安装。
3.2.1 修改配置文件
主要配置harbor.yml
3.2.1.1 http&https
这块大家根据需要调整,比如端口冲突,就调整端口。
重点说明下 hostname 和external_url
1.官网解释:若配置了external_url,可以不配置hostname ;external_url 一般与proxy_nginx 里配置的域名保持一致;
2.harbor 搭建好后,检查pull 或者push 地址 是否是你想要的地址,这个地址 是由这两个参数控制
# Configuration file of Harbor# The IP address or hostname to access admin UI and registry service.
# DO NOT use localhost or 127.0.0.1, because Harbor needs to be accessed by external clients.
hostname: 10.3.170.75# http related config
http:# port for http, default is 80. If https enabled, this port will redirect to https portport: 8033# https related config
#https:# https port for harbor, default is 443
#  port: 443# The path of cert and key files for nginx
#  certificate: /your/certificate/path
#  private_key: /your/private/key/path# # Uncomment following will enable tls communication between all harbor components
# internal_tls:
#   # set enabled to true means internal tls is enabled
#   enabled: true
#   # put your cert and key files on dir
#   dir: /etc/harbor/tls/internal# Uncomment external_url if you want to enable external proxy
# And when it enabled the hostname will no longer used
external_url: https://stg1junharbor.XXXXX.com
3.2.1.2 配置 harbor容器 映射目录
这里配置 harbor 容器的映射目录
# The default data volume
data_volume: /data/yunweistg1/harbor/harbordata
3.2.2 安装
然后执行
./prepare
./install.sh
到此harbor 核心服务就完成安装
3.3 非核心服务安装
harbor 里有些组件是非核心服务,作为可选组件安装。比如容器漏洞扫描软件trivy
3.3.1 安装trivy
先关闭harbor 容器然后再安装
docker-compose -f docker-compose.yml down -v
./install.sh --with-trivy
四 日常使用及维护
4.1 trivy 漏洞库离线同步
主要通过在外网下载trivy 漏洞库,然后人工同步到内网trivy
4.1.1 关闭harbor 里trivy 自动更新配置
trivy:# 关闭在线更新skip_update: true
# 开启离线扫描offline_scan: true
#其余配置请使用默认或者按需调整
重新执行
./prepare
./install.sh --with-trivy
4.1.2 外网下载trivy 漏洞库
通过oras 下载漏洞库,然后人工同步到内网对应目录
下载oras 地址:https://github.com/oras-project/oras/releases
漏洞库下载:
trivy v2
oras pull ghcr.io/aquasecurity/trivy-db:2
oras pull ghcr.io/aquasecurity/trivy-java-db:1
trivy v1
https://github.com/aquasecurity/trivy-db/releases
oras pull ghcr.io/aquasecurity/trivy-java-db:1
我用的是V2
人工同步到内网
漏洞库存放到对应目录
# 漏洞库离线文件移动至对应目录
tar -xzvf db.tar.gz -C /data/yunweistg1/harbor/harbordata/trivy-adapter/trivy/db
tar -xzvf javadb.tar.gz  -C /data/yunweistg1/harbor/harbordata/trivy-adapter/trivy/java-db
# 授权
chown 10000:10000 -R /data/harbordata/trivy-adapter/trivy
最好重启下harbor 容器即可。
4.2 proxy-nginx 反向代理配置
这个配置仅供参考
upstream harbor {# session stickyserver 10.3.170.75:8033 max_fails=3 fail_timeout=10s;keepalive 128;
}server {listen 80;listen 443 ssl;server_name stg1junharbor.xxxxx.com;ssl_certificate /etc/nginx/conf.d/cert/_.xxxxx.com.pem;ssl_certificate_key /etc/nginx/conf.d/cert/_.xxxxx.com.key;ssl_session_cache builtin:1000 shared:SSL:10m;ssl_protocols TLSv1 TLSv1.1 TLSv1.2;ssl_ciphers HIGH:!aNULL:!eNULL:!EXPORT:!CAMELLIA:!DES:!MD5:!PSK:!RC4;ssl_prefer_server_ciphers on;charset utf-8;client_body_buffer_size 10M;client_max_body_size 10240M;location / {proxy_pass http://harbor;proxy_connect_timeout 300;proxy_send_timeout 600;proxy_read_timeout 600;proxy_max_temp_file_size 5000m;}error_page 500 502 503 504 /50x.html;location = /50x.html {root html;}
}