VScode断点调试vue
1、修改launch.js文件(没有这个文件就新建)。
{// Use IntelliSense to learn about possible attributes.// Hover to view descriptions of existing attributes.// For more information, visit: https://go.microsoft.com/fwlink/?linkid=830387"version": "0.2.0","configurations": [{"type": "chrome", //调试的环境"request": "launch", //调试模式:启动类型"name": "vue", // 自定义调试名称"url": "http://localhost:80", //调试的服务地址,需要和devServer对应"webRoot": "${workspaceFolder}/src", //调试的根路径为src业务目录下"breakOnLoad": true,"sourceMapPathOverrides": { //指定生成的sourceMap路径,参考浏览器生成的 .目录和src目录// "webpack:///src/*": "${webRoot}/*",// "webpack:///./src/*": "${webRoot}/*""webpack:///./*": "${webRoot}/*","webpack:///src/*": "${webRoot}/*",// "webpack:///./src/*": "${webRoot}/*", // 该行代码存在时,会出现vue文件断点定位错位的问题,但可正常使用js文件的断点调试"webpack:///*": "*","webpack:///./~/*": "${webRoot}/node_modules/*","meteor:///app/*": "${webRoot}/*"}},]
}
2、修改vue.config.js文件
configureWebpack: (config) => {config.devtool = 'source-map';
},
或
configureWebpack:{devtool:'source-map'
3、修改babel.config.js 文件
'env': {'development': {"sourceMaps": true, // 关键是这两行"retainLines": true, // 关键是这两行}}
4、启vscode,即可进行vue的断点调试
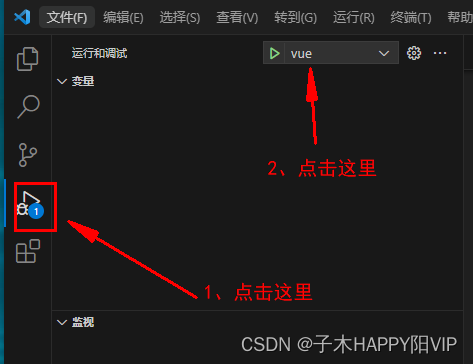
5、操作界面(首先启动项目,然后操作下图步骤,然后会打开新浏览器界面再次操作新弹出界面就会进入预先设置的断点,至此成功使用vscode调试vue)