uniapp 实现不同用户展示不同的tabbar(底部导航栏)
一、背景
最近在做一个uniapp开发的小程序遇到一个需求,希望不同用户登录后展示不同的tabbar页面,但是uniapp项目中的pages.json是只有一个list数组的,并且是不能写成动态效果,为了实现这个需求,便自定义了tabbar组件
二、效果展示
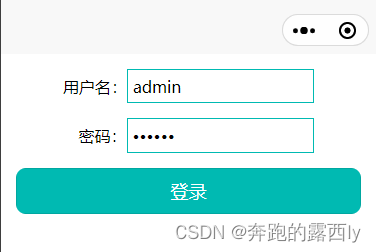
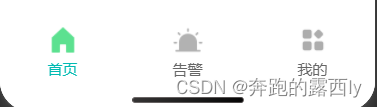
2.1、角色1:admin账号登录效果
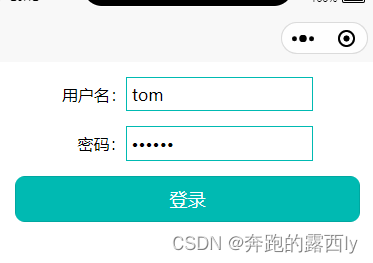
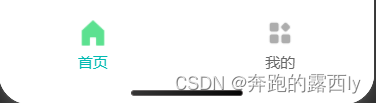
2.2、角色2:tom账户登录效果
三、前置工作
3.1、将登录页面作为用户进入小程序展示的第一个页面,pages.json文件中的pages数组第一个设为login页面👇
3.2、pages.json配置tabbar的基本路径(只需路径即可)👇
{"pages": [ //pages数组中第一项表示应用启动页,参考:https://uniapp.dcloud.io/collocation/pages{"path" : "pages/login/login","style" :                                                                                    {"navigationBarTitleText": "","enablePullDownRefresh": false}},{"path": "pages/index/index","style": {"navigationBarTitleText": ""}},{"path" : "pages/my/my","style" :                                                                                    {"navigationBarTitleText": "","enablePullDownRefresh": false}},{"path" : "pages/warn/warn","style" :                                                                                    {"navigationBarTitleText": "","enablePullDownRefresh": false}}],"globalStyle": {"navigationBarTextStyle": "black","navigationBarTitleText": "uni-app","navigationBarBackgroundColor": "#F8F8F8","backgroundColor": "#F8F8F8"},"uniIdRouter": {},"tabBar": {"color": "#999","selectedColor": "#0aa671","borderStyle": "white","list": [{"pagePath": "pages/index/index"},{"pagePath": "pages/warn/warn"},{"pagePath": "pages/my/my"}]}
}
四、创建tabbar组件
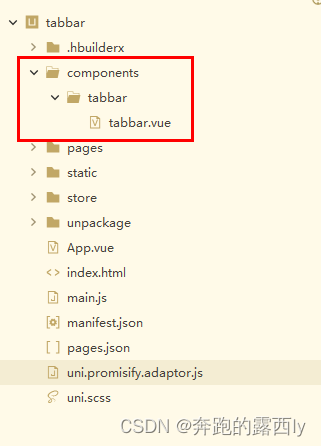
4.1、第一步:在项目中创建components文件夹,并在文件夹下创建tabbar组件👇
tabbar组件具体代码如下:
<template><view class="tab"><view v-for="(item,index) in list" :key="index" class="tab-item" @click="switchTab(item, index)"><image class="tab_img" :src="currentIndex == index ? item.selectedIconPath : item.iconPath"></image><view class="tab_text" :style="{color: currentIndex == index ? selectedColor : color}">{{item.text}}</view></view></view>
</template><script>export default {props: {selectedIndex: { // 当前选中的tab indexdefault: 0},},data() {return {color: "#666666",selectedColor: "#00BAB2",list: [],currentIndex:0,}},created() {this.currentIndex = this.selectedIndex;let _this = thisif (uni.getStorageSync('identify') == 'tom') {//角色1_this.list = [{"pagePath": "/pages/index/index","iconPath": "/static/tab/home.png","selectedIconPath": "/static/tab/home_active.png","text": "首页"},{"pagePath": "/pages/my/my","iconPath": "/static/tab/my.png","selectedIconPath": "/static/tab/my_active.png","text": "我的"}]} else {//角色2_this.list = [{"pagePath": "/pages/index/index","iconPath": "/static/tab/home.png","selectedIconPath": "/static/tab/home_active.png","text": "首页"},{"pagePath": "/pages/warn/warn","iconPath": "/static/tab/warn.png","selectedIconPath": "/static/tab/warn_active.png","text": "告警"},{"pagePath": "/pages/my/my","iconPath": "/static/tab/my.png","selectedIconPath": "/static/tab/my_active.png","text": "我的"}]}},methods: {switchTab(item, index) {this.currentIndex = index;let url = item.pagePath;uni.redirectTo({url:url})}}}
</script><style lang="scss">.tab {position: fixed;bottom: 0;left: 0;right: 0;height: 100rpx;background: white;display: flex;justify-content: center;align-items: center;padding-bottom: env(safe-area-inset-bottom); // 适配iphoneX的底部.tab-item {flex: 1;text-align: center;display: flex;justify-content: center;align-items: center;flex-direction: column;.tab_img {width: 60rpx;height: 60rpx;}.tab_text {font-size: 30rpx;margin-top: 9rpx;}}}
</style>
注意:👉 跳转路径:pagePath以/开头
说明:tab_img可以修改图标大小,tab_text可以修改文字大小
4.2、第二步: 在main.js文件中将自定义的tabBar定义为全局组件
//⭐⭐ main.js 文件
import tabBar from "@/components/tabbar/tabbar.vue"
Vue.component('tabBar',tabBar)
4.3、第三步:在需要使用的页面引入tabbar组件
//如 index页面👇
<template><view>告警<tabBar selectedIndex = 0></tabBar></view>
</template>//如 warn 页面👇
<template><view>告警<tabBar selectedIndex = 1></tabBar></view>
</template>//如 my 页面👇
<template><view>告警<tabBar selectedIndex = 2></tabBar></view>
</template>
4.4、第四步:隐藏pages.json里配置的导航栏,使用封装的tabbar组件,在需要引入tabbar组件的页面进行配置
//如 warn 页面👇 index 和 my 页面也是同样的设置
<script>export default {onShow() {//⭐隐藏pages.json里配置的导航栏,使用封装的tabbar组件uni.hideTabBar({animation:false})}}
</script>
五、登录页面根据不同身份进行tabbar切换逻辑
//登录 login 页面👇
<template>
<view class="container">
<view class="form-group">
<text>用户名:</text>
<input v-model="username" type="text" placeholder="请输入用户名"></input>
</view><view class="form-group"><view style="margin-left: 30rpx;"></view>
<text>密码:</text>
<input v-model="password" type="password" placeholder="请输入密码"></input>
</view>
<view class="btn-login">
<button @click="login">登录</button>
</view>
</view>
</template><script>
export default {data() {return {//页面上设置的默认账户admin,密码123456username: 'admin',password: '123456'};},onShow() {uni.clearStorageSync('identify')},methods: {login() {const username = this.username;const password = this.password;let identify = '';// 根据用户名和密码来确定身份if (username === 'tom' && password === '123456') {identify = 'tom';} else if (username === 'admin' && password === '123456') {identify = 'admin';} else {// 用户名或密码错误console.log('用户名或密码错误');return;}//本地存储uni.setStorageSync('identify', identify);// 跳转到首页uni.switchTab({url: '/pages/index/index'});}}
};
</script><style scoped>
.container {
padding: 30rpx;
}.form-group {display: flex;align-items: center;justify-content: center;
margin-bottom: 30rpx;
}
input{border: 1rpx solid #00BAB2;padding: 10rpx;
}
button {
background-color: #00BAB2;
color: white;
border: none;
border-radius: 20rpx;
}
</style>
六、问题拓展
6.1、问题:当是角色1时,点击tabbar我的页面文字和图标造成颜色闪烁
6.2、原因:角色1是有两个tabbar ,“我的”页面对应的index值是1,而selectedIndex 被设置为超出角色1 tab 的索引范围。在这种情况下,currentIndex 的默认值为0,而将 selectedIndex 设置为2 会导致 currentIndex 与实际选中的 tab 不一致,进而导致文字和图标显示颜色发生闪烁。
6.3、解决:在传递 selectedIndex 给 <tabBar> 组件时进行判断,并确保它不会超出角色1 tab 的索引范围
6.4、重新修改my页面
//👇 my 页面
<template><view>我的<tabBar :selectedIndex="selectedTabIndex"></tabBar></view>
</template><script>export default {computed: {//判断是什么角色selectedTabIndex() {return uni.getStorageSync('identify') === 'tom' ? 1 : 2;}},onShow() {uni.hideTabBar({animation:false})},}
</script>
PS:如果对你有帮助的话,请给个赞,有问题欢迎大家在评论区讨论。ღ( ´・ᴗ・` ) ღ( ´・ᴗ・` )