Yolov8小目标检测-添加模块改进-实验记录
简介,本文通过结合了一些先进的算法改进了yolov8小目标检测能力,以下是一些记录。
数据集:足球比赛数据集,里面只有两个类别足球和人。
import os
from ultralytics import YOLOmodel = YOLO('yolov8n.yaml')  # 后缀n就调用n的模型# Train the model
model.train(data='./ultralytics/datasets/soccer.yaml', epochs=100, imgsz=640)# val
metrics = model.val()  # no arguments needed, dataset and settings remembered
metrics.box.map    # map50-95
metrics.box.map50  # map50
metrics.box.map75  # map75
metrics.box.maps  # # predict
# model.predict('datasets/soccernet/tracking/images/test/SNMOT-132/img1', save=True, imgsz=640, conf=0.5)
# results = model('datasets/soccernet/tracking/images/train/SNMOT-061/img1/')
# for result in results:
#     boxes = result.data  # Boxes object for bbox outputs
#     masks = result.masks  # Masks object for segmentation masks outputs
#     keypoints = result.keypoints  # Keypoints object for pose outputs
#     probs = result.probs  # Class probabilities for classification outputs# export
# model.export(format='onnx')
以下是我实验的一些记录:持续更新中~
实验1. baseline: 使用yolov8n.yaml训练
map: 0.371
person: 0.648
soccer: 0.095
实验2. 使用yolov8n-p2.yaml训练,四个头预测目标,大尺寸的特征图P2也预测目标。足球提升4%。
复杂度:277 layers, 3354144 parameters, 3354128 gradients, 17.3 GFLOPs
map: 0.387
person: 0.639
soccer: 0.135
实验3. 使用yolov8-p2-exp1-spdconv.yaml训练(注意调用其中的n模型需要这样调用model = YOLO('yolov8n-p2-exp1-spdconv.yaml')),在yolov8后加n即可。把conv修改成spdconv,减少步长和池化对小目标检测的影响,原论文链接 。
添加新模块的步骤如下:
- 1. 在ultralytics/nn/modules/conv.py下添加,space_to_depth。


- 2. 在ultralytics/nn/modules/init.py添加模块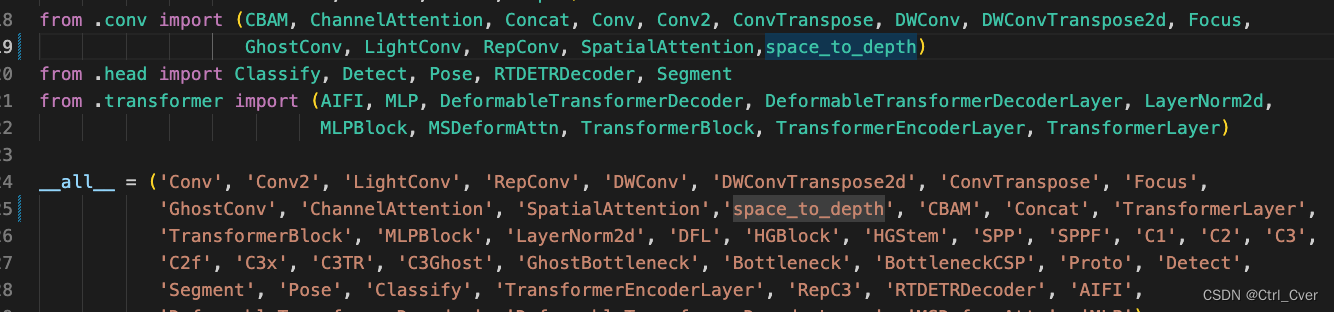
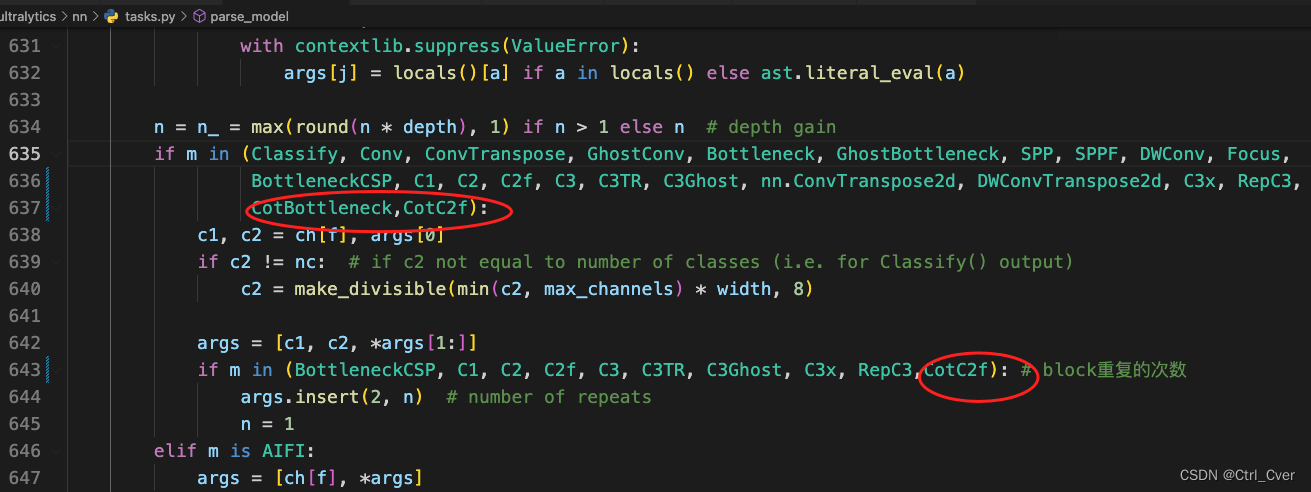
- 3. 在ultralytics/nn/tasks.py添加模块
- 4. 在ultralytics/nn/tasks.py,添加通道数判断,用于后续提取指定序号的模块的输出。
最后新建配置文件yolov8-p2-exp1-spdconv.yaml,放置ultralytics/models/v8/yolov8-p2-exp1-spdconv.yaml,附上我的配置
# Ultralytics YOLO 🚀, AGPL-3.0 license
# YOLOv8 object detection model with P2-P5 outputs. For Usage examples see https://docs.ultralytics.com/tasks/detect# Parameters
nc: 80  # number of classes
scales: # model compound scaling constants, i.e. 'model=yolov8n.yaml' will call yolov8.yaml with scale 'n'# [depth, width, max_channels]n: [0.33, 0.25, 1024]s: [0.33, 0.50, 1024]m: [0.67, 0.75, 768]l: [1.00, 1.00, 512]x: [1.00, 1.25, 512]# YOLOv8.0 backbone, 修改space_to_depth后面模块的输入通道数4倍
backbone:# [from, repeats, module, args]- [-1, 1, Conv, [64, 3, 1]]  # 0-P1/2- [-1,1,space_to_depth,[1]]- [-1, 1, Conv, [128, 3, 1]]  # 128*4,2-P2/4- [-1,1,space_to_depth,[1]]- [-1, 3, C2f, [128, True]] # 128*4- [-1, 1, Conv, [256, 3, 1]]  # 5-P3/8- [-1,1,space_to_depth,[1]]- [-1, 6, C2f, [256, True]] # 256*4- [-1, 1, Conv, [512, 3, 1]]  # 8-P4/16- [-1,1,space_to_depth,[1]]- [-1, 6, C2f, [512, True]] # 512*4- [-1, 1, Conv, [1024, 3, 1]]  # 11-P5/32- [-1,1,space_to_depth,[1]]- [-1, 3, C2f, [1024, True]] # 1024*4- [-1, 1, SPPF, [1024, 5]]  # 14# YOLOv8.0-p2 head
head:- [-1, 1, nn.Upsample, [None, 2, 'nearest']]- [[-1, 10], 1, Concat, [1]] # cat backbone P4- [-1, 3, C2f, [512]] # 17- [-1, 1, nn.Upsample, [None, 2, 'nearest']]- [[-1, 7], 1, Concat, [1]] # cat backbone P3- [-1, 3, C2f, [256]] # 20 (P3/8-small)- [-1, 1, nn.Upsample, [None, 2, 'nearest']]- [[-1, 4], 1, Concat, [1]] # cat backbone P2- [-1, 3, C2f, [128]] # 23 (P2/4-xsmall)- [-1, 1, Conv, [128, 3, 1]]- [-1,1,space_to_depth,[1]]- [[-1, 20], 1, Concat, [1]] # cat head P3- [-1, 3, C2f, [256]] # 27 (P3/8-small)- [-1, 1, Conv, [256, 3, 1]]- [-1,1,space_to_depth,[1]]- [[-1, 17], 1, Concat, [1]] # cat head P4- [-1, 3, C2f, [512]] # 31 (P4/16-medium)- [-1, 1, Conv, [512, 3, 1]]- [-1,1,space_to_depth,[1]]- [[-1, 14], 1, Concat, [1]] # cat head P5- [-1, 3, C2f, [1024]] # 35 (P5/32-large)- [[23, 27, 31, 35], 1, Detect, [nc]] # Detect(P2, P3, P4, P5)复杂度:285 layers, 3330792 parameters, 3330776 gradients, 20.2 GFLOPs
map: -
person: -
soccer: -
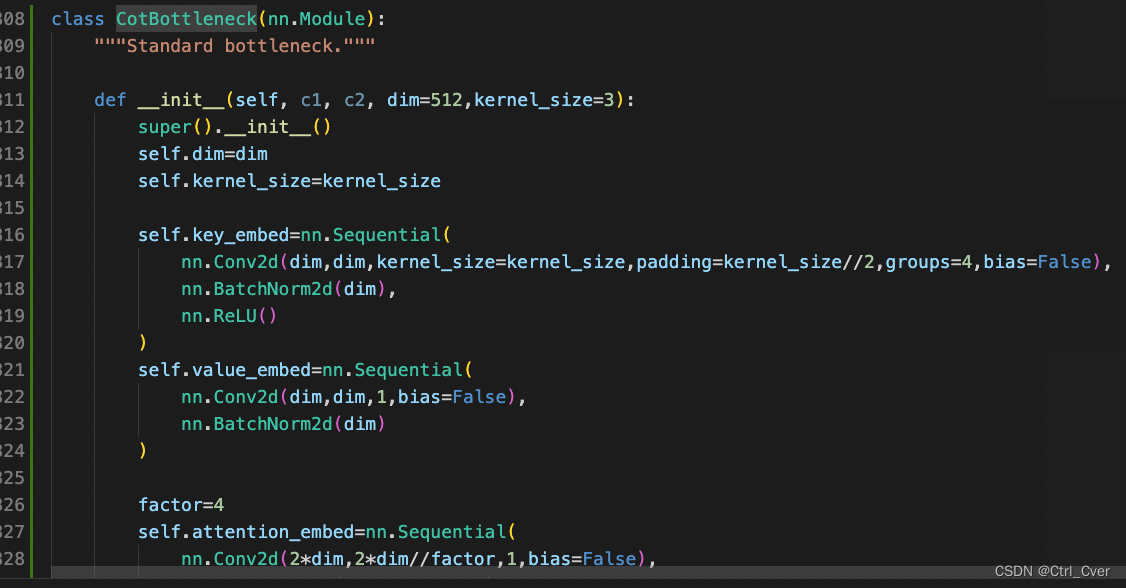
实验4. 使用CoTAttention替换bottleneck里面的conv。配置文件yolov8-p2-exp2-cotattention.yaml。
- 添加模块步骤与上述相似,这里就贴几张图。
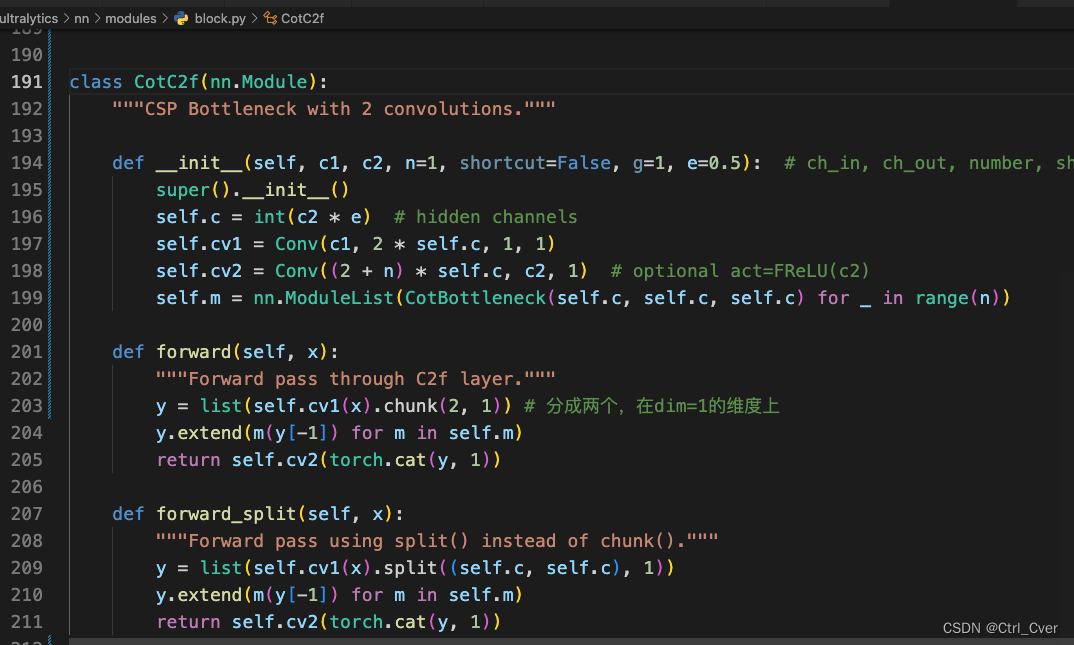


复杂度:349 layers, 2436264 parameters, 2436248 gradients, 10.9 GFLOPs
map: -
person: -
soccer: -