【若依框架RuoYi-Vue-Plus 图片回显不显示问题,OSS文件上传或者本地上传】
一、问题
1.设计表 product(商品表) 有 id (id) name(商品名)icon(图标)
2.使用若依代码生成功能,导入product表,代码生成。
3.将生成的代码导入到项目中得到如下列表和表单(插入数据),图片仅在提交、修改表单中回显,列表没有显示,如下图。

1.在若依框架中图片上传与回显引用了 components 组件组件中的 ImageUpload 与 ImagePreview
Vue.component('ImageUpload', ImageUpload)
Vue.component('ImagePreview', ImagePreview)
// 图片上传组件
import ImageUpload from "@/components/ImageUpload"
// 图片预览组件
import ImagePreview from "@/components/ImagePreview"
2.引用ImageUpload组件上传图片
<el-form-item label="商品图片" prop="icon"><imageUpload v-model="form.icon"  :limit="1" />
</el-form-item>
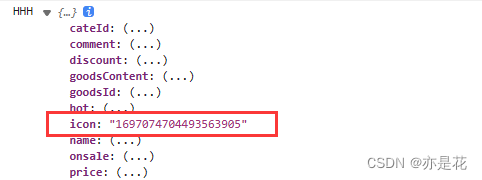
3.ImagePreview组件回显图片,得到的却是OSS回传的oss_id 值,所以在 image-preview 组件不回显图片,需要拿到图片的url地址才是回显图片。
<el-table-column label="商品图片" align="center" prop="icon" :show-overflow-tooltip="true" ><template slot-scope="scope"><ImagePreview :src="scope.row.icon" /> </template></el-table-column>
console.log("HHH",this.form)
- 找到ImagePreview组件 查看 上传结束处理方法 uploadedSuccessfully
// 上传结束处理uploadedSuccessfully() {if (this.number > 0 && this.uploadList.length === this.number) {this.fileList = this.fileList.concat(this.uploadList);this.uploadList = [];this.number = 0;this.$emit("input", this.listToString(this.fileList));this.$modal.closeLoading();}},
二 . 解决(添加表字段或者修改回调方法)
1. 添加表字段
1.修改 uploadedSuccessfully 方法
在上传图片的过程中,调用了父子组件 $emit 可以使用 @input 来获取调用该方法,可以直接获取到该图片的信息。
//****************修改前***********************// 上传结束处理uploadedSuccessfully() {if (this.number > 0 && this.uploadList.length === this.number) {this.fileList = this.fileList.concat(this.uploadList);this.uploadList = [];this.number = 0;this.$emit("input", this.listToString(this.fileList));this.$modal.closeLoading();}},
//*****************修改后**********************// 上传结束处理uploadedSuccessfully() {if (this.number > 0 && this.uploadList.length === this.number) {this.fileList = this.fileList.concat(this.uploadList);this.uploadList = [];this.number = 0;this.$emit("input", this.listToString(this.fileList), this.fileList);this.$modal.closeLoading();}},
2.添加新字段 url用来存放图片 url, 重新生成代码或者添加url字段代码即可。
<!-- 修改前 --><el-form-item label="商品图片" prop="icon"><imageUpload v-model="form.icon" :limit="1" /></el-form-item><!-- 修改后 --><el-form-item label="商品图片" prop="icon"><imageUpload v-model="form.icon" @input="getImgUrl" :limit="1" /></el-form-item>
 // 表单重置reset() {photos:undefined
}
- 添加getImgUrl方法
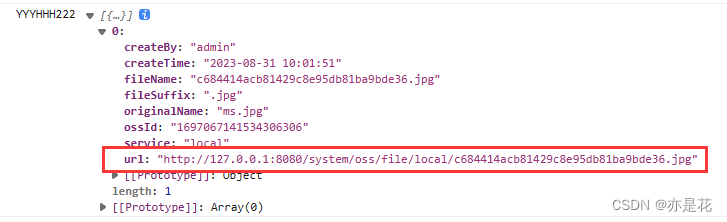
getImgUrl(id,item){console.log("URLLLL",id,item);this.form.url = item[0].url;},
4.回显,
<el-table-column label="商品图片" align="center" prop="icon" :show-overflow-tooltip="true" ><template slot-scope="scope"><ImagePreview :src="scope.row.url" /> </template></el-table-column>
已回显
2. 不添加字段
1.修改 uploadedSuccessfully 方法
在上传图片的过程中,调用了父子组件 $emit 可以使用 @input 来获取调用该方法,可以直接获取到该图片的信息。
//****************修改前***********************// 上传结束处理uploadedSuccessfully() {if (this.number > 0 && this.uploadList.length === this.number) {this.fileList = this.fileList.concat(this.uploadList);this.uploadList = [];this.number = 0;this.$emit("input", this.listToString(this.fileList));this.$modal.closeLoading();}},
//*****************修改后**********************// 上传结束处理uploadedSuccessfully() {if (this.number > 0 && this.uploadList.length === this.number) {this.fileList = this.fileList.concat(this.uploadList);this.uploadList = [];this.number = 0;this.$emit("input", this.listToString(this.fileList), this.fileList);this.$modal.closeLoading();}},
<!-- 修改前 --><el-form-item label="商品图片" prop="icon"><imageUpload v-model="form.icon" :limit="1" /></el-form-item><!-- 修改后 --><el-form-item label="商品图片" prop="icon"><imageUpload v-model="form.icon" @input="getImgUrl" :limit="1" /></el-form-item>
 // 表单重置reset() {photos:undefined
}
- 添加getImgUrl方法
getImgUrl(id,item){console.log("URLLLL",id,item);this.form.icon= item[0].url;},
2.修改监听方法
url已保存到数据库,判断以http开头的直接回显,不查数据库
watch: {value: {async handler(val) {if (val) {// 首先将值转为数组let list;if (Array.isArray(val)) {list = val;} else {if(val.slice(0,4)=="http"){let time = new Date().getTime()let objArr=[];objArr.push( {ossId: time,url:val,name: time})list=objArr}else{await listByIds(val).then(res => {list = res.data;})} }console.log("YYYHHH333",list)// 然后将数组转为对象数组this.fileList = list.map(item => {// 此处name使用ossId 防止删除出现重名item = { name: item.ossId, url: item.url, ossId: item.ossId };return item;});} else {this.fileList = [];return [];}},deep: true,immediate: true}},