pytorch学习(8)——现有网络模型的使用以及修改
1 vgg16模型
1.1 vgg16模型的下载
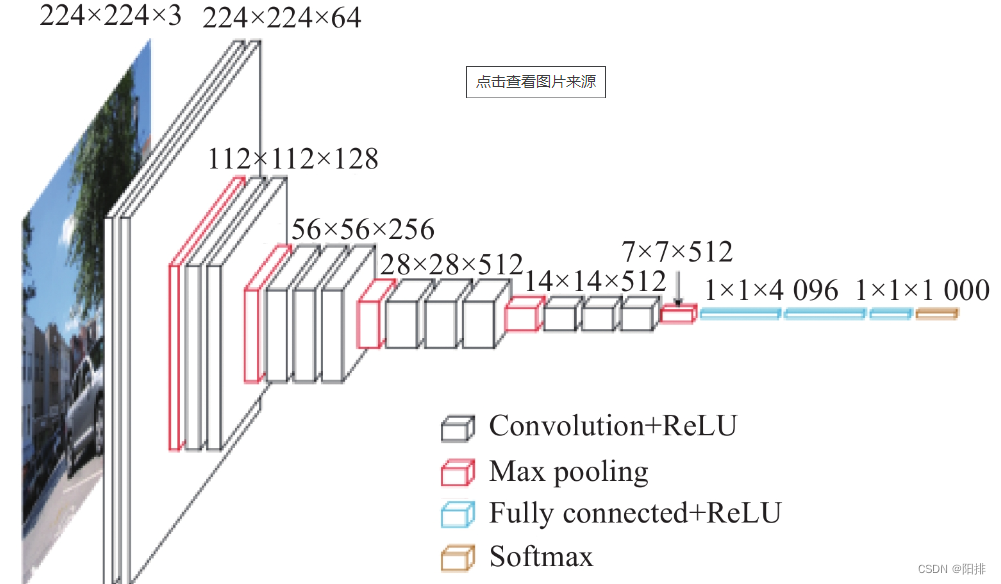
采用torchvision中的vgg16模型,能够实现1000个类型的图像分类,VGG模型在AlexNet的基础上使用3*3小卷积核,增加网络深度,具有很好的泛化能力。
首先下载vgg16模型,python代码如下:
import torchvision# 下载路径:C:\Users\win10\.cache\torch\hub\checkpoints
vgg16_false = torchvision.models.vgg16(pretrained=False)
vgg16_true = torchvision.models.vgg16(pretrained=True)
print("ok")
下载结果:
G:\Anaconda3\envs\pytorch\lib\site-packages\torchvision\models\_utils.py:208: UserWarning: The parameter 'pretrained' is deprecated since 0.13 and may be removed in the future, please use 'weights' instead.warnings.warn(
G:\Anaconda3\envs\pytorch\lib\site-packages\torchvision\models\_utils.py:223: UserWarning: Arguments other than a weight enum or `None` for 'weights' are deprecated since 0.13 and may be removed in the future. The current behavior is equivalent to passing `weights=None`.warnings.warn(msg)
G:\Anaconda3\envs\pytorch\lib\site-packages\torchvision\models\_utils.py:223: UserWarning: Arguments other than a weight enum or `None` for 'weights' are deprecated since 0.13 and may be removed in the future. The current behavior is equivalent to passing `weights=VGG16_Weights.IMAGENET1K_V1`. You can also use `weights=VGG16_Weights.DEFAULT` to get the most up-to-date weights.warnings.warn(msg)
ok
1.2 vgg16模型内部结构
查看预训练的模型和未预训练的模型的内部结构:
import torchvisionvgg16_false = torchvision.models.vgg16(pretrained=False)
vgg16_true = torchvision.models.vgg16(pretrained=True)print(vgg16_true)
print(vgg16_false)
预训练的模型和未预训练的模型在整体结构上相同,但内部节点的参数(weight和bias)有所不同。
输出结果如下:
VGG((features): Sequential((0): Conv2d(3, 64, kernel_size=(3, 3), stride=(1, 1), padding=(1, 1))(1): ReLU(inplace=True)(2): Conv2d(64, 64, kernel_size=(3, 3), stride=(1, 1), padding=(1, 1))(3): ReLU(inplace=True)(4): MaxPool2d(kernel_size=2, stride=2, padding=0, dilation=1, ceil_mode=False)(5): Conv2d(64, 128, kernel_size=(3, 3), stride=(1, 1), padding=(1, 1))(6): ReLU(inplace=True)(7): Conv2d(128, 128, kernel_size=(3, 3), stride=(1, 1), padding=(1, 1))(8): ReLU(inplace=True)(9): MaxPool2d(kernel_size=2, stride=2, padding=0, dilation=1, ceil_mode=False)(10): Conv2d(128, 256, kernel_size=(3, 3), stride=(1, 1), padding=(1, 1))(11): ReLU(inplace=True)(12): Conv2d(256, 256, kernel_size=(3, 3), stride=(1, 1), padding=(1, 1))(13): ReLU(inplace=True)(14): Conv2d(256, 256, kernel_size=(3, 3), stride=(1, 1), padding=(1, 1))(15): ReLU(inplace=True)(16): MaxPool2d(kernel_size=2, stride=2, padding=0, dilation=1, ceil_mode=False)(17): Conv2d(256, 512, kernel_size=(3, 3), stride=(1, 1), padding=(1, 1))(18): ReLU(inplace=True)(19): Conv2d(512, 512, kernel_size=(3, 3), stride=(1, 1), padding=(1, 1))(20): ReLU(inplace=True)(21): Conv2d(512, 512, kernel_size=(3, 3), stride=(1, 1), padding=(1, 1))(22): ReLU(inplace=True)(23): MaxPool2d(kernel_size=2, stride=2, padding=0, dilation=1, ceil_mode=False)(24): Conv2d(512, 512, kernel_size=(3, 3), stride=(1, 1), padding=(1, 1))(25): ReLU(inplace=True)(26): Conv2d(512, 512, kernel_size=(3, 3), stride=(1, 1), padding=(1, 1))(27): ReLU(inplace=True)(28): Conv2d(512, 512, kernel_size=(3, 3), stride=(1, 1), padding=(1, 1))(29): ReLU(inplace=True)(30): MaxPool2d(kernel_size=2, stride=2, padding=0, dilation=1, ceil_mode=False))(avgpool): AdaptiveAvgPool2d(output_size=(7, 7))(classifier): Sequential((0): Linear(in_features=25088, out_features=4096, bias=True)(1): ReLU(inplace=True)(2): Dropout(p=0.5, inplace=False)(3): Linear(in_features=4096, out_features=4096, bias=True)(4): ReLU(inplace=True)(5): Dropout(p=0.5, inplace=False)(6): Linear(in_features=4096, out_features=1000, bias=True))
)
可以发现(classifier)中最后一层可以发现out_features=1000,表示该模型能够支持1000种类型的图像分类。
2 迁移学习
迁移学习是机器学习的一个子领域,它允许一个已经在一个任务上训练好的模型用于另一个但相关的任务。通过这种方式,模型可以借用在原任务上学到的知识,从而更快地、更准确地完成新任务。
本文采用CIFAR10数据集,内部包含10个种类的图像,修改vgg16模型对数据集进行图像分类。为了将此数据集代入vgg16模型,需要对模型进行修改。
(classifier): Sequential(... ...(6): Linear(in_features=4096, out_features=1000, bias=True)
)
2.1 添加层
使用add_module()函数添加模块。由于最后的归一化层为4096通道输出转1000通道输出,因此添加一个归一化层将1000通道输出转换为10通道输出。
import torchvision
from torch import nnvgg16_true = torchvision.models.vgg16(pretrained=True)
print(vgg16_true)vgg16_true.classifier.add_module('add_linear', nn.Linear(1000, 10))
print(vgg16_true)
输出结果(部分):
(classifier): Sequential((0): Linear(in_features=25088, out_features=4096, bias=True)(1): ReLU(inplace=True)(2): Dropout(p=0.5, inplace=False)(3): Linear(in_features=4096, out_features=4096, bias=True)(4): ReLU(inplace=True)(5): Dropout(p=0.5, inplace=False)(6): Linear(in_features=4096, out_features=1000, bias=True)(add_linear): Linear(in_features=1000, out_features=10, bias=True))
2.2 修改层
对classifier内的第6层进行修改。由于最后的归一化层为4096通道输出转1000通道输出,因此需要修改为4096通道输出转换为10通道输出。
import torchvision
from torch import nnvgg16_false = torchvision.models.vgg16(pretrained=False)
print(vgg16_false)vgg16_false.classifier[6] = nn.Linear(4096, 10)
print(vgg16_false)
输出结果(部分):
(classifier): Sequential((0): Linear(in_features=25088, out_features=4096, bias=True)(1): ReLU(inplace=True)(2): Dropout(p=0.5, inplace=False)(3): Linear(in_features=4096, out_features=4096, bias=True)(4): ReLU(inplace=True)(5): Dropout(p=0.5, inplace=False)(6): Linear(in_features=4096, out_features=10, bias=True))
2.3 模型保存
有两种方式保存模型数据。第一种保存方式是将模型结构和模型参数保存,第二种保存方式只是保存模型参数,以字典类型保存。
python代码如下:
import torch
import torchvision
from torch import nn
from torch.nn import Linear, Conv2d, MaxPool2d, Flatten, Sequential, CrossEntropyLossvgg16_false = torchvision.models.vgg16(pretrained=False)        # 未经过训练的模型# 保存方式1,模型结构+模型参数
torch.save(vgg16_false, "G:\\Anaconda\\pycharm_pytorch\\learning_project\\model\\vgg16_method1.pth")# 保存方式2,模型参数(官方推荐)
torch.save(vgg16_false.state_dict(), "G:\\Anaconda\\pycharm_pytorch\\learning_project\\model\\vgg16_method2.pth")
保存修改过的模型或自己的编写的模型:
# 保存模型和导入模型时都需要导入MYNN这个类
class MYNN(nn.Module):def __init__(self):super(MYNN, self).__init__()self.model1 = Sequential(Conv2d(3, 32, 5, padding=2, stride=1),MaxPool2d(2),Conv2d(32, 32, 5, padding=2, stride=1),MaxPool2d(2),Conv2d(32, 64, 5, padding=2, stride=1),MaxPool2d(2),Flatten(),Linear(1024, 64),Linear(64, 10))def forward(self, x):x = self.model1(x)return xmynn = MYNN()
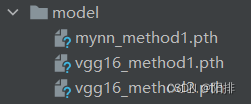
torch.save(mynn, "G:\\Anaconda\\pycharm_pytorch\\learning_project\\model\\mynn_method1.pth")
以上两部分Python代码运行结果如下:
2.4 模型导入
有两种方式导入模型数据。第一种导入方式能够直接使用,第二种导入方法需要将字典数据导入原来的网络模型。
import torch
import torchvision
from torch import nn
from torch.nn import Linear, Conv2d, MaxPool2d, Flatten, Sequential, CrossEntropyLoss# 方式1:加载模型
vgg16_import = torch.load("G:\\Anaconda\\pycharm_pytorch\\learning_project\\model\\vgg16_method1.pth")
print(vgg16_import)# 方式2:加载模型(字典数据)
vgg16_import2 = torch.load("G:\\Anaconda\\pycharm_pytorch\\learning_project\\model\\vgg16_method2.pth")
vgg16_new = torchvision.models.vgg16(pretrained=False)      # 重新加载模型
vgg16_new.load_state_dict(vgg16_import2)                    # 将数据填入模型
print(vgg16_import2)
print(vgg16_new)
导入保存的自己的模型,python代码如下:
# 需要导入自己网络模型
class MYNN(nn.Module):def __init__(self):super(MYNN, self).__init__()self.model1 = Sequential(Conv2d(3, 32, 5, padding=2, stride=1),MaxPool2d(2),Conv2d(32, 32, 5, padding=2, stride=1),MaxPool2d(2),Conv2d(32, 64, 5, padding=2, stride=1),MaxPool2d(2),Flatten(),Linear(1024, 64),Linear(64, 10))def forward(self, x):x = self.model1(x)return xmodel = torch.load("G:\\Anaconda\\pycharm_pytorch\\learning_project\\model\\mynn_method1.pth")
print(model)
自己的网络模型导入运行结果:
MYNN((model1): Sequential((0): Conv2d(3, 32, kernel_size=(5, 5), stride=(1, 1), padding=(2, 2))(1): MaxPool2d(kernel_size=2, stride=2, padding=0, dilation=1, ceil_mode=False)(2): Conv2d(32, 32, kernel_size=(5, 5), stride=(1, 1), padding=(2, 2))(3): MaxPool2d(kernel_size=2, stride=2, padding=0, dilation=1, ceil_mode=False)(4): Conv2d(32, 64, kernel_size=(5, 5), stride=(1, 1), padding=(2, 2))(5): MaxPool2d(kernel_size=2, stride=2, padding=0, dilation=1, ceil_mode=False)(6): Flatten(start_dim=1, end_dim=-1)(7): Linear(in_features=1024, out_features=64, bias=True)(8): Linear(in_features=64, out_features=10, bias=True))
)
完整的模型训练套路-GPU训练
模型验证套路
Github上的代码