边写代码边学习之Bidirectional LSTM
1. 什么是Bidirectional LSTM
双向 LSTM (BiLSTM) 是一种主要用于自然语言处理的循环神经网络。 与标准 LSTM 不同,输入是双向流动的,并且它能够利用双方的信息。 它也是一个强大的工具,可以在序列的两个方向上对单词和短语之间的顺序依赖关系进行建模。
综上所述,BiLSTM 又增加了一层 LSTM,从而反转了信息流的方向。 简而言之,这意味着输入序列在附加的 LSTM 层中向后流动。 然后,我们以多种方式组合两个 LSTM 层的输出,例如平均、求和、乘法或串联。
为了说明这一点,展开的 BiLSTM 如下图所示:
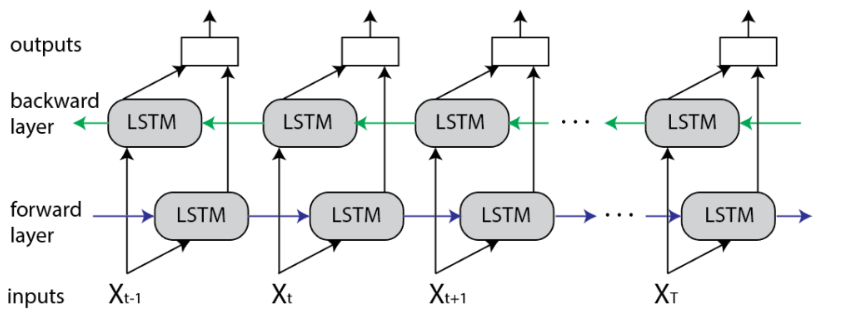
这种类型的架构在现实世界的问题中具有许多优势,尤其是在 NLP 中。 主要原因是输入序列的每个组成部分都包含来自过去和现在的信息。 因此,BiLSTM 可以通过组合两个方向的 LSTM 层来产生更有意义的输出。
例如这句话:
Apple is something that…
可能是关于苹果作为水果或关于苹果公司。 因此,LSTM 不知道“Apple”是什么意思,因为它不知道未来的上下文。
相反,最有可能在这两个句子中:
Apple is something that competitors simply cannot reproduce.
和
Apple is something that I like to eat.
BiLSTM 对于序列(句子)的每个组成部分(单词)都会有不同的输出。 因此,BiLSTM 模型在一些 NLP 任务中是有益的,例如句子分类(sentence classification)、翻译(translation)和实体识别(entity recognition)。 此外,它还应用于语音识别(speech recognition)、蛋白质结构预测(protein structure prediction)、手写识别(handwritten recognition)和类似领域。
最后,关于 BiLSTM 与 LSTM 相比的缺点,值得一提的是 BiLSTM 是一个速度慢得多的模型,并且需要更多的训练时间。 因此,建议仅在确实有必要时才使用它。
2. 实验代码
2.1. Bidirectional layer 方法介绍
tf.keras.layers.Bidirectional(layer, merge_mode="concat", weights=None, backward_layer=None, **kwargs
)
参数
layer:keras.layers.RNN实例,例如keras.layers.LSTM或keras.layers.GRU。 它也可以是满足以下条件的 keras.layers.Layer 实例:
成为序列处理层(接受 3D+ 输入)。
有一个 go_backwards、return_sequences 和 return_state 属性(与 RNN 类具有相同的语义)。
有一个 input_spec 属性。
通过 get_config() 和 from_config() 实现序列化。 请注意,创建新 RNN 层的推荐方法是编写自定义 RNN 单元并将其与 keras.layers.RNN 一起使用,而不是直接子类化 keras.layers.Layer。 - 当 returns_sequences 为 true 时,无论该层的原始 Zero_output_for_mask 值如何,屏蔽时间步长的输出都将为零。
merge_mode:组合前向和后向 RNN 输出的模式。 {'sum'、'mul'、'concat'、'ave'、None} 之一。 如果没有,输出将不会被组合,它们将作为列表返回。 默认值为“concat”。
back_layer:可选的 keras.layers.RNN 或 keras.layers.Layer 实例,用于处理向后输入处理。 如果未提供backward_layer,则作为层参数传递的层实例将用于自动生成后向层。 请注意,提供的backward_layer层应具有与layer参数相匹配的属性,特别是它应具有相同的stateful、return_states、return_sequences等值。此外,backward_layer和layer应具有不同的go_backwards参数值。 如果不满足这些要求,将会引发 ValueError。
2.2. 搭建一个只有一层LSTM和Dense网络的模型。
def simple_lstm_layer():# Create a dense layer with 10 output neurons and input shape of (None, 20)model = Sequential()model.add(Bidirectional(LSTM(3, return_sequences=True), input_shape=(3, 2)))model.add(Dense(1))  # Output layer with one neuronprint(model.summary())
if __name__ == '__main__':simple_lstm_layer()
输出
Model: "sequential"
_________________________________________________________________Layer (type)                Output Shape              Param #
=================================================================bidirectional (Bidirectiona  (None, 3, 6)             144       l)                                                              dense (Dense)               (None, 3, 1)              7         =================================================================
Total params: 151
Trainable params: 151
Non-trainable params: 0
_________________________________________________________________
None
2.3. 验证Bidirectional LSTM里的逻辑
假设我的输入数据是x = [1,0],
forward_kernel = [[[2, 1, 1, 0, 0, 0, 0, 1, 1, 0, 1, 0],
[1, 1, 0, 1, 1, 0, 0, 1, 1 ,0, 0, 0],]]
forward_recurrent_kernel = [[1, 0, 0, 1, 2,1,0,1,2,0,1,0],
[1, 1, 0, 0, 2,1,0,1,2,2,0,0],
[1, 0, 1, 2, 0,1,0,1,1,0,1,0]]
forward_biase = [3, 1, 0, 1, 1,0,0,1,0,2,0.0,0]
backward_kernel = [[[2, 1, 1, 0, 0, 0, 0, 1, 1, 0, 1, 0],
[1, 1, 0, 1, 1, 0, 0, 1, 1 ,0, 0, 0],]]
backward_recurrent_kernel = [[1, 0, 0, 1, 2,1,0,1,2,0,1,0],
[1, 1, 0, 0, 2,1,0,1,2,2,0,0],
[1, 0, 1, 2, 0,1,0,1,1,0,1,0]]
backward_biase = [3, 1, 0, 1, 1,0,0,1,0,2,0.0,0]
通过下面手算,输出: [[[0. 4. 0. 0. 4. 0.]]], forward/backward memory_state的结果是[[0. 4. 0.]], forward/backward carry_state 的结果是 [[0. 4. 1.]]. 注意无激活函数。
代码验证上面的结果
def change_weight():# Create a simple Bidirectional LSTM layerlstm_layer = LSTM(units=3, input_shape=(3, 2), activation=None, recurrent_activation=None, return_sequences=True,return_state= True)bi_lstm_layer = Bidirectional(lstm_layer, merge_mode='concat')# Simulate input data (batch size of 1 for demonstration)input_data = np.array([[[1.0, 2], [2, 3], [3, 4]],[[5, 6], [6, 7], [7, 8]],[[9, 10], [10, 11], [11, 12]]])# Pass the input data through the layer to initialize the weights and biasesbi_lstm_layer(input_data)kernel = np.array([[2, 1, 1, 0, 0, 0, 0, 1, 1, 0, 1, 0],[1, 1, 0, 1, 1, 0, 0, 1, 1 ,0, 0, 0],])recurrent_kernel = np.array([[1, 0, 0, 1, 2,1,0,1,2,0,1,0],[1, 1, 0, 0, 2,1,0,1,2,2,0,0],[1, 0, 1, 2, 0,1,0,1,1,0,1,0]])biases = np.array([3, 1, 0, 1, 1,0,0,1,0,2,0.0,0])bi_lstm_layer.set_weights([kernel, recurrent_kernel, biases, kernel, recurrent_kernel, biases])print(bi_lstm_layer.get_weights())test_data = np.array([[[1,0.0]]])output, memory_state, carry_state, backward_memory_state, backward_carry_state = bi_lstm_layer(test_data)print('output = ',output.numpy())print('forward memory_state = ', memory_state.numpy())print('forward carry_state = ',carry_state.numpy())print('backward memory state = ', backward_memory_state.numpy())print('backward carry state = ',backward_carry_state.numpy())if __name__ == '__main__':change_weight()输出
[array([[2., 1., 1., 0., 0., 0., 0., 1., 1., 0., 1., 0.],[1., 1., 0., 1., 1., 0., 0., 1., 1., 0., 0., 0.]], dtype=float32), array([[1., 0., 0., 1., 2., 1., 0., 1., 2., 0., 1., 0.],[1., 1., 0., 0., 2., 1., 0., 1., 2., 2., 0., 0.],[1., 0., 1., 2., 0., 1., 0., 1., 1., 0., 1., 0.]], dtype=float32), array([3., 1., 0., 1., 1., 0., 0., 1., 0., 2., 0., 0.], dtype=float32), array([[2., 1., 1., 0., 0., 0., 0., 1., 1., 0., 1., 0.],[1., 1., 0., 1., 1., 0., 0., 1., 1., 0., 0., 0.]], dtype=float32), array([[1., 0., 0., 1., 2., 1., 0., 1., 2., 0., 1., 0.],[1., 1., 0., 0., 2., 1., 0., 1., 2., 2., 0., 0.],[1., 0., 1., 2., 0., 1., 0., 1., 1., 0., 1., 0.]], dtype=float32), array([3., 1., 0., 1., 1., 0., 0., 1., 0., 2., 0., 0.], dtype=float32)]
output =  [[[0. 4. 0. 0. 4. 0.]]]
forward memory_state =  [[0. 4. 0.]]
forward carry_state =  [[0. 4. 1.]]
backward memory state =  [[0. 4. 0.]]
backward carry state =  [[0. 4. 1.]]