全志orangepi-zero2驱动编写2,控制电平高低
使用驱动编写控制高低电平
可看我前俩篇文章:
【1】全志orangepi-zeor2驱动编写
【2】驱动函数框架详解
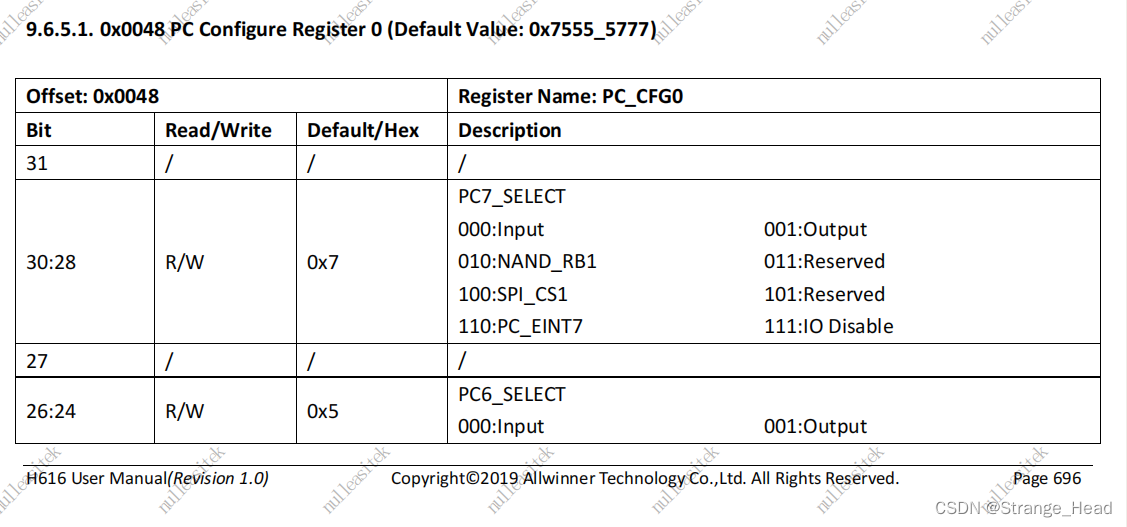
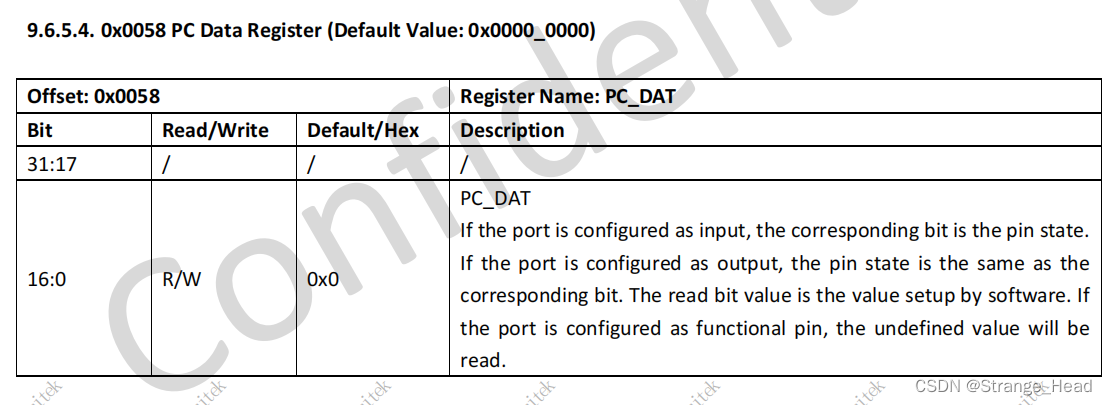
检索芯片手册关键信息
知道GPIO基地址

知道PC偏移地址

知道想要控制的端口的信息

知道数据位如何操作

代码实操
驱动代码
#include <linux/fs.h>               //file_operations声明
#include <linux/module.h>           //module_init module_exit声明
#include <linux/init.h>             //__init__exit 宏声明
#include <linux/device.h>           //class device 声明
#include <linux/uaccess.h>          //copy_from_user的头文件
#include <linux/types.h>            //设备号dev_t类型声明
#include <asm/io.h>                 //ioremap iounmap的头文件static struct class *pin5_class;
static struct device *pin5_class_dev;static dev_t devno;            //设备号
static int major =231;       //主设备号
static int minor =0;          //次设备号
static char *module_name="pin5";   //模块名volatile unsigned int* GPIOBASE =  NULL;
volatile unsigned int* GPIOPC   =  NULL;
volatile unsigned int* GPIODAT  =  NULL;//ssize_t (*read) (struct file *, char __user *, size_t, loff_t *);
static ssize_t pin5_read(struct file *file, char __user *buf, size_t count, loff_t *ppos)
{printk("pin5_read\n");return 0;
}static int pin5_open(struct inode *inode,struct file *file)
{printk("pin5_open\n");      //内核打印函数,和printf类似*GPIOPC &= ~(0x6 << 20);         //把bit22~bit20 配置成001 ,为输出模式*GPIOPC |= (0x1 << 20);return 0;
}static ssize_t pin5_write(struct file *file,const char __user *buf,size_t count, loff_t *ppos)
{char user_cmd;printk("pin5_write\n");//获取用户空间write的值copy_from_user(&user_cmd,buf,count);//根据值来操控io口,高电平或者低电平if(user_cmd == '1'){*GPIODAT |= 0x01 << 5;printk("pin5_set\n");}else if(user_cmd == '0'){*GPIODAT &= ~(0x01 << 5);printk("pin5_reset\n");}else{printk("undo\n");}
static struct file_operations pin5_fops = {.owner = THIS_MODULE,.open  = pin5_open,.write = pin5_write,.read  = pin5_read,
};
//static int __init
static int  pin5_drv_init(void)
{int ret;devno = MKDEV(major,minor);             //创建设备号ret   = register_chrdev(major, module_name,&pin5_fops);         //注册驱动 告诉内核 把这个驱动加入到>内核链表当中pin5_class=class_create(THIS_MODULE,"myfirstdemo");             //让代码在dev自动生成设备pin5_class_dev =device_create(pin5_class,NULL,devno,NULL,module_name);          //创建设备文件//映射虚拟地址//GPIO基地址GPIOBASE =  (volatile unsigned int *)ioremap(0x0300B000,4);//GPIOPC地址GPIOPC   =  (volatile unsigned int *)ioremap(0x0300B048,4);//GPIO数据地址GPIODAT  =  (volatile unsigned int *)ioremap(0x0300B058,4);return 0;
}static void pin5_drv_exit(void)
{iounmap(GPIOBASE);iounmap(GPIOPC);iounmap(GPIODAT);device_destroy(pin5_class,devno);class_destroy(pin5_class);unregister_chrdev(major, module_name);
}module_init(pin5_drv_init);
module_exit(pin5_drv_exit);
MODULE_LICENSE("GPL");
MODULE_AUTHOR("SHUN-GE");
用户空间测试代码
#include <stdio.h>
#include <sys/types.h>
#include <sys/stat.h>
#include <fcntl.h>
#include <unistd.h>int main()
{int fd;int cmd;fd = open("/dev/pin5",O_RDWR);if(fd < 0){printf("open fail\n");}else {printf("open success\n");}scanf("%d",&cmd);if(cmd == 1){fd = write(fd,"1",1);printf("%d=cmd \n",cmd);}else if(cmd == 0){fd = write(fd,"0",1);printf("%d=cmd \n",cmd);}
}
结果展示
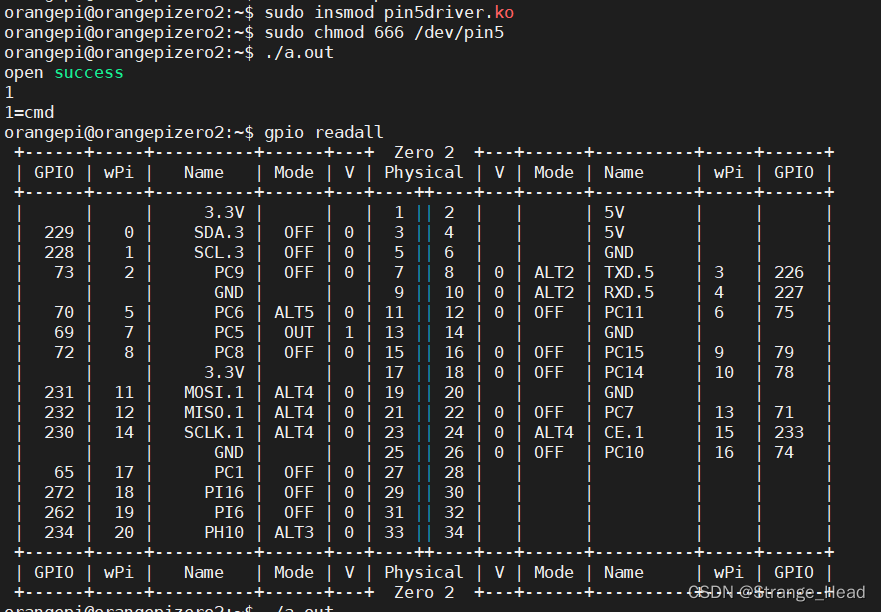
PC5为OUT模式,电平为1

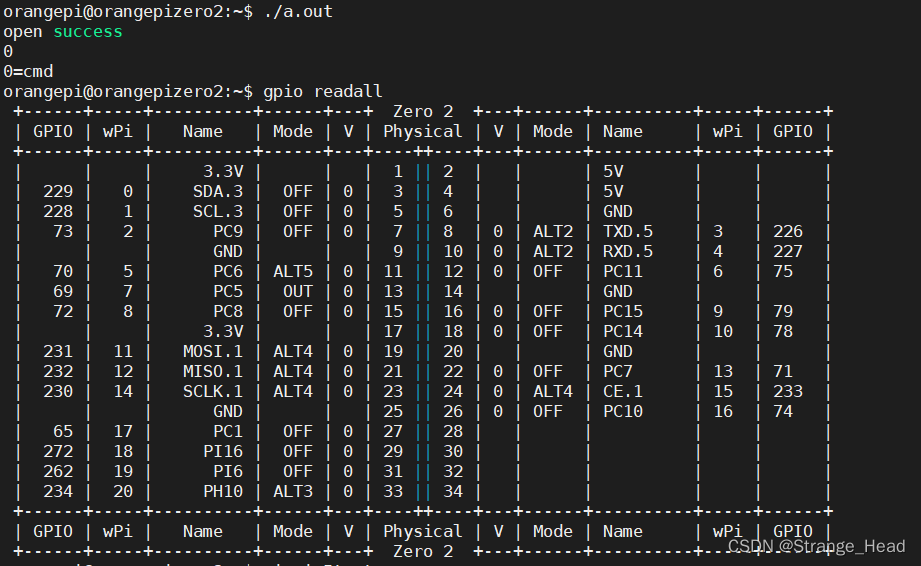
PC5为OUT模式,电平为低

结束
如有问题,欢迎提出,共同进步。
