# HandTrackingModule.py
import cv2
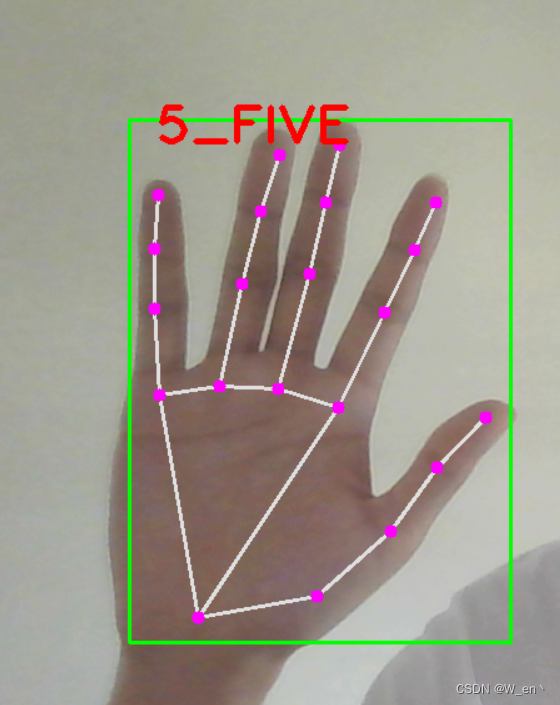
import mediapipe as mpclass HandDetector:"""使用mediapipe库查找手。导出地标像素格式。添加了额外的功能。如查找方式,许多手指向上或两个手指之间的距离。而且提供找到的手的边界框信息。"""def __init__(self, mode=False, maxHands=2, detectionCon=0.5, minTrackCon = 0.5):""":param mode: 在静态模式下,对每个图像进行检测:param maxHands: 要检测的最大手数:param detectionCon: 最小检测置信度:param minTrackCon: 最小跟踪置信度"""self.mode = modeself.maxHands = maxHandsself.modelComplex = Falseself.detectionCon = detectionConself.minTrackCon = minTrackCon# 初始化手部识别模型self.mpHands = mp.solutions.handsself.hands = self.mpHands.Hands(self.mode, self.maxHands, self.modelComplex,self.detectionCon, self.minTrackCon)self.mpDraw = mp.solutions.drawing_utils # 初始化绘图器self.tipIds = [4, 8, 12, 16, 20] # 指尖列表self.fingers = []self.lmList = []def findHands(self, img, draw=True):"""从图像(BRG)中找到手部。:param img: 用于查找手的图像。:param draw: 在图像上绘制输出的标志。:return: 带或不带图形的图像"""imgRGB = cv2.cvtColor(img, cv2.COLOR_BGR2RGB) # 将传入的图像由BGR模式转标准的Opencv模式——RGB模式,self.results = self.hands.process(imgRGB)if self.results.multi_hand_landmarks:for handLms in self.results.multi_hand_landmarks:if draw:self.mpDraw.draw_landmarks(img, handLms,self.mpHands.HAND_CONNECTIONS)return imgdef findPosition(self, img, handNo=0, draw=True):"""查找单手的地标并将其放入列表中像素格式。还可以返回手部周围的边界框。:param img: 要查找的主图像:param handNo: 如果检测到多只手,则为手部id:param draw: 在图像上绘制输出的标志。(默认绘制矩形框):return: 像素格式的手部关节位置列表;手部边界框"""xList = []yList = []bbox = []bboxInfo =[]self.lmList = []if self.results.multi_hand_landmarks:myHand = self.results.multi_hand_landmarks[handNo]for id, lm in enumerate(myHand.landmark):h, w, c = img.shapepx, py = int(lm.x * w), int(lm.y * h)xList.append(px)yList.append(py)self.lmList.append([px, py])if draw:cv2.circle(img, (px, py), 5, (255, 0, 255), cv2.FILLED)xmin, xmax = min(xList), max(xList)ymin, ymax = min(yList), max(yList)boxW, boxH = xmax - xmin, ymax - yminbbox = xmin, ymin, boxW, boxHcx, cy = bbox[0] + (bbox[2] // 2), \bbox[1] + (bbox[3] // 2)bboxInfo = {"id": id, "bbox": bbox,"center": (cx, cy)}if draw:cv2.rectangle(img, (bbox[0] - 20, bbox[1] - 20),(bbox[0] + bbox[2] + 20, bbox[1] + bbox[3] + 20),(0, 255, 0), 2)return self.lmList, bboxInfodef fingersUp(self):"""查找列表中打开并返回的手指数。会分别考虑左手和右手:return:竖起手指的列表"""if self.results.multi_hand_landmarks:myHandType = self.handType()fingers = []# Thumbif myHandType == "Right":if self.lmList[self.tipIds[0]][0] > self.lmList[self.tipIds[0] - 1][0]:fingers.append(1)else:fingers.append(0)else:if self.lmList[self.tipIds[0]][0] < self.lmList[self.tipIds[0] - 1][0]:fingers.append(1)else:fingers.append(0)# 4 Fingersfor id in range(1, 5):if self.lmList[self.tipIds[id]][1] < self.lmList[self.tipIds[id] - 2][1]:fingers.append(1)else:fingers.append(0)return fingersdef handType(self):"""检查传入的手部是左还是右:return: "Right" 或 "Left""""if self.results.multi_hand_landmarks:if self.lmList[17][0] < self.lmList[5][0]:return "Right"else:return "Left"
import cv2
from HandTrackingModule import HandDetectorclass Main:def __init__(self):self.camera = cv2.VideoCapture(0,cv2.CAP_DSHOW)self.camera.set(3, 1280)self.camera.set(4, 720)def Gesture_recognition(self):while True:self.detector = HandDetector()frame, img = self.camera.read()img = self.detector.findHands(img)lmList, bbox = self.detector.findPosition(img)if lmList:x_1, y_1 = bbox["bbox"][0], bbox["bbox"][1]x1, x2, x3, x4, x5 = self.detector.fingersUp()if (x2 == 1 and x3 == 1) and (x4 == 0 and x5 == 0 and x1 == 0):cv2.putText(img, "2_TWO", (x_1, y_1), cv2.FONT_HERSHEY_PLAIN, 3,(0, 0, 255), 3)elif (x2 == 1 and x3 == 1 and x4 == 1) and (x1 == 0 and x5 == 0):cv2.putText(img, "3_THREE", (x_1, y_1), cv2.FONT_HERSHEY_PLAIN, 3,(0, 0, 255), 3)elif (x2 == 1 and x3 == 1 and x4 == 1 and x5 == 1) and (x1 == 0):cv2.putText(img, "4_FOUR", (x_1, y_1), cv2.FONT_HERSHEY_PLAIN, 3,(0, 0, 255), 3)elif x1 == 1 and x2 == 1 and x3 == 1 and x4 == 1 and x5 == 1:cv2.putText(img, "5_FIVE", (x_1, y_1), cv2.FONT_HERSHEY_PLAIN, 3,(0, 0, 255), 3)elif x2 == 1 and (x1 == 0, x3 == 0, x4 == 0, x5 == 0):cv2.putText(img, "1_ONE", (x_1, y_1), cv2.FONT_HERSHEY_PLAIN, 3,(0, 0, 255), 3)elif x1 and (x2 == 0, x3 == 0, x4 == 0, x5 == 0):cv2.putText(img, "GOOD!", (x_1, y_1), cv2.FONT_HERSHEY_PLAIN, 3,(0, 0, 255), 3)cv2.imshow("camera", img)if cv2.getWindowProperty('camera', cv2.WND_PROP_VISIBLE) < 1:breakcv2.waitKey(1)if cv2.waitKey(1) & 0xFF == ord("q"):breakif __name__ == '__main__':Solution = Main()Solution.Gesture_recognition()