19_微信小程序之优雅实现侧滑菜单
19_微信小程序之优雅实现侧滑菜单
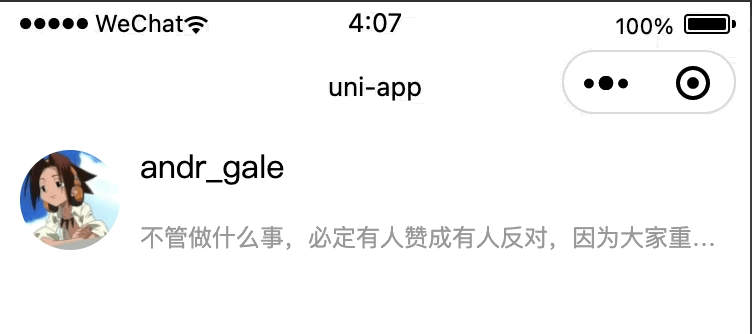
一.先上效果图

要实现这样一个效果,布局其实很简单,整体布局是一个横向滚动的scroll-view,难点在于怎么控制侧滑菜单的回弹,以及寻找回弹的边界条件? 此篇文章主要是基于uni-app来实现的,以后也将继续使用uni-app,但是即使使用的是原生微信小程序框架也不影响,思路都是一样的,而且uni-app的api和原生微信小程序api是对标的。
二.整体布局实现
整体布局是一个横向滚动的scroll-view,scroll-view内部有两个标签,第一个标签是内容区域,宽度占满组件的宽度,高度自适应,第二个标签用于摆放侧滑按钮,宽度为每一个侧滑按钮的宽度之和,由于是自定义组件,所以预留了slot插槽。
<template><scroll-view class="swipe-cell__inner" enable-flex scroll-x><view class="swipe-cell__content"><slot></slot></view><view class="swipe-cell__right"><slot name="right"></slot></view></scroll-view>
</template><script>export default {name:"swipe-cell",data() {return {};}}
</script><style scoped>.swipe-cell__inner /deep/ ::-webkit-scrollbar {display: block;width: 0px !important;height: 0px !important;}.swipe-cell__inner {width: 100%;display: inline-flex;flex-direction: row;align-items: flex-start;white-space: nowrap;}.swipe-cell__content {display: inline-block;width: 100%;flex-shrink: 0;position: relative;white-space: normal;overflow: hidden;}.swipe-cell__right {align-self: stretch;display: inline-flex;flex-direction: row;align-items: stretch;position: relative;white-space: normal;}
</style>
三.在页面中使用该组件
我们先把组件引入使用,页面布局没问题之后,再来考虑侧滑面板的回弹效果。
<template><scroll-view class="scroll-view" scroll-y><swipe-cell class="swipe-cell" v-for="(item, index) in 3"><view class="user-item"><image class="user-avatar" src="/static/avatar.png"/><view class="user-info-group"><view class="user-name">andr_gale</view><view class="user-desc clamp1">不管做什么事,必定有人赞成有人反对,因为大家重视的东西都有所不同。而且,不管什么事情,都可以随意给他加上好与不好的理由,所以,若果一定要分清争议与罪恶的行为,反而有问题。因此,重要的事情由心去决定就行了,不是凭感情,而是凭心</view></view></view><template #right><view class="user-button-group"><view class="user-button-follow">关注</view><view class="user-button-chat">私信</view></view></template></swipe-cell></scroll-view>
</template><script>export default {data() {return {}},onLoad() {},methods: {}}
</script><style>page {width: 100%;height: 100%;overflow: hidden;display: flex;flex-direction: column;align-items: stretch;}.clamp1 {display: -webkit-box;word-break: break-all;overflow: hidden;-webkit-box-orient: vertical;text-overflow: ellipsis;-webkit-line-clamp: 1;}.clamp2 {display: -webkit-box;word-break: break-all;overflow: hidden;-webkit-box-orient: vertical;text-overflow: ellipsis;-webkit-line-clamp: 2;}.clamp3 {display: -webkit-box;word-break: break-all;overflow: hidden;-webkit-box-orient: vertical;text-overflow: ellipsis;-webkit-line-clamp: 3;}.scroll-view {height: 100%;}.swipe-cell {display: block;border-bottom: thin solid #f2f2f2;}.swipe-cell:last-child {border-bottom: none;}.user-item {display: flex;flex-direction: row;align-items: stretch;padding: 20rpx;box-sizing: border-box;}.user-avatar {width: 100rpx;height: 100rpx;display: block;border-radius: 50rpx;box-sizing: border-box;overflow: hidden;}.user-info-group {flex: 1;overflow: hidden;margin-left: 20rpx;display: flex;flex-direction: column;align-items: stretch;justify-content: center;}.user-name {font-size: 32rpx;color: #000;line-height: 1;margin-bottom: auto;}.user-desc {font-size: 24rpx;color: #999;line-height: 1;margin-top: auto;}.user-button-group {display: flex;flex-direction: row;align-items: stretch;}.user-button-follow {width: 160rpx;background: orange;font-size: 28rpx;color: white;display: flex;flex-direction: row;align-items: center;justify-content: center;}.user-button-chat {width: 160rpx;background: #09BB07;font-size: 28rpx;color: white;display: flex;flex-direction: row;align-items: center;justify-content: center;}
</style>

四.什么时候向左回弹打开? 什么时候向右回弹关闭

上图中,红色区域是一条辅助线,被固定在了组件的最由边的位置,为了好演示,我把宽度设置的比较宽,正常1px就够了,蓝色区域为侧滑面板的右半边。
当我们滑动完,放手后,红色区域与蓝色区域相交,这时应该向左回弹打开。
当我们滑动完,放手后,红色区域与蓝色区域不相交,这时应该向右回弹关闭。
<template><view class="swipe-cell__container"><scroll-view class="swipe-cell__inner" enable-flex scroll-x><view class="swipe-cell__content"><slot></slot></view><view class="swipe-cell__right"><view class="swipe-cell__right-half"></view><slot name="right"></slot></view></scroll-view><view class="swipe-cell__guide-line"></view></view>
</template><script>...
</script><style scoped>.swipe-cell__container {position: relative;width: 100%;}....swipe-cell__right-half {position: absolute;left: 50%;top: 0;width: 50%;height: 100%;background: blue;}.swipe-cell__guide-line {position: absolute;width: 6px;top: 0;bottom: 0;right: 0;background: red;}
</style>
问题转化为怎么判断红色区域与蓝色区域相交,我们的主角正式登场,使用IntersectionObserver可监听两个或多个组件节点在布局位置上的相交状态。
-
IntersectionObserver wx.createIntersectionObserver(Object component, Object options)
- 在页面中使用: IntersectionObserver wx.createIntersectionObserver(this, {observeAll: true}),observeAll为true可同时监听多个节点
- 在自定义组件中使用:IntersectionObserver this.createIntersectionObserver({observeAll: true})
-
IntersectionObserver IntersectionObserver.relativeTo(string selector, Object margins)
- 使用选择器指定一个节点,作为参照区域
-
IntersectionObserver.observe(string targetSelector, IntersectionObserver.observeCallback callback)
- 指定目标节点的选择器并监听由relativeTo指定的参照区域与目标节点是否相交,由于我们需要监听多个video节点,所以这里的目标节点选择器我们使用class选择器即可。
- 当目标节点与参照区域相交时,callback(res)返回的res中的intersectionRatio大于0
- 当目标节点与参照区域不相交时,callback(res)返回的res中的intersectionRatio等于0
-
IntersectionObserver.disconnect()
- 最后当页面或组件销毁的时候,需调用IntersectionObserver.disconnect()取消监听
<template><view class="swipe-cell__container"><scroll-view class="swipe-cell__inner" enable-flex scroll-x @touchend="onTouchEnd($event)"><view class="swipe-cell__content"><slot></slot></view><view class="swipe-cell__right"><view id="observable" class="swipe-cell__right-half"></view><slot name="right"></slot></view></scroll-view><view id="guide-line" class="swipe-cell__guide-line"></view></view>
</template><script>export default {name:"swipe-cell",data() {return {intersectionObserver: undefined,intersectionRatio: -1,};},mounted() {this.intersectionObserver = uni.createIntersectionObserver(this)this.intersectionObserver.relativeTo("#guide-line").observe("#observable", (res) => {let intersectionRatio = res.intersectionRatiothis.intersectionRatio = intersectionRatio})},unmounted() {this.intersectionObserver.disconnect()},methods: {onTouchEnd: function(event) {if(this.intersectionRatio > 0) {//红色区域与蓝色区域相交,向左回弹打开console.log("onTouchEnd", "向左回弹打开")} else {//红色区域与蓝色区域不相交,向右回弹关闭console.log("onTouchEnd", "向右回弹关闭")}}}}
</script><style scoped>...
</style>
五.怎么控制回弹?
通过设置scroll-view的scroll-into-view属性的值,滚动到指定元素来控制回弹,并设置scroll-with-animation为true来开启自动滚动动画效果,我们给内容区域的标签指定id为content,给侧滑面板的标签指定id为right,那么:
当红色区域与蓝色区域相交时,设置scroll-into-view属性的值为right,向左回弹打开
当红色区域与蓝色区域不相交,设置scroll-into-view属性的值为content,向左回弹关闭
<template><view class="swipe-cell__container"><scroll-view class="swipe-cell__inner" enable-flex scroll-x @touchend="onTouchEnd($event)" :scroll-into-view="scrollIntoView" scroll-with-animation><view id="content" class="swipe-cell__content"><slot></slot></view><view id="right" class="swipe-cell__right"><view id="observable" class="swipe-cell__right-half"></view><slot name="right"></slot></view></scroll-view><view id="guide-line" class="swipe-cell__guide-line"></view></view>
</template><script>export default {name:"swipe-cell",data() {return {intersectionObserver: undefined,intersectionRatio: -1,scrollIntoView: "content"};},...methods: {onTouchEnd: function(event) {if(this.intersectionRatio > 0) {//红色区域与蓝色区域相交,向左回弹打开console.log("onTouchEnd", "向左回弹打开")this.scrollIntoView = "right"} else {//红色区域与蓝色区域不相交,向右回弹关闭console.log("onTouchEnd", "向右回弹关闭")this.scrollIntoView = "content"}}}}
</script><style scoped>...
</style>

仔细观察上图,我们回发现有一个问题,当我们两次放手,两次的相交状态从不相交到相交或者从相交到不相交时,能正常回弹,
从相交到相交或者从不相交到不相交时,则不会回弹,这是因为:
从相交到相交的过程中,scroll-into-view始终为right不变
从不相交到不相交的过程中,scroll-into-view始终为content不变
要解决这个问题,我们需要在每一次放手的时候,产生一个唯一的随机数,给内容区域的标签指定id为content-随机数,给侧滑面板的标签指定id为right−{随机数},给侧滑面板的标签指定id为right-随机数,给侧滑面板的标签指定id为right−{随机数},最后,如果是回弹打开,设置scroll-into-view的值为right-随机数,如果是回弹关闭,设置scroll−into−view的值为content−{随机数},如果是回弹关闭,设置scroll-into-view的值为content-随机数,如果是回弹关闭,设置scroll−into−view的值为content−{随机数}。
这个随机数的生成规则,你可以自己写算法实现,这里我用了一种比较巧妙的办法,那就是在事件触发的回调中,系统会给我们一个event对象,我们通过这个event对象的timeStamp属性,可以获取到事件触发的时间戳,这个时间戳必然是唯一的,因此event.timesSamp就可以作为这个唯一的随机数来使用。
<template><view class="swipe-cell__container"><scroll-view class="swipe-cell__inner" enable-flex scroll-x @touchend="onTouchEnd($event)" :scroll-into-view="scrollIntoView" scroll-with-animation><view :id="'content-' + random" class="swipe-cell__content"><slot></slot></view><view :id="'right-' + random" class="swipe-cell__right"><view id="observable" class="swipe-cell__right-half"></view><slot name="right"></slot></view></scroll-view><view id="guide-line" class="swipe-cell__guide-line"></view></view>
</template><script>export default {name:"swipe-cell",data() {return {intersectionObserver: undefined,intersectionRatio: -1,scrollIntoView: "content-0",random: 0,};},...methods: {onTouchEnd: function(event) {this.random = event.timeStamp || 0if(this.intersectionRatio > 0) {//红色区域与蓝色区域相交,向左回弹打开console.log("onTouchEnd", "向左回弹打开")this.$nextTick(() => {this.scrollIntoView = "right-" + this.random})} else {//红色区域与蓝色区域不相交,向右回弹关闭console.log("onTouchEnd", "向右回弹关闭")this.$nextTick(() => {this.scrollIntoView = "content-" + this.random})}}}}
</script><style scoped>...
</style>

最后,我们把辅助色块去掉,就大功告成了。
<style scoped>....swipe-cell__right-half {position: absolute;left: 50%;top: 0;width: 50%;height: 100%;z-index: -1;}.swipe-cell__guide-line {position: absolute;width: 1px;top: 0;bottom: 0;right: 0;z-index: -1;}
</style>
六.完整代码
<template><view class="swipe-cell__container"><scroll-view class="swipe-cell__inner" enable-flex scroll-x @touchend="onTouchEnd($event)" :scroll-into-view="scrollIntoView" scroll-with-animation><view :id="'content-' + random" class="swipe-cell__content"><slot></slot></view><view :id="'right-' + random" class="swipe-cell__right"><view id="observable" class="swipe-cell__right-half"></view><slot name="right"></slot></view></scroll-view><view id="guide-line" class="swipe-cell__guide-line"></view></view>
</template><script>export default {name:"swipe-cell",data() {return {intersectionObserver: undefined,intersectionRatio: -1,scrollIntoView: "content-0",random: 0,};},mounted() {this.intersectionObserver = uni.createIntersectionObserver(this)this.intersectionObserver.relativeTo("#guide-line").observe("#observable", (res) => {let intersectionRatio = res.intersectionRatiothis.intersectionRatio = intersectionRatio})},unmounted() {this.intersectionObserver.disconnect()},methods: {onTouchEnd: function(event) {this.random = event.timeStamp || 0if(this.intersectionRatio > 0) {//红色区域与蓝色区域相交,向左回弹打开console.log("onTouchEnd", "向左回弹打开")this.$nextTick(() => {this.scrollIntoView = "right-" + this.random})} else {//红色区域与蓝色区域不相交,向右回弹关闭console.log("onTouchEnd", "向右回弹关闭")this.$nextTick(() => {this.scrollIntoView = "content-" + this.random})}}}}
</script><style scoped>.swipe-cell__container {position: relative;width: 100%;}.swipe-cell__inner /deep/ ::-webkit-scrollbar {display: block;width: 0px !important;height: 0px !important;}.swipe-cell__inner {width: 100%;display: inline-flex;flex-direction: row;align-items: flex-start;white-space: nowrap;}.swipe-cell__content {display: inline-block;width: 100%;flex-shrink: 0;position: relative;white-space: normal;overflow: hidden;}.swipe-cell__right {align-self: stretch;display: inline-flex;flex-direction: row;align-items: stretch;position: relative;white-space: normal;}.swipe-cell__right-half {position: absolute;left: 50%;top: 0;width: 50%;height: 100%;z-index: -1;}.swipe-cell__guide-line {position: absolute;width: 1px;top: 0;bottom: 0;right: 0;z-index: -1;}
</style>