Spring-2-透彻理解Spring 注解方式创建Bean--IOC
今日目标
学习使用XML配置第三方Bean
掌握纯注解开发定义Bean对象
掌握纯注解开发IOC模式
1. 第三方资源配置管理
说明:以管理DataSource连接池对象为例讲解第三方资源配置管理
1.1 XML管理Druid连接池(第三方Bean)对象【重点】
数据库准备
-- 创建数据库
create database if not exists spring_druid character set utf8;
use spring_druid;
-- 创建表
create table if not exists tbl_account(id int primary key auto_increment,name varchar(20),money double
);
-- 插入数据
insert into tbl_account values(null,'张三',1000);
insert into tbl_account values(null,'李四',1000);
-- 查询所有
select * from tbl_account;
1.2 代码实现XML管理Druid连接池对象(第三方Bean)
【第一步】创建12_1_xml_druid项目

【第二步】Pom.xml添加Druid连接池依赖
 <dependencies><!--导入spring的坐标spring-context,对应版本是5.3.15.RELEASE--><dependency><groupId>org.springframework</groupId><artifactId>spring-context</artifactId><version>5.3.15</version></dependency><!-- mysql 驱动--><dependency><groupId>mysql</groupId><artifactId>mysql-connector-java</artifactId><version>8.0.30</version></dependency><!--druid包--><dependency><groupId>com.alibaba</groupId><artifactId>druid</artifactId><version>1.2.18</version></dependency><!-- 导入junit的测试包 --><dependency><groupId>org.junit.jupiter</groupId><artifactId>junit-jupiter</artifactId><version>5.8.2</version><scope>test</scope></dependency><dependency><groupId>org.projectlombok</groupId><artifactId>lombok</artifactId><version>1.18.28</version></dependency>
</dependencies>
【第三步】配置DruidDataSource连接池Bean对象 思考:配置数据库连接参数时,注入驱动类名是用driverClassName还是driver? 在resources下创建Spring的核心配置文件:application.xml

<?xml version="1.0" encoding="UTF-8"?>
<beans xmlns="http://www.springframework.org/schema/beans"xmlns:xsi="http://www.w3.org/2001/XMLSchema-instance"xsi:schemaLocation="http://www.springframework.org/schema/beans http://www.springframework.org/schema/beans/spring-beans.xsd"><!--1.创建连接池对象 DruidDataSource实际:  dataSource = new DruidDataSource();--><bean id="dataSource" class="com.alibaba.druid.pool.DruidDataSource"><property name="driverClassName" value="com.mysql.jdbc.Driver"/><property name="url" value="jdbc:mysql://localhost:3306/spring_druid"/><property name="username" value="root"/><property name="password" value="root"/></bean>
</beans>
【第四步】在测试类中从IOC容器中获取连接池对象并打印

package com.zbbmeta;import org.junit.jupiter.api.Test;
import org.springframework.context.support.ClassPathXmlApplicationContext;import javax.sql.DataSource;
import java.sql.Connection;
import java.sql.SQLException;public class DataSourceTest {@Testpublic void test() throws SQLException {//目标:从IOC容器中获取德鲁伊连接池对象//1.创建IOC容器ClassPathXmlApplicationContext ac =new ClassPathXmlApplicationContext("application.xml");//2.获取连接池对象和数据库连接对象DataSource dataSource = ac.getBean(DataSource.class);Connection connection = dataSource.getConnection();//3.打印对象System.out.println("连接池对象:"+dataSource);System.out.println("连接象地址:"+connection);//4.关闭容器ac.close();}
}
-
控制台结果:
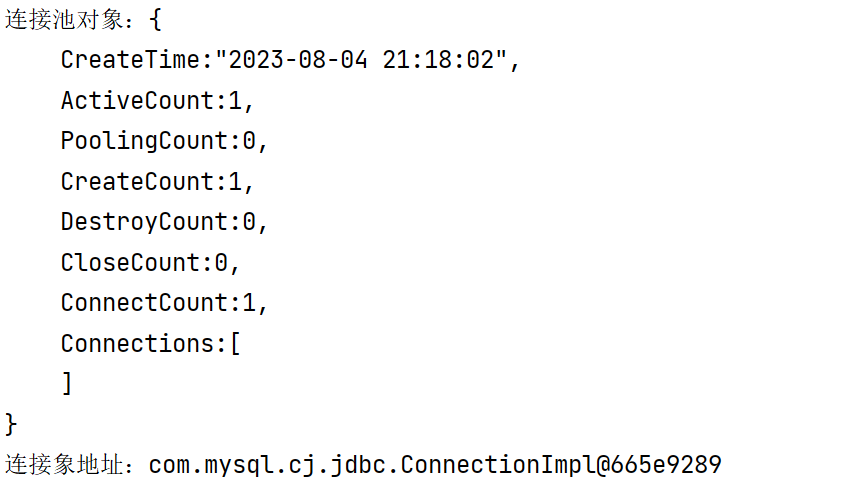
现在我们的数据库参数都是写死在xml文件中的,我们讲解druid,是希望大家可以通过这个第三方Bean创建,实现我们举一反三实现其他第三方Bean的创建
思考:根据上面描述我们向如果有一千个第三方Bean需要创建,那么我们把每一个Bean的参数都写死在xml里面?
肯定不是的,所以我们要学习如何将参数数据进行提取出来,每一个Bean的参数单独放一个文件,方便我们查找和修改
1.3 加载properties属性文件【重点】
目的:将数据库的连接参数抽取到一个单独的文件中,与Spring配置文件解耦。
1.3.1 properties基本用法
【第一步】在resources下编写jdbc.properties属性文件

jdbc.driver=com.mysql.jdbc.Driver
jdbc.url=jdbc:mysql://127.0.0.1:3306/spring_druid
username=root
jdbc.password=root
【第二步】在application.xml中开启开启context命名空间,加载jdbc.properties属性文件
<context:property-placeholder location="jdbc.properties" />
【第三步】在配置连接池Bean的地方使用EL表达式获取jdbc.properties属性文件中的值
    <!--1.创建连接池对象 DruidDataSource实际:  dataSource = new DruidDataSource();-->
<bean id="dataSource" class="com.alibaba.druid.pool.DruidDataSource"><property name="driverClassName" value="${jdbc.driver}"/><property name="url" value="${jdbc.url}"/><property name="username" value="${username}"/><property name="password" value="${jdbc.password}"/>
</bean>
【第四步】配置完成之后,运行之前的获取Druid连接池代码
思考:会不会运行成功
不会
严重: create connection SQLException, url: jdbc:mysql://127.0.0.1:3306/spring_druid, errorCode 1045, state 28000
java.sql.SQLException: Access denied for user 'zbb'@'localhost' (using password: YES)
为什么会出现这样的问题?
因为我们加载了系统的环变量
-
解决1:换一个名称,例如不叫username,叫jdbc.username。(了解)
【第五步】报错解决方式:在properties标签添加属性
<context:property-placeholder location="jdbc.properties" system-properties-mode="NEVER"/>
application.xml完整配置
<?xml version="1.0" encoding="UTF-8"?>
<beans xmlns="http://www.springframework.org/schema/beans"xmlns:xsi="http://www.w3.org/2001/XMLSchema-instance"xmlns:context="http://www.springframework.org/schema/context"xsi:schemaLocation="http://www.springframework.org/schema/beans http://www.springframework.org/schema/beans/spring-beans.xsd http://www.springframework.org/schema/context https://www.springframework.org/schema/context/spring-context.xsd"><!--加载properties文件, ctrl + z 撤销${键}: 取键对应的值system-properties-mode="NEVER": 不使用系统的环境变量location: 指定properties文件的位置location="jdbc.properties,msg.properties": 加载多个properties文件, 使用,逗号分割location="*.properties": 加载所有的properties文件,如果单元测试加载 src/test/resources里面的所有的properties如果main方法运行加载 src/main/resources里面的所有的propertieslocation="classpath:*.properties" 加载类路径所有的properties文件, 用在Web应用中location="classpath*:*.properties" 加载类路径和依赖的jar中所有的properties文件, 用在Web应用中--><context:property-placeholder location="jdbc.properties" system-properties-mode="NEVER"/><!--1.创建连接池对象 DruidDataSource实际:  dataSource = new DruidDataSource();--><bean id="dataSource" class="com.alibaba.druid.pool.DruidDataSource"><property name="driverClassName" value="${jdbc.driver}"/><property name="url" value="${jdbc.url}"/><property name="username" value="${username}"/><property name="password" value="${jdbc.password}"/></bean>
<!--    <bean id="dataSource" class="com.alibaba.druid.pool.DruidDataSource"><property name="driverClassName" value="com.mysql.jdbc.Driver"/><property name="url" value="jdbc:mysql://localhost:3306/spring_druid"/><property name="username" value="root"/><property name="password" value="root"/></bean>-->
</beans>
2.Spring容器
2.1 创建容器
-
方式一:类路径加载配置文件
ApplicationContext ctx = new ClassPathXmlApplicationContext("application.xml");
-
方式二:文件路径加载配置文件
ApplicationContext ctx = new FileSystemXmlApplicationContext("D:\\application.xml");
-
加载多个配置文件
ApplicationContext ctx = new ClassPathXmlApplicationContext("bean1.xml", "bean2.xml");
2.2 Spring容器中获取bean对象
-
方式一:使用bean名称获取
弊端:需要自己强制类型转换
DataSource dataSource = (DataSource)ac.getBean("dataSource");
-
方式二:使用bean名称获取并指定类型
弊端:推荐使用
DataSource dataSource = ctx.getBean("dataSource", DataSource.class);
-
方式三:使用bean类型获取
弊端:如果IOC容器中同类型的Bean对象有多个,此处获取会报错
DataSource dataSource = ac.getBean(DataSource.class);
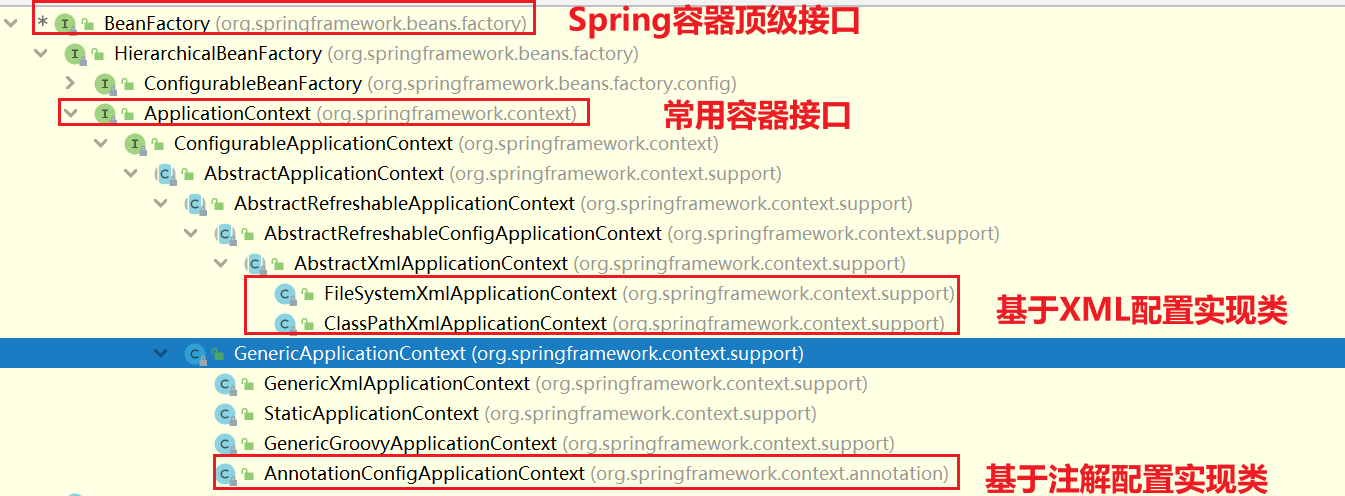
2.3 容器类层次结构
-
BeanFactory是IoC容器的顶层接口,初始化BeanFactory对象时,加载的bean延迟加载
-
ApplicationContext接口是Spring容器的核心接口,初始化时bean立即加载
-
ApplicationContext接口提供基础的bean操作相关方法,通过其他接口扩展其功能
- ApplicationContext接口常用初始化类
-
ClassPathXmlApplicationContext(常用)
-
FileSystemXmlApplicationContext
-
AnnotationConfigApplicationContext
-
3. Spring注解开发
3.1 注解开发定义Bean对象【重点】
目的:xml配置Bean对象有些繁琐,使用注解简化Bean对象的定义
3.2代码实现注解开发
【第一步】创建12_2_annotation_ioc

【第二步】Pom.xml添加依赖
<dependencies><!-- spring容器包 --><dependency><groupId>org.springframework</groupId><artifactId>spring-context</artifactId><version>5.2.10.RELEASE</version></dependency><!-- junit --><dependency><groupId>junit</groupId><artifactId>junit</artifactId><version>4.13</version><scope>test</scope></dependency>
</dependencies>
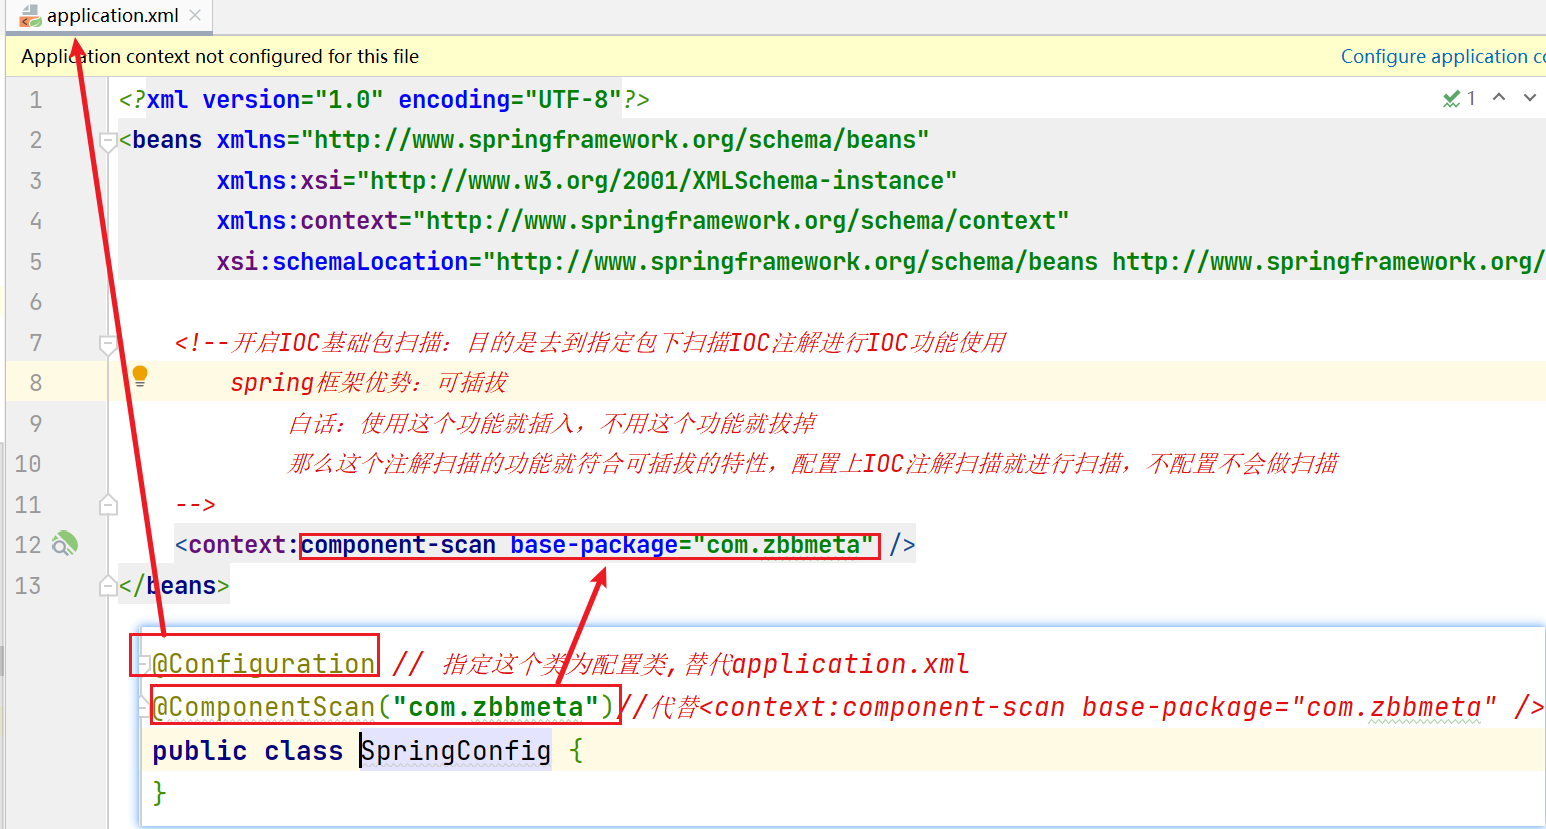
【第三步】在application.xml中开启Spring注解包扫描
<?xml version="1.0" encoding="UTF-8"?>
<beans xmlns="http://www.springframework.org/schema/beans"xmlns:xsi="http://www.w3.org/2001/XMLSchema-instance"xmlns:context="http://www.springframework.org/schema/context"xsi:schemaLocation="http://www.springframework.org/schema/beans http://www.springframework.org/schema/beans/spring-beans.xsd http://www.springframework.org/schema/context https://www.springframework.org/schema/context/spring-context.xsd"><!--开启IOC基础包扫描:目的是去到指定包下扫描IOC注解进行IOC功能使用spring框架优势:可插拔白话:使用这个功能就插入,不用这个功能就拔掉那么这个注解扫描的功能就符合可插拔的特性,配置上IOC注解扫描就进行扫描,不配置不会做扫描--><context:component-scan base-package="com.zbbmeta" />
</beans>
【第四步】在类上使用@Component注解定义Bean。
public interface StudentDao {/*** 添加学生*/void save();
}
package com.zbbmeta.dao.impl;import com.zbbmeta.dao.StudentDao;
import org.springframework.stereotype.Component;/*** @Component* 作用:相当于<bean>标签,用于创建IOC创建对象并加入IOC容器* 使用方法2种格式:*    @Component 创建对象并且设置对象别名为类名小驼峰,*              与<bean class="com.zbbmeta.dao.impl.StudentDaoImpl" id="studentDaoImpl"></bean>功能一样*    @Component("自定义别名") 创建对象并且设置别名加入IOC容器**   IOC创建对象注解还有衍生的3个*      @Controller 定义表现层的对象*      @Service 定义业务层的对象*      @Repository 定义数据访问层的对象*      说明:这3个功能与@Component一样,只是为了增加可读性*            @Component适合在工具类的上面使用创建对象**/
@Component
public class StudentDaoImpl implements StudentDao {@Overridepublic void save() {System.out.println("DAO: 添加学生信息到数据库...");}
}
补充说明:如果@Component注解没有使用参数指定Bean的名称,那么类名首字母小写就是Bean在IOC容器中的默认名称。例如:StudentDaoImpl对象在IOC容器中的名称是studentDaoImpl。
【第五步】在测试类中获取Bean对象
package com.zbbmeta;import com.zbbmeta.dao.StudentDao;
import org.junit.jupiter.api.Test;
import org.springframework.context.ApplicationContext;
import org.springframework.context.support.ClassPathXmlApplicationContext;public class StudentDaoAnnotationTest {//目标:获取注解创建的Bean对象@Testpublic void testAnnotation(){//1.根据配置文件application.xml创建IOC容器ApplicationContext ac = new ClassPathXmlApplicationContext("application.xml");//2.从IOC容器里面获取id="studentDao"对象StudentDao studentDao = (StudentDao) ac.getBean("studentDaoImpl");System.out.println(studentDao);}
}
运行结果
com.zbbmeta.dao.impl.StudentDaoImpl@7d64e326
注意:每一个人获取的地址是不一样的
3.3 @Component三个衍生注解
说明:加粗的注解为常用注解
- Spring提供**
@Component**注解的三个衍生注解-
**
@Controller**:用于表现层bean定义 -
**
@Service**:用于业务层bean定义 -
@Repository:用于数据层bean定义
-
说明:这3个功能与@Component一样,只是为了增加可读性
@Component适合在工具类的上面使用创建对象
@Repository
public class StudentDaoImpl implements StudentDao {
}
我们上面代码虽然类中都使用注解,但是我们还是存在xml,说明现在spring开发还不是完全的注解开发,可以称为半注解开发
4 Spring纯注解开发模式IOC【重点】
问题导入
思考:配置类上使用什么注解进行Spring注解包扫描替代xml中的配置?
4.1 纯注解开发模式介绍
-
Spring3.0开启了纯注解开发模式,使用Java类替代配置文件,开启了Spring快速开发赛道
-
Java类代替Spring核心配置文件
-
@Configuration注解用于设定当前类为配置类
-
@ComponentScan注解用于设定扫描路径
注意:此注解只能添加一次,多个数据请用数组格式
@ComponentScan({com.zbbmeta.service","com.zbbmeta.dao"})
-
读取Spring注解配置类初始化容器对象
//加载配置类初始化容器
ApplicationContext ctx = new AnnotationConfigApplicationContext(SpringConfig.class);
4.2 代码演示
【第零步】创建12_3_full_annotation_ioc项目并添加依赖
依赖和上一个项目相同

【第一步】定义配置类代替配置文件
@Configuration // 指定这个类为配置类,替代application.xml
@ComponentScan("com.zbbmeta")//代替<context:component-scan base-package="com.zbbmeta" />
//设置bean扫描路径,多个路径书写为字符串数组格式
//@ComponentScan({com.zbbmeta.service","com.zbbmeta.dao"})
public class SpringConfig {
}
【第二步】在测试类中加载配置类,获取Bean对象并使用
package com.zbbmeta;import com.zbbmeta.config.SpringConfig;
import com.zbbmeta.service.StudentService;
import org.junit.jupiter.api.Test;
import org.springframework.context.ApplicationContext;
import org.springframework.context.annotation.AnnotationConfigApplicationContext;public class StudentDaoAnnotationTest {//目标:获取注解创建的Bean对象@Testpublic void testAnnotation(){//1.AnnotationConfigApplicationContext加载Spring配置类初始化Spring容器ApplicationContext ctx = new AnnotationConfigApplicationContext(SpringConfig.class);StudentService studentService = (StudentService) ctx.getBean("studentServiceImpl");System.out.println(studentService);//按类型获取beanStudentService studentService2 = ctx.getBean(StudentService.class);System.out.println(studentService2);}
}
4.3 注解开发Bean作用范围和生命周期管理
问题导入
思考:在类上使用什么注解定义Bean的作用范围?
4.3.1 bean作用范围注解配置
-
使用@Scope定义bean作用范围
@Component
@Scope("singleton")
public class StudentUtils {
}
4.3.2 bean生命周期注解配置
-
使用@PostConstruct、@PreDestroy定义bean生命周期
package com.zbbmeta.utils;import org.springframework.context.annotation.Scope;
import org.springframework.stereotype.Component;
import javax.annotation.PostConstruct;
import javax.annotation.PreDestroy;@Component
@Scope("singleton")
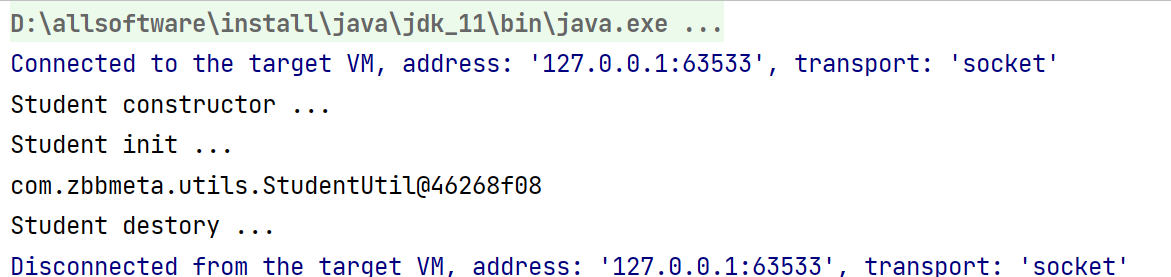
public class StudentUtil {public StudentUtil() {System.out.println("Student constructor ...");}@PostConstructpublic void init(){System.out.println("Student init ...");}@PreDestroypublic void destroy(){System.out.println("Student destory ...");}
}注意:@PostConstruct和@PreDestroy注解是jdk中提供的注解,从jdk9开始,jdk中的javax.annotation包被移除了,也就是说这两个注解就用不了了,可以额外导入一下依赖解决这个问题。
<dependency><groupId>javax.annotation</groupId><artifactId>javax.annotation-api</artifactId><version>1.3.2</version>
</dependency>
-
测试类
@Test
public void testStudentUtil(){//1.AnnotationConfigApplicationContext加载Spring配置类初始化Spring容器AnnotationConfigApplicationContext ctx = new AnnotationConfigApplicationContext(SpringConfig.class);//按类型获取beanStudentUtil studentUtil = ctx.getBean(StudentUtil.class);System.out.println(studentUtil);//关闭容器ctx.close();
}
测试结果: