Android中级——RemoteView
RemoteView
- RemoteView的应用
- Notification
- Widget
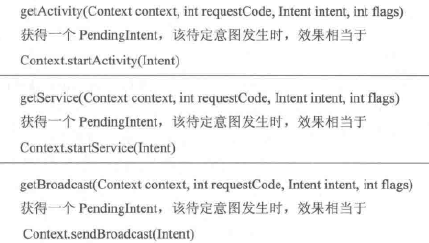
- PendingIntent
- RemoteViews内部机制
- 模拟RemoteViews
RemoteView的应用
Notification
如下开启一个系统的通知栏,点击后跳转到某网页
public class MainActivity extends AppCompatActivity {private static final String TAG = "MainActivity";protected void onCreate(Bundle savedInstanceState) {super.onCreate(savedInstanceState);setContentView(R.layout.activity_main);Intent intent = new Intent(Intent.ACTION_VIEW, Uri.parse("http://www.baidu.com"));PendingIntent pendingIntent = PendingIntent.getActivity(this, 0, intent, PendingIntent.FLAG_UPDATE_CURRENT);NotificationManager manager = (NotificationManager) getSystemService(Context.NOTIFICATION_SERVICE);NotificationChannel channel1 = new NotificationChannel("0", "channel1", NotificationManager.IMPORTANCE_LOW);manager.createNotificationChannel(channel1);Notification.Builder builder = new Notification.Builder(this, "0");builder.setSmallIcon(R.drawable.ic_launcher).setLargeIcon(Icon.createWithResource(this, R.drawable.ic_launcher)).setContentTitle("Notification").setContentText("Hello World").setContentIntent(pendingIntent);manager.notify(1, builder.build());}
}
效果如下

若采用RemoteView,可以自定义通知栏的布局,notification.xml文件如下
<?xml version="1.0" encoding="utf-8"?>
<LinearLayout xmlns:android="http://schemas.android.com/apk/res/android"android:id="@+id/root"android:layout_width="match_parent"android:layout_height="match_parent"><ImageViewandroid:id="@+id/iv"android:layout_width="0dp"android:layout_height="match_parent"android:layout_weight="1" /><TextViewandroid:id="@+id/tv"android:layout_width="0dp"android:layout_height="match_parent"android:layout_weight="1"android:gravity="center_vertical" />
</LinearLayout>
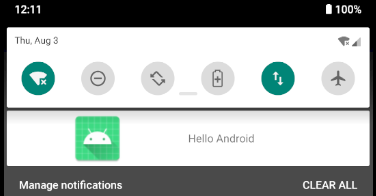
代码如下,可通过一系列set方法设置布局
public class MainActivity extends AppCompatActivity {private static final String TAG = "MainActivity";protected void onCreate(Bundle savedInstanceState) {super.onCreate(savedInstanceState);setContentView(R.layout.activity_main);Intent intent = new Intent(Intent.ACTION_VIEW, Uri.parse("http://www.baidu.com"));PendingIntent pendingIntent = PendingIntent.getActivity(this, 0, intent, PendingIntent.FLAG_UPDATE_CURRENT);NotificationManager manager = (NotificationManager) getSystemService(Context.NOTIFICATION_SERVICE);NotificationChannel channel1 = new NotificationChannel("0", "channel1", NotificationManager.IMPORTANCE_LOW);manager.createNotificationChannel(channel1);RemoteViews remoteViews = new RemoteViews(getPackageName(), R.layout.notification);remoteViews.setTextViewText(R.id.tv, "Hello Android");remoteViews.setImageViewResource(R.id.iv, R.drawable.ic_launcher);remoteViews.setOnClickPendingIntent(R.id.root, pendingIntent);Notification.Builder builder = new Notification.Builder(this, "0");builder.setSmallIcon(R.drawable.ic_launcher).setCustomContentView(remoteViews);manager.notify(1, builder.build());}
}
效果如下
Widget
res/layout下创建widget.xml
<?xml version="1.0" encoding="utf-8"?>
<LinearLayout xmlns:android="http://schemas.android.com/apk/res/android"android:layout_width="match_parent"android:layout_height="match_parent"><ImageViewandroid:id="@+id/iv"android:layout_width="wrap_content"android:layout_height="wrap_content"android:src="@drawable/ic_launcher" />
</LinearLayout>
res/xml下创建appwidget_provider_info.xml,设置最小宽高、自动更新的周期(ms)
<?xml version="1.0" encoding="utf-8"?>
<appwidget-provider xmlns:android="http://schemas.android.com/apk/res/android"android:initialLayout="@layout/widget"android:minWidth="84dp"android:minHeight="84dp"android:updatePeriodMillis="86400000"></appwidget-provider>
创建MyAppWidgetProvider,给小组件设置一个点击动画
- onEnable:第一次添加时调用,可添加多次,但只在第一次调用
- onUpdate:添加或更新(周期时间到)时调用
- onDeleted:删除时调用
- onDisabled:最后一个小组件被删除时调用
- onReceive :分发上面的事件
public class MyAppWidgetProvider extends AppWidgetProvider {private static final String TAG = "MyAppWidgetProvider";public static final String CLICK_ACTION = "com.demo.demo0.MyAppWidgetProvider.CLICK";public MyAppWidgetProvider() {super();}@Overridepublic void onReceive(Context context, Intent intent) {super.onReceive(context, intent);String action = intent.getAction();Log.d(TAG, "onReceive: action = " + action);if (CLICK_ACTION.equals(action)) {Toast.makeText(context, "click", Toast.LENGTH_SHORT).show();new Thread(new Runnable() {@Overridepublic void run() {Bitmap srcBitmap = BitmapFactory.decodeResource(context.getResources(), R.drawable.ic_launcher);AppWidgetManager appWidgetManager = AppWidgetManager.getInstance(context);for (int i = 0; i < 37; i++) {float degree = (i * 10) % 360;RemoteViews remoteViews = new RemoteViews(context.getPackageName(), R.layout.widget);remoteViews.setImageViewBitmap(R.id.iv, rotateBitmap(context, srcBitmap, degree));/*Intent clickIntent = new Intent();clickIntent.setAction(CLICK_ACTION);clickIntent.setComponent(new ComponentName(context, "com.demo.demo0.MyAppWidgetProvider"));PendingIntent pendingIntent = PendingIntent.getBroadcast(context, 0, clickIntent, 0);remoteViews.setOnClickPendingIntent(R.id.iv, pendingIntent);*/appWidgetManager.updateAppWidget(new ComponentName(context, MyAppWidgetProvider.class), remoteViews);SystemClock.sleep(30);}}}).start();}}@Overridepublic void onUpdate(Context context, AppWidgetManager appWidgetManager, int[] appWidgetIds) {super.onUpdate(context, appWidgetManager, appWidgetIds);Log.d(TAG, "onUpdate: ");int count = appWidgetIds.length;Log.d(TAG, "onUpdate: count = " + count);for (int appWidgetId : appWidgetIds) {onWidgetUpdate(context, appWidgetManager, appWidgetId);}}private void onWidgetUpdate(Context context, AppWidgetManager appWidgetManager, int appWidgetId) {Log.d(TAG, "onWidgetUpdate: appWidgetId = " + appWidgetId);RemoteViews remoteViews = new RemoteViews(context.getPackageName(), R.layout.widget);Intent intentClick = new Intent();intentClick.setAction(CLICK_ACTION);intentClick.setComponent(new ComponentName(context, "com.demo.demo0.MyAppWidgetProvider"));PendingIntent pendingIntent = PendingIntent.getBroadcast(context, 0, intentClick, 0);remoteViews.setOnClickPendingIntent(R.id.iv, pendingIntent);appWidgetManager.updateAppWidget(appWidgetId, remoteViews);}private Bitmap rotateBitmap(Context context, Bitmap srcBitmap, float degree) {Matrix matrix = new Matrix();matrix.reset();matrix.setRotate(degree);return Bitmap.createBitmap(srcBitmap, 0, 0, srcBitmap.getWidth(), srcBitmap.getHeight(), matrix, true);}
}
AppWidgetProvider本质是一个广播,需要在Manifest中注册,第二个Action是桌面组件的标识必须要加
<receiverandroid:name=".MyAppWidgetProvider"><meta-dataandroid:name="android.appwidget.provider"android:resource="@xml/appwidget_provider_info" /><intent-filter><action android:name="com.demo.demo0.MyAppWidgetProvider.CLICK" /><action android:name="android.appwidget.action.APPWIDGET_UPDATE" /></intent-filter>
</receiver>
PendingIntent
PendingIntent是在将来的某个不确定的时刻发生,而Intent是立刻发生
PendingIntent通过send和cancel方法发送和取消特定的Intent
- requesetCode一般情况下设为0
- 当ComponentName和intent-filter相同时,两个Intent相同
- 当Intent和requestCode相同时,两个PendingIntent相同
Flag常用的有:
- FLAG_ONE_SHOT:当前PendingIntent只能被调用一次,随后被自动cancel,后续send会调用失败。对于消息来说,后续通知和第一条通知保持一致,单击任一条通知后,其他无法再打开
- FLAG_NO_CREATE:当前PendingIntent不会主动创建,若之前不存在,则调用上面方法返回null
- FLAG_CANCEL_CURRENT:若当前PendingIntent已存在,则会被cancel并创建新的,被cancel的通知再点击无作用。对于消息来说,只有最新的才能打开
- FLAG_UPDATE_CURRENT:若当前PendingIntent已存在,则更新Intent中的Extra。对于消息来说,前面通知和最后一条通知保持一致,且都可以打开
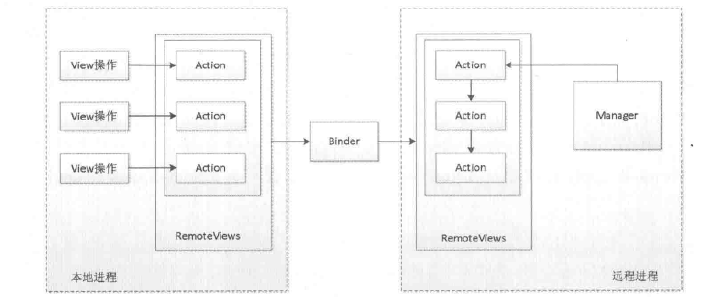
RemoteViews内部机制
RemoteViews用于在其他进程中显示并更新UI,所支持的类型有

为避免每次对RemoteViews的操作都通过Binder传输,提供了Action封装对View的操作,如下
如对于setTextViewText()方法,传入对应操作的方法名
public void setTextViewText(int viewId, CharSequence text) {setCharSequence(viewId, "setText", text);
}
而在setCharSequence()中添加子类ReflectionAction
public void setCharSequence(int viewId, String methodName, CharSequence value) {addAction(new ReflectionAction(viewId, methodName, ReflectionAction.CHAR_SEQUENCE, value));
}
并将Action添加到ArrayList
private void addAction(Action a) {......if (mActions == null) {mActions = new ArrayList<>();}mActions.add(a);
}
每当调用setxxx()方法时,并不会立即更新界面,而必须要通过NotificationManager的notify()或AppWidgetManager的updateAppWidget(),其内部会调用RemoteViews的
- apply():加载布局并更新界面
- reApply():只会更新界面
如下为AppWidgetHostView的updateAppWidget()方法
public void updateAppWidget(RemoteViews remoteViews) {applyRemoteViews(remoteViews, true);
}protected void applyRemoteViews(RemoteViews remoteViews, boolean useAsyncIfPossible) {......if (content == null && layoutId == mLayoutId) {try {remoteViews.reapply(mContext, mView, mOnClickHandler);content = mView;recycled = true;if (LOGD) Log.d(TAG, "was able to recycle existing layout");} catch (RuntimeException e) {exception = e;}}if (content == null) {try {content = remoteViews.apply(mContext, this, mOnClickHandler);if (LOGD) Log.d(TAG, "had to inflate new layout");} catch (RuntimeException e) {exception = e;}}......
}
apply()方法通过inflateView()获取View返回
public View apply(Context context, ViewGroup parent, OnClickHandler handler) {RemoteViews rvToApply = getRemoteViewsToApply(context);View result = inflateView(context, rvToApply, parent);rvToApply.performApply(result, parent, handler);return result;
}
performApply()则是遍历调用Action的apply()方法
private void performApply(View v, ViewGroup parent, OnClickHandler handler) {if (mActions != null) {handler = handler == null ? DEFAULT_ON_CLICK_HANDLER : handler;final int count = mActions.size();for (int i = 0; i < count; i++) {Action a = mActions.get(i);a.apply(v, parent, handler);}}
}
再看子类ReflectionAction中apply()具体实现,可知其通过反射调用
@Override
public void apply(View root, ViewGroup rootParent, OnClickHandler handler) {final View view = root.findViewById(viewId);if (view == null) return;Class<?> param = getParameterType();if (param == null) {throw new ActionException("bad type: " + this.type);}try {getMethod(view, this.methodName, param, false /* async */).invoke(view, this.value);} catch (Throwable ex) {throw new ActionException(ex);}
}
模拟RemoteViews
如下模拟在MainActivity中通过广播传递RemoteViews,修改SecondActivity中的布局,manifest如下
<?xml version="1.0" encoding="utf-8"?>
<manifest xmlns:android="http://schemas.android.com/apk/res/android"xmlns:tools="http://schemas.android.com/tools"package="com.demo.demo0"><applicationandroid:allowBackup="true"android:icon="@mipmap/ic_launcher"android:label="@string/app_name"android:roundIcon="@mipmap/ic_launcher_round"android:supportsRtl="true"android:theme="@style/AppTheme"><activityandroid:name=".SecondActivity"android:process=":remote"><intent-filter><action android:name="android.intent.action.MAIN" /><category android:name="android.intent.category.LAUNCHER" /></intent-filter></activity><activity android:name=".MainActivity"></activity></application></manifest>
MainActivity创建RemoteViews并发送广播
public class MainActivity extends AppCompatActivity {private static final String TAG = "MainActivity";protected void onCreate(Bundle savedInstanceState) {super.onCreate(savedInstanceState);setContentView(R.layout.activity_main);RemoteViews remoteViews = new RemoteViews(getPackageName(), R.layout.notification);remoteViews.setTextViewText(R.id.tv, "Hello RemoteViews");remoteViews.setImageViewResource(R.id.iv, R.drawable.ic_launcher);Intent remoteViewsIntent = new Intent(Intent.ACTION_VIEW, Uri.parse("http://www.baidu.com"));PendingIntent pendingIntent = PendingIntent.getActivity(this, 0, remoteViewsIntent, PendingIntent.FLAG_UPDATE_CURRENT);remoteViews.setOnClickPendingIntent(R.id.root, pendingIntent);Intent broadcastIntent = new Intent(SecondActivity.ACTION_REMOTE_VIEWS);broadcastIntent.putExtra(SecondActivity.EXTRA_REMOTE_VIEWS, remoteViews);sendBroadcast(broadcastIntent);finish();}
}
布局notification.xml如下
<?xml version="1.0" encoding="utf-8"?>
<LinearLayout xmlns:android="http://schemas.android.com/apk/res/android"android:id="@+id/root"android:layout_width="match_parent"android:layout_height="match_parent"><ImageViewandroid:id="@+id/iv"android:layout_width="0dp"android:layout_height="match_parent"android:layout_weight="1" /><TextViewandroid:id="@+id/tv"android:layout_width="0dp"android:layout_height="match_parent"android:layout_weight="1"android:gravity="center_vertical" />
</LinearLayout>
SecondActivity接收广播获取RemoteViews,调用apply方法并把View添加到自身布局
public class SecondActivity extends AppCompatActivity {private static final String TAG = "SecondActivity";private LinearLayout mRemoteViesContainer;public static final String ACTION_REMOTE_VIEWS = "ACTION_REMOTE_VIEWS";public static final String EXTRA_REMOTE_VIEWS = "EXTRA_REMOTE_VIEWS";private BroadcastReceiver mRemoteViewsReceiver = new BroadcastReceiver() {@Overridepublic void onReceive(Context context, Intent intent) {RemoteViews remoteViews = intent.getParcelableExtra(EXTRA_REMOTE_VIEWS);if (remoteViews != null) {updateUI(remoteViews);}}};private void updateUI(RemoteViews remoteViews) {View view = remoteViews.apply(getApplicationContext(), mRemoteViesContainer);mRemoteViesContainer.addView(view);}@Overrideprotected void onCreate(Bundle savedInstanceState) {super.onCreate(savedInstanceState);setContentView(R.layout.activity_second);initView();startActivity(new Intent(this, MainActivity.class));}private void initView() {mRemoteViesContainer = findViewById(R.id.remote_views_container);IntentFilter intentFilter = new IntentFilter(ACTION_REMOTE_VIEWS);registerReceiver(mRemoteViewsReceiver, intentFilter);}@Overrideprotected void onDestroy() {super.onDestroy();unregisterReceiver(mRemoteViewsReceiver);}
}
SecondActivity布局为一个空的LinearLayout
<?xml version="1.0" encoding="utf-8"?>
<LinearLayout xmlns:android="http://schemas.android.com/apk/res/android"android:id="@+id/remote_views_container"android:layout_width="match_parent"android:layout_height="match_parent"android:orientation="vertical"></LinearLayout>