Netty服务端请求接受过程源码剖析

目标
- 服务器启动后,客户端进行连接,服务器端此时要接受客户端请求,并且返回给客户端想要的请求,下面我们的目标就是分析Netty 服务器端启动后是怎么接受到客户端请求的。
- 我们的代码依然与上一篇中用同一个demo, 用io.netty.example下的echo包下的代码
- 我们直接debug模式启动Server端,让后在浏览器输入Http://localhost:8007,接着以下代码分析
源码剖析
- 在上一篇文章Netty启动过程源码分析中,我们知道了服务器最终注册 一个Accept事件等待客户端的连接,同时将NioServerSocketChannel注册到boss单例线程池中,也就是EventLoop如上图左边黄色区域部分
- 因此我们想要分析接受client连接的代码,先找到对应的EventLoop源码,如上图中NioEventLoop 循环,找到如下源码
//代码位置 NioEventLoop --- >  run()
@Overrideprotected void run() {int selectCnt = 0;for (;;) {try {int strategy;try {strategy = selectStrategy.calculateStrategy(selectNowSupplier, hasTasks());switch (strategy) {.......// 处理各种strategy类型default:}} catch (IOException e) {// If we receive an IOException here its because the Selector is messed up. Let's rebuild// the selector and retry. https://github.com/netty/netty/issues/8566rebuildSelector0();selectCnt = 0;handleLoopException(e);continue;}selectCnt++;cancelledKeys = 0;needsToSelectAgain = false;final int ioRatio = this.ioRatio;boolean ranTasks;if (ioRatio == 100) {try {if (strategy > 0) {//对strategy事件进行处理processSelectedKeys();}} finally {ranTasks = runAllTasks();}} else if (strategy > 0) {final long ioStartTime = System.nanoTime();try {processSelectedKeys();} finally {.......}} else {ranTasks = runAllTasks(0); // This will run the minimum number of tasks}.......} catch (CancelledKeyException e) {.......} catch (Throwable t) {handleLoopException(t);}.......}}
- 如上代码中 strategy 更具请求的类型走不同的策略,最后处理策略的方法是 processSelectedKeys();,我们继续根核心方法 processSelectedKeys();,如下源码
//进入processSelectedKeys ---》processSelectedKeysOptimized(); ---〉processSelectedKey
private void processSelectedKey(SelectionKey k, AbstractNioChannel ch) {final AbstractNioChannel.NioUnsafe unsafe = ch.unsafe();if (!k.isValid()) {final EventLoop eventLoop;try {eventLoop = ch.eventLoop();} catch (Throwable ignored) {return;}if (eventLoop == this) {unsafe.close(unsafe.voidPromise());}return;}try {int readyOps = k.readyOps();if ((readyOps & SelectionKey.OP_CONNECT) != 0) {int ops = k.interestOps();ops &= ~SelectionKey.OP_CONNECT;k.interestOps(ops);unsafe.finishConnect();}if ((readyOps & SelectionKey.OP_WRITE) != 0) {ch.unsafe().forceFlush();}if ((readyOps & (SelectionKey.OP_READ | SelectionKey.OP_ACCEPT)) != 0 || readyOps == 0) {unsafe.read();}} catch (CancelledKeyException ignored) {unsafe.close(unsafe.voidPromise());}}- 第一个if中最事件合法性验证,接着获取readyOps,我们debug得到是16,如下图

- 找到SelectionKey中16 代码的意义
/*** Operation-set bit for socket-accept operations.** <p> Suppose that a selection key's interest set contains* <tt>OP_ACCEPT</tt> at the start of a <a* href="Selector.html#selop">selection operation</a>. If the selector* detects that the corresponding server-socket channel is ready to accept* another connection, or has an error pending, then it will add* <tt>OP_ACCEPT</tt> to the key's ready set and add the key to its* selected-key set. </p>*/public static final int OP_ACCEPT = 1 << 4;
- 术语连接请求,这就是我们拿到了之前用Http://localhost:8007 请求的连接,接着继续跟进代码 EventLoopGroup —> processSelectedKey —> unsafe.read(); 其中unsafe是NioMessageUnsafed,上一篇中有过分析用来处理消息接收
- 继续跟进AbstractNioMessageChannel —> read() ,得到如下源码,删了一些对本次无关的一些代码,如下
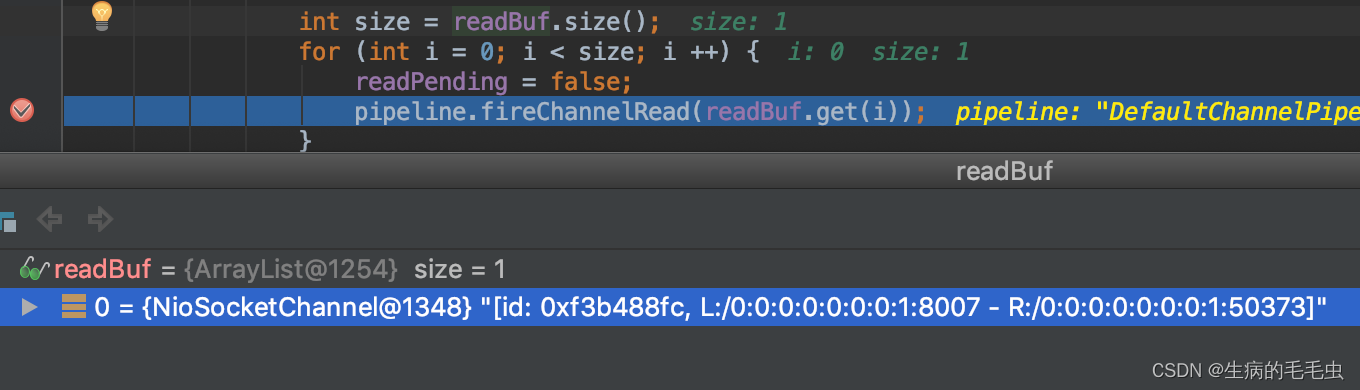
public void read() {assert eventLoop().inEventLoop();final ChannelConfig config = config();final ChannelPipeline pipeline = pipeline();final RecvByteBufAllocator.Handle allocHandle = unsafe().recvBufAllocHandle();allocHandle.reset(config);boolean closed = false;Throwable exception = null;try {try {do {int localRead = doReadMessages(readBuf);......allocHandle.incMessagesRead(localRead);} while (allocHandle.continueReading());} catch (Throwable t) {exception = t;}int size = readBuf.size();for (int i = 0; i < size; i ++) {readPending = false;pipeline.fireChannelRead(readBuf.get(i));}......if (exception != null) {......}if (closed) {......}} finally {......}}}-
assert eventLoop().inEventLoop(); 判断改eventLoop线程是否当前线程
-
ChannelConfig config = config(); 获取NioServerSocketChannelConfig
-
ChannelPipeline pipeline = pipeline(); 获取DefaultChannelPipeline。他是一个双向链表,可以看到内部包含 LoggingHandler,ServerBootStraptHandler
-
继续跟进 NioServersocketChannel —> doMessage(buf),可以进入到NioServerSocketChannel,找到doMessage方法
protected int doReadMessages(List<Object> buf) throws Exception {SocketChannel ch = SocketUtils.accept(javaChannel());try {if (ch != null) {buf.add(new NioSocketChannel(this, ch));return 1;}} catch (Throwable t) {logger.warn("Failed to create a new channel from an accepted socket.", t);try {ch.close();} catch (Throwable t2) {logger.warn("Failed to close a socket.", t2);}}return 0;}
-
参数buf是一个静态队列。private final List readBuf = new ArrayList(); 读取boss线程中的NioServerSocketChannel接受到的请求,并且将请求放到buf容器中
-
SocketChannel ch = SocketUtils.accept(javaChannel()); 通过Nio中工具类的建立连接,其实底层是调用了ServerSocketChannelImpl —> accept()方法建立TCP连接,并返回一个Nio中的SocketChannel
-
buf.add(new NioSocketChannel(this, ch)); 将获取到的Nio中SocketCHannel包装成Netty中的NioSocketChannel 并且添加到buf队列中(list)
-
doReadMessages到这分析完。
-
我们回到回到EventLoopGroup —> ProcessSelectedKey
-
循环遍历之前doReadMessage中获取的buf中的所有请求,调用Pipeline的firstChannelRead方法,用于处理这些接受的请求或者其他事件,在read方法中,循环调用ServerSocket的Pipeline的fireChannelRead方法,开始执行管道中的handler的ChannelRead方法,如下
- 继续跟进,进入 pipeline.fireChannelRead(readBuf.get(i)); 一直跟到AbstracChannelHandlerContext —> invokeChannelRead
private void invokeChannelRead(Object msg) {if (invokeHandler()) {try {((ChannelInboundHandler) handler()).channelRead(this, msg);} catch (Throwable t) {notifyHandlerException(t);}} else {fireChannelRead(msg);}}
- 进入 handler() 中,DefaultChannelPipeline —> handler()
- debug源码可以看到,在管道中添加了多个Handler,分别是:HeadContext,LoggingContext,ServerBootStrapAcceptor,TailContext 因此debug时候会依次进入每一个Handler中。我们重点看ServerBootStrapAcceptor中的channelRead方法
@Override@SuppressWarnings("unchecked")public void channelRead(ChannelHandlerContext ctx, Object msg) {final Channel child = (Channel) msg;child.pipeline().addLast(childHandler);setChannelOptions(child, childOptions, logger);setAttributes(child, childAttrs);try {childGroup.register(child).addListener(new ChannelFutureListener() {@Overridepublic void operationComplete(ChannelFuture future) throws Exception {if (!future.isSuccess()) {forceClose(child, future.cause());}}});} catch (Throwable t) {forceClose(child, t);}}
- 因为参数msg是NioSocketChannel,此处强制转成channel,
- child.pipeline().addLast(childHandler); 将我们在main方法中设置的EchoServerHandler添加到pipeline的handler链表中
- setChannelOptions 对TCP参数赋值
- setAttributes 设置各种属性
- childGroup.register(child).addListener(…) 将NioSocketChannel注册到 NioEventLoopGroup中的一个EventLoop中,并且添加一个监听器
- 以上NioEventLoopGroup就是我们main方法创建的数组workerGroup
- 进入register方法, MultithreadEventLoopGroup —>register , SingleThreadEventLoop —>register , AbstractChannel —> register,如下
- 首先看MultithreadEventLoopGroup中的register
@Overridepublic ChannelFuture register(Channel channel) {return next().register(channel);}
- 进入next()方法中,最终我们可以追到 DefaultEventExecutorChooserFactory — > PowerOfTwoEventExecutorChooser — > next() 内部类中的next
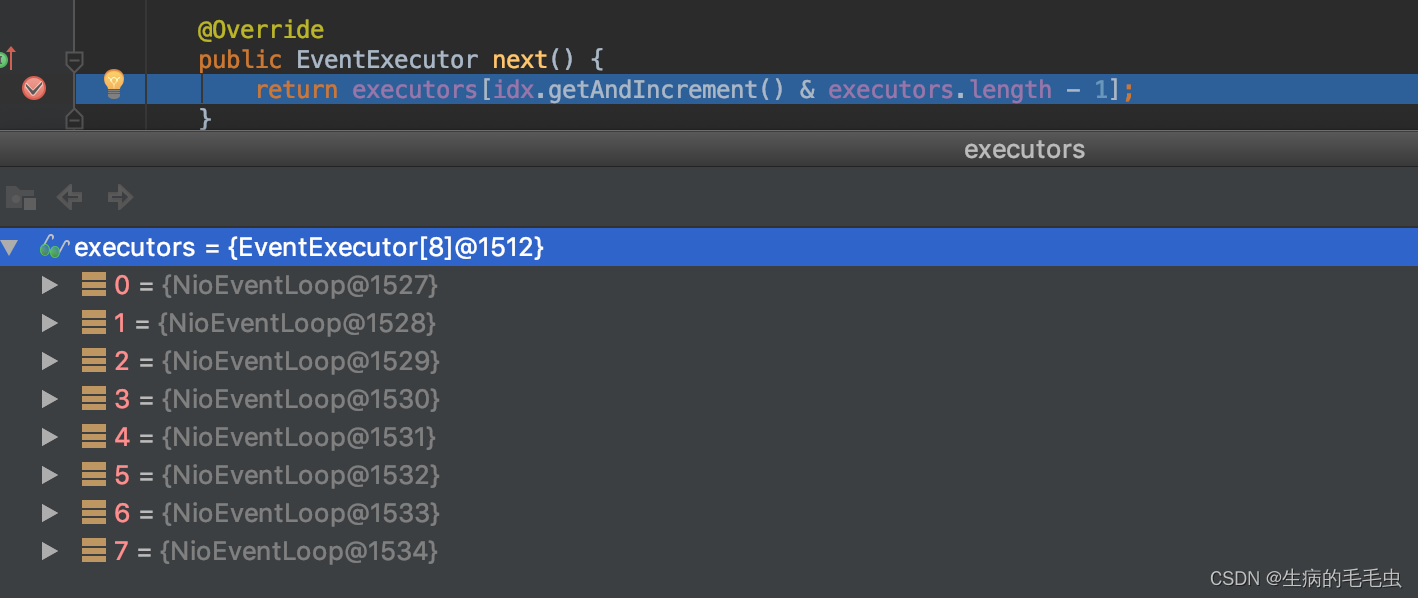
private static final class PowerOfTwoEventExecutorChooser implements EventExecutorChooser {private final AtomicInteger idx = new AtomicInteger();private final EventExecutor[] executors;PowerOfTwoEventExecutorChooser(EventExecutor[] executors) {this.executors = executors;}@Overridepublic EventExecutor next() {return executors[idx.getAndIncrement() & executors.length - 1];}}
-
入上我们通过debug可以看到,next返回的就是我们在workerGroup中创建的线程数组中的某一个子线程EventExecutor
-
接下来我们在回到register方法: AbstractChannel —> register 方法,如下:
@Overridepublic final void register(EventLoop eventLoop, final ChannelPromise promise) {......AbstractChannel.this.eventLoop = eventLoop;if (eventLoop.inEventLoop()) {register0(promise);} else {try {eventLoop.execute(new Runnable() {@Overridepublic void run() {register0(promise);}});} catch (Throwable t) {......}}}
- 关键方法register0
private void register0(ChannelPromise promise) {try {// check if the channel is still open as it could be closed in the mean time when the register// call was outside of the eventLoopif (!promise.setUncancellable() || !ensureOpen(promise)) {return;}boolean firstRegistration = neverRegistered;doRegister();neverRegistered = false;registered = true;// Ensure we call handlerAdded(...) before we actually notify the promise. This is needed as the// user may already fire events through the pipeline in the ChannelFutureListener.pipeline.invokeHandlerAddedIfNeeded();safeSetSuccess(promise);pipeline.fireChannelRegistered();// Only fire a channelActive if the channel has never been registered. This prevents firing// multiple channel actives if the channel is deregistered and re-registered.if (isActive()) {if (firstRegistration) {pipeline.fireChannelActive();} else if (config().isAutoRead()) {// This channel was registered before and autoRead() is set. This means we need to begin read// again so that we process inbound data.//// See https://github.com/netty/netty/issues/4805beginRead();}}} catch (Throwable t) {// Close the channel directly to avoid FD leak.closeForcibly();closeFuture.setClosed();safeSetFailure(promise, t);}}
- 进入 doRegister(); 方法:AbstractNioChannel —> doRegister
@Overrideprotected void doRegister() throws Exception {boolean selected = false;for (;;) {try {selectionKey = javaChannel().register(eventLoop().unwrappedSelector(), 0, this);return;} catch (CancelledKeyException e) {if (!selected) {// Force the Selector to select now as the "canceled" SelectionKey may still be// cached and not removed because no Select.select(..) operation was called yet.eventLoop().selectNow();selected = true;} else {// We forced a select operation on the selector before but the SelectionKey is still cached// for whatever reason. JDK bug ?throw e;}}}}
- 上代码,selectionKey = javaChannel().register(eventLoop().unwrappedSelector(), 0, this);此处我们将bossGroup中的EventLoop的channel 注册到workerGroup中的EventLoop中的 select中,方法中会得到一个selectionKey
- 我们可以看register方法的注视,如下:
Registers this channel with the given selector, returning a selectionkey.
使用给定的选择器注册此通道,并返回选择键。
- 接着debug,最终会到 AbstractNioChannel 中的doBeginRead方法
@Overrideprotected void doBeginRead() throws Exception {// Channel.read() or ChannelHandlerContext.read() was calledfinal SelectionKey selectionKey = this.selectionKey;if (!selectionKey.isValid()) {return;}readPending = true;final int interestOps = selectionKey.interestOps();if ((interestOps & readInterestOp) == 0) {selectionKey.interestOps(interestOps | readInterestOp);}}
- 此方法比较难进入,包含了几个异步,将之前的断电去掉,再次http请求,可以到这个方法中
- 追到这里,针对客户的连接已经完成,接下来是读取监听事件,也就是bossGroup的连接建立,注册步骤已近完成了,接下来就是workerGroup中的事件处理了
Netty接收请求过程梳理
-
总流程:接收连接 — 》创建一个新的NioSocketChannel —〉 注册到一个WorkerEventLoop上 —》 注册selecotRead事件
- 服务器沦陷Accept事件(文中最开始的那个for循环),获取事件后调用unsafe的read方法,这个unsafe是ServerSocket的内部类,改方法内部由2部分组成
- doReadMessage 用于创建NioSocketChannel对象,改对象包装JDK的NioChannel客户端,该方法创建一个ServerSocketChannel
- 之后执行pipeline.firstChannelRead方法,并且将自己绑定到一个chooser选择器选择的workerGroup中的某个EventLoop上,并且注册一个0(连接),表示注册成功,但是并没有注册1 (读取)
-
上一篇:Netty启动流程源码剖析