vue+ThreeJs 创建过渡圆圈效果
嗨,我是小路。今天主要和大家分享的主题是“vue+ThreeJs 创建过渡圆圈效果”。
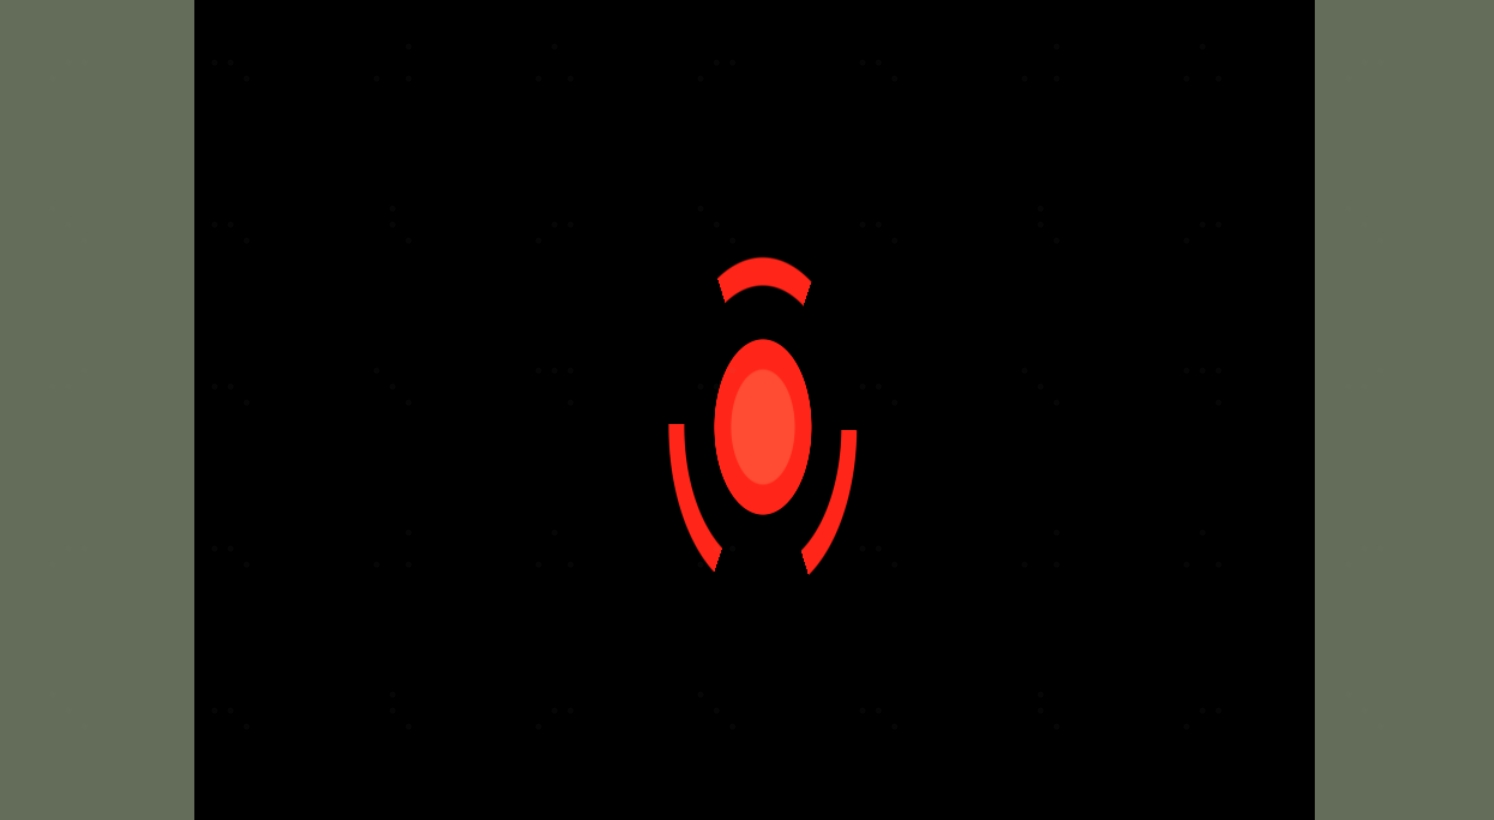
今天在做着色器过渡效果练习,发现出现了很多新的函数,这些都超出了js之外,需要更多的掌握和学习。以下是自己的复盘和梳理。
1.获取距离
定义:distance获取两个点之间的距离
2.平滑过渡
定义:smoothstep函数是用来平滑插值的函数。在HLSL或者其他着色语言中,smoothstep可能用于生成平滑的过渡效果,比如在边缘模糊或者渐变时使用。
3.计算模型长度
定义:length 函数用于计算向量的欧几里得长度(模长)。
二、实例代码
<!--创建一个球体-->
<template><div class="pageBox"><div class="leftBox" ref="leftRef"></div></div></template>
<script setup>
import { onMounted, onUnmounted, reactive, ref } from 'vue';
import * as THREE from 'three';
// 引入轨道控制器扩展库OrbitControls.js
import { OrbitControls } from 'three/addons/controls/OrbitControls.js';
import { getRandomColor, createLight } from '../utils/commonThree';
const leftRef = ref();
// 定义相机输出画布的尺寸(单位:像素px)
let width = window.innerWidth; //宽度
let height = window.innerHeight; //高度
// 创建3D场景对象Scene
const scene = new THREE.Scene();
//设置背景色
scene.background = new THREE.Color(0x646d59);const camera = new THREE.PerspectiveCamera(75, width / height, 0.1, 1000);
//三角形缩放过大时,会形成多种三角形形成的背景图
camera.position.z = 5;// 创建渲染器对象
const renderer = new THREE.WebGLRenderer();let tubes = [];
let material
const createTube = () => {const geometry = new THREE.PlaneGeometry(10,10);material = new THREE.ShaderMaterial({transparent: true,uniforms: {iResolution: { value: new THREE.Vector2() },iTime: { value: 0 },},vertexShader: `varying vec2 vUv;void main() {vUv = uv;gl_Position = projectionMatrix * modelViewMatrix * vec4(position, 1.0);}`,fragmentShader: `uniform vec2 iResolution;uniform float iTime;varying vec2 vUv;float circle(float radius, vec2 center, vec2 uv) {float d = distance(center, uv);return 1.0 - smoothstep(radius-1./iResolution.y, radius+1./iResolution.y, d);}vec2 angleRadius(vec2 uv) {float anglePixel = atan(uv.y, uv.x);//length 计算模型长度float lengthPixel = length(uv);//画一条贝塞尔曲线return vec2(anglePixel, lengthPixel);}float filterPositive(float n) {return smoothstep(0.0, 0.005, n);}void main() {// 坐标系转换vec2 uv = (vUv - 0.5) * vec2(iResolution.x/iResolution.y, 1.0)*2.0;//生成原型的半径float radius = 0.3;//边缘的宽度float ringThick = 0.05;//画一条贝塞尔曲线vec2 stPolar = angleRadius(uv);float sPolar = stPolar.x * 3.0 + iTime * 10.0;float cosSPolarTemp = cos(sPolar);float cosSPolar = filterPositive(cosSPolarTemp);vec3 color = vec3(cosSPolar);float inCircleAA = smoothstep(radius, radius + 0.005, stPolar.y);float smallCircleAA = smoothstep(radius - ringThick, radius - ringThick + 0.005, stPolar.y);vec3 col = 1.0 - vec3(inCircleAA);vec3 col_2 = 1.0 - vec3(smallCircleAA);vec3 colorGap = col - col_2;vec3 finalColor = color * colorGap;vec3 colorMask = vec3(10.0, 1.5, 1.0);finalColor /= 10.0;finalColor *= colorMask;//实现平滑过渡效果float centerCircleAA = smoothstep(0.1, 0.1 + 0.005, stPolar.y);vec3 centerCircleColor = 1.0 - vec3(centerCircleAA);centerCircleColor /= 10.0;centerCircleColor *= colorMask;vec2 centerC = vec2(0.0);float bubbleRadius = abs(sin(iTime * 3.0)) / 3.0;float bubbleCircleColor = circle(bubbleRadius, centerC, uv);//创建一个四位结构体 x、y、z、w 或者颜色 rgbavec4 bubbleColor = vec4(vec3(bubbleCircleColor) / 10.0 * colorMask, 1.0);gl_FragColor = vec4(finalColor + centerCircleColor, 1.0);gl_FragColor += bubbleColor;}`,side: THREE.DoubleSide});const tube = new THREE.Mesh(geometry, material);//设置网格的随机位置// sphere.position.set(//   (Math.random() - 0.5) * 2000,//   (Math.random() - 0.5) * 1000,//   (Math.random() - 0.5) * 1000// );return tube;
}onMounted(() => {initData()//添加相机空间const controls = new OrbitControls(camera, renderer.domElement);// controls.enableDamping = false;controls.enableZoom = false;// 如果OrbitControls改变了相机参数,重新调用渲染器渲染三维场景controls.addEventListener('change', function () {renderer.render(scene, camera); //执行渲染操作});//监听鼠标、键盘事件renderer.setSize(width, height); //设置three.js渲染区域的尺寸(像素px)//将innerHTML置空,避免append重复添加渲染leftRef.value.innerHTML = ''leftRef.value.append(renderer.domElement);})
const initData = () => {createLight(scene);// for (let i = 1; i >= 0; i--) {const outSphere = createTube();tubes.push(outSphere);scene.add(outSphere);// }render();
}
function render() {requestAnimationFrame(render);// 旋转所有三角形// tubes.forEach(tube => {//   tube.rotation.x += 0.01;//   tube.rotation.y += 0.01;//   tube.rotation.z += 0.01;// });console.log( 'dfffff',material.uniforms.iResolution);material.uniforms.iResolution.value.set(window.innerWidth,window.innerHeight);material.uniforms.iTime.value = performance.now() / 1000;renderer.render(scene, camera);
}
onUnmounted(() => {//释放内存renderer.dispose();
})</script>
<style scoped lang="less">
.pageBox {width: 100%;height: 100vh;padding: 0;margin: 0;display: flex;justify-content: space-between;align-items: center;.rightBox {width: 100%;height: 100%;}
}
</style>
三、总结
在学习中,重新复盘了着色器的知识点,并寻找更好掌握着色器的方法,同时了解到了glsl编程中的动态过渡、获取模型长度、计算两个元素之间距离的方法。
都看到这里了,记得【点赞】+【关注】哟。
参考文章: