vue里使用driver.js实现项目功能向导指引
介绍
https://github.com/kamranahmedse/driver.js
driver.js 是一个轻量级、无依赖的原生JavaScript引擎,在整个页面中驱动用户的注意力,强大的、高度可定制的原生JavaScript引擎,无外部依赖,支持所有主流浏览器。
安装
npm install driver.js

使用
import Driver from 'driver.js';
import 'driver.js/dist/driver.min.css';
突出显示单个元素
const driver = new Driver();
driver.highlight('#create-post');
高亮和弹出窗口
const driver = new Driver();
driver.highlight({element: '#some-element',popover: {title: 'Title for the Popover',description: 'Description for it',}
});
定位弹出窗口
const driver = new Driver();
driver.highlight({element: '#some-element',popover: {title: 'Title for the Popover',description: 'Description for it',// position can be left, left-center, left-bottom, top,// top-center, top-right, right, right-center, right-bottom,// bottom, bottom-center, bottom-right, mid-centerposition: 'left',}
});
还可以使用offset属性为弹窗位置添加偏移量
const driver = new Driver();
driver.highlight({element: '#some-element',popover: {title: 'Title for the Popover',description: 'Description for it',position: 'bottom',// Will show it 20 pixels away from the actual position of popover// You may also provide the negative valuesoffset: 20,}
});
创建功能介绍
功能介绍在新用户入门时很有用,可以让他们了解应用程序的不同部分。您可以使用驱动程序无缝创建它们。定义步骤,并在你想开始展示时调用start。用户将能够使用键盘或使用弹出窗口上的按钮来控制步骤。
const driver = new Driver();// Define the steps for introduction
driver.defineSteps([{element: '#first-element-introduction',popover: {className: 'first-step-popover-class',title: 'Title on Popover',description: 'Body of the popover',position: 'left'}},{element: '#second-element-introduction',popover: {title: 'Title on Popover',description: 'Body of the popover',position: 'top'}},{element: '#third-element-introduction',popover: {title: 'Title on Popover',description: 'Body of the popover',position: 'right'}},
]);// Start the introduction
driver.start();
异步操作
对于转换步骤之间的任何异步操作,可以将执行延迟到操作完成。你所要做的就是在 onNext 或 onPrevious 回调函数中使用driver.preventMove() 停止过渡,并使用 driver.moveNext() 手动初始化它。这是一个示例实现,它将在第二步停止4秒钟,然后进入下一步。
const driver = new Driver();// Define the steps for introduction
driver.defineSteps([{element: '#first-element-introduction',popover: {title: 'Title on Popover',description: 'Body of the popover',position: 'left'}},{element: '#second-element-introduction',popover: {title: 'Title on Popover',description: 'Body of the popover',position: 'top'},onNext: () => {// Prevent moving to the next stepdriver.preventMove();// Perform some action or create the element to move to// And then move to that elementsetTimeout(() => {driver.moveNext();}, 4000);}},{element: '#third-element-introduction',popover: {title: 'Title on Popover',description: 'Body of the popover',position: 'right'}},
]);// Start the introduction
driver.start();
配置
const driver = new Driver({className: 'scoped-class',        // 封装driver.js弹窗的类名animate: true,                    // 是否进行动画opacity: 0.75,                    // 背景不透明度(0表示只有弹窗,没有覆盖层)padding: 10,                      // 元素到边缘的距离allowClose: true,                 // 点击覆盖层是否应该关闭overlayClickNext: false,          // 下一步点击覆盖层是否应该移动doneBtnText: 'Done',              // final按钮文本closeBtnText: 'Close',            // 关闭按钮文本stageBackground: '#ffffff',       // 高亮元素背后的舞台背景颜色nextBtnText: 'Next',              // 下一步按钮文本prevBtnText: 'Previous',          // 前一步按钮文本showButtons: false,               // 在页脚不显示控制按钮keyboardControl: true,            // 允许通过键盘控制(esc键关闭,箭头键移动)scrollIntoViewOptions: {},        // 如果可能的话,我们使用`scrollIntoView()`,如果你想要任何选项,在这里传递onHighlightStarted: (Element) => {}, // 当元素将要高亮时调用onHighlighted: (Element) => {},      // 当元素完全高亮时调用onDeselected: (Element) => {},       // 当元素被取消选择时调用onReset: (Element) => {},            // 当覆盖层即将被清除时调用onNext: (Element) => {},             // 当移动到下一个步骤时调用onPrevious: (Element) => {},         // 在任何步骤中移动到上一步时调用
});
定义步骤
定义步骤时可以传递的一组选项 defineSteps 或传递给 highlight 方法的对象:
const stepDefinition = {element: '#some-item',        // 要突出显示的查询选择器字符串或节点stageBackground: '#ffffff',   // 这将覆盖在驱动程序中设置的popover: {                    // 如果为空或未指定弹窗,则不会有弹窗className: 'popover-class', // 除了驱动程序选项中的一般类名外,还要包装这个特定步骤弹出窗口title: 'Title',             // popover 标题description: 'Description', // popover 描述showButtons: false,         // 在页脚不显示控制按钮doneBtnText: 'Done',        // 最后一个按钮文本closeBtnText: 'Close',      // 关闭按钮文本nextBtnText: 'Next',        // 下一个按钮文本prevBtnText: 'Previous',    // 上一个按钮文本},onNext: () => {},             // 从当前步骤移动到下一步时调用onPrevious: () => {},         // 从当前步骤移动到上一步时调用
};
突出显示单个元素时的效果
const driver = new Driver(driverOptions);
driver.highlight(stepDefinition);
创建一个分步指南:
const driver = new Driver(driverOptions);
driver.defineSteps([stepDefinition1,stepDefinition2,stepDefinition3,stepDefinition4,
]);
API方法
下面是可用的方法集:
const driver = new Driver(driverOptions);// 检查driver是否激活
if (driver.isActivated) {console.log('Driver is active');
}// 在步骤指南中,可以调用以下方法
driver.defineSteps([ stepDefinition1, stepDefinition2, stepDefinition3 ]);
driver.start(stepNumber = 0);  // 定义开始步骤
driver.moveNext();             // 移动到“步骤”列表中的下一步
driver.movePrevious();         // 移动到“步骤”列表中的上一步
driver.hasNextStep();          // 检查是否有下一步要移动
driver.hasPreviousStep();      // 检查是否有要移动到的上一个步骤// 阻止当前移动,如果你想,可以在`onNext`或`onPrevious`中使用,执行一些异步任务,然后手动切换到下一步
driver.preventMove();// 使用查询选择器或步骤定义突出显示元素
driver.highlight(string|stepDefinition);// 重新定位弹出窗口并突出显示元素
driver.refresh();// 重置覆盖层并清空屏幕
driver.reset();// 另外,你可以传递一个布尔参数
// 立即清除,不做动画等
// 在你运行的时候可能有用
// driver程序运行时的不同实例
driver.reset(clearImmediately = false);// 检查是否有高亮的元素
if(driver.hasHighlightedElement()) {console.log('There is an element highlighted');
}// 获取屏幕上当前高亮显示的元素,would be an instance of `/src/core/element.js`
const activeElement = driver.getHighlightedElement();// 获取最后一个高亮显示的元素, would be an instance of `/src/core/element.js`
const lastActiveElement = driver.getLastHighlightedElement();activeElement.getCalculatedPosition(); // 获取活动元素的屏幕坐标
activeElement.hidePopover();           // 隐藏弹出窗口
activeElement.showPopover();           // 显示弹出窗口activeElement.getNode();  // 获取这个元素后面的DOM元素
别忘了给触发 driver 的 click 绑定添加 e.stopPropagation()。
实战
下面是我实现的一个 vue 的 demo,用的 driver.js 是 0.9.8。
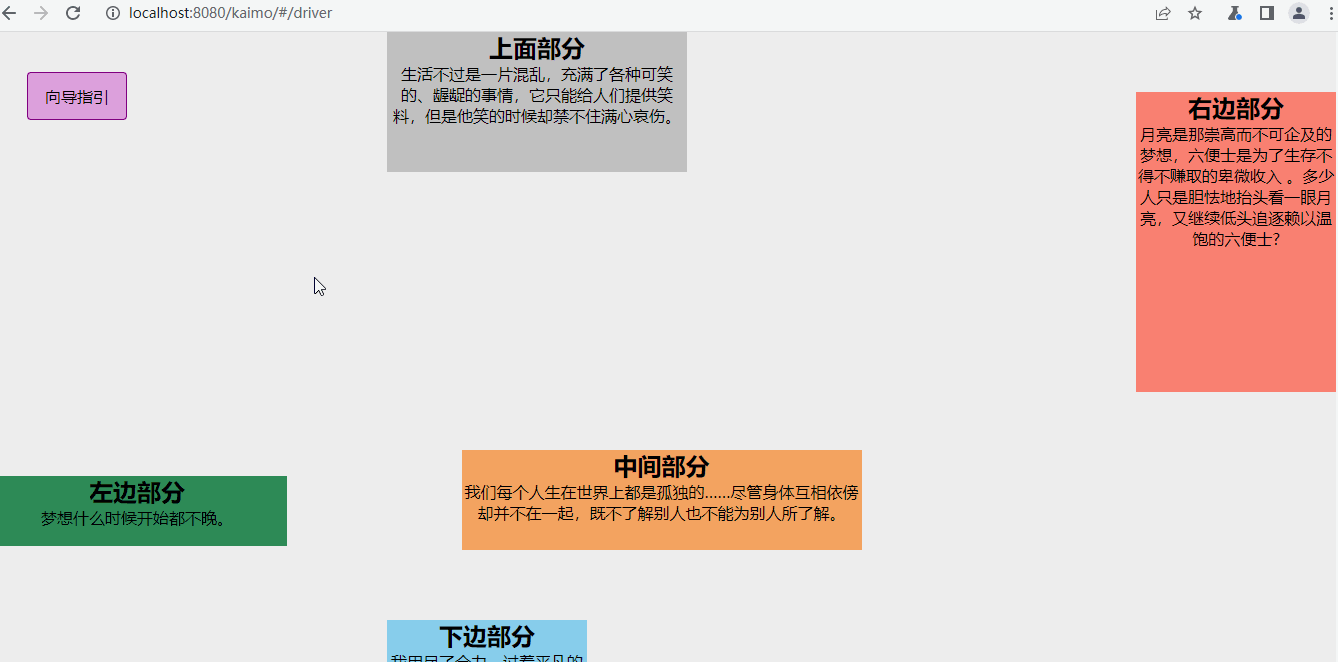
<template><div class='driver-demo'><div class="btn" @click="handleClick">向导指引</div><!-- 上 --><div id="step-item-1" class="top"><h2>上面部分</h2><section>生活不过是一片混乱,充满了各种可笑的、龌龊的事情,它只能给人们提供笑料,但是他笑的时候却禁不住满心哀伤。</section></div><!-- 右 --><div id="step-item-2" class="right"><h2>右边部分</h2><section>月亮是那崇高而不可企及的梦想,六便士是为了生存不得不赚取的卑微收入 。多少人只是胆怯地抬头看一眼月亮,又继续低头追逐赖以温饱的六便士?</section></div><!-- 下 --><div id="step-item-3" class="bottom"><h2>下边部分</h2><section>我用尽了全力,过着平凡的一生。</section></div><!-- 左 --><div id="step-item-4" class="left"><h2>左边部分</h2><section>梦想什么时候开始都不晚。</section></div><!-- 中 --><div id="step-item-5" class="center"><h2>中间部分</h2><section>我们每个人生在世界上都是孤独的……尽管身体互相依傍却并不在一起,既不了解别人也不能为别人所了解。</section></div></div>
</template><script>
// 引入资源
import Driver from 'driver.js';
import 'driver.js/dist/driver.min.css';export default {name: 'DriverDemo',data () {return {driverOptions: {className: 'kaimo-driver',        // 封装driver.js弹窗的类名animate: true,                    // 是否进行动画opacity: 0.5,                    // 背景不透明度(0表示只有弹窗,没有覆盖层)padding: 20,                      // 元素到边缘的距离allowClose: true,                 // 点击覆盖层是否应该关闭overlayClickNext: false,          // 下一步点击覆盖层是否应该移动doneBtnText: '确定',              // final按钮文本closeBtnText: '我知道了',            // 关闭按钮文本stageBackground: '#fff',       // 高亮元素背后的舞台背景颜色nextBtnText: '下一步',              // 下一步按钮文本prevBtnText: '上一步',          // 前一步按钮文本showButtons: true,               // 在页脚不显示控制按钮keyboardControl: true,            // 允许通过键盘控制(esc键关闭,箭头键移动)scrollIntoViewOptions: {},        // 如果可能的话,我们使用`scrollIntoView()`,如果你想要任何选项,在这里传递onHighlightStarted: (Element) => {}, // 当元素将要高亮时调用onHighlighted: (Element) => {},      // 当元素完全高亮时调用onDeselected: (Element) => {},       // 当元素被取消选择时调用onReset: (Element) => {},            // 当覆盖层即将被清除时调用onNext: (Element) => {},             // 当移动到下一个步骤时调用onPrevious: (Element) => {},         // 在任何步骤中移动到上一步时调用}};},methods: {handleClick(e) {// 阻止点击事件进一步传播,不加的话指引打开会关闭e.stopPropagation();// 初始化const driver = new Driver(this.driverOptions);// 自定义几个步骤driver.defineSteps([this.stepDefinition1(),this.stepDefinition2(),this.stepDefinition3(),this.stepDefinition4(),this.stepDefinition5(),]);// 开始进行向导,默认从0开始也就是步骤1,也可以自己调整其他步骤(0可以不写)driver.start(0);},stepDefinition1() {return {element: '#step-item-1',        // 要突出显示的查询选择器字符串或节点// stageBackground: '#ffffff',   // 这将覆盖在驱动程序中设置的popover: {                    // 如果为空或未指定弹窗,则不会有弹窗className: 'popover-class', // 除了驱动程序选项中的一般类名外,还要包装这个特定步骤弹出窗口title: '步骤1',             // popover 标题description: '这是步骤1的向导描述', // popover 描述// showButtons: true,         // 在页脚不显示控制按钮// doneBtnText: 'Done',        // 最后一个按钮文本// closeBtnText: 'Close',      // 关闭按钮文本// nextBtnText: 'Next',        // 下一个按钮文本// prevBtnText: 'Previous',    // 上一个按钮文本},onNext: () => { // 从当前步骤移动到下一步时调用console.log("步骤1:onNext");},             onPrevious: () => { // 从当前步骤移动到上一步时调用console.log("步骤1:onPrevious");},     };},stepDefinition2() {return {element: '#step-item-2',        // 要突出显示的查询选择器字符串或节点popover: {                    // 如果为空或未指定弹窗,则不会有弹窗className: 'popover-class', // 除了驱动程序选项中的一般类名外,还要包装这个特定步骤弹出窗口title: '步骤2',             // popover 标题description: '这是步骤2的向导描述', // popover 描述position: 'left-center'},onNext: () => { // 从当前步骤移动到下一步时调用console.log("步骤2:onNext");},             onPrevious: () => { // 从当前步骤移动到上一步时调用console.log("步骤2:onPrevious");}, };},stepDefinition3() {return {element: '#step-item-3',        // 要突出显示的查询选择器字符串或节点popover: {                    // 如果为空或未指定弹窗,则不会有弹窗className: 'popover-class', // 除了驱动程序选项中的一般类名外,还要包装这个特定步骤弹出窗口title: '步骤3',             // popover 标题description: '这是步骤3的向导描述', // popover 描述},onNext: () => { // 从当前步骤移动到下一步时调用console.log("步骤3:onNext");},             onPrevious: () => { // 从当前步骤移动到上一步时调用console.log("步骤3:onPrevious");}, };},stepDefinition4() {return {element: '#step-item-4',        // 要突出显示的查询选择器字符串或节点popover: {                    // 如果为空或未指定弹窗,则不会有弹窗className: 'popover-class', // 除了驱动程序选项中的一般类名外,还要包装这个特定步骤弹出窗口title: '步骤4',             // popover 标题description: '这是步骤4的向导描述', // popover 描述position: 'right-center'},onNext: () => { // 从当前步骤移动到下一步时调用console.log("步骤4:onNext");},             onPrevious: () => { // 从当前步骤移动到上一步时调用console.log("步骤4:onPrevious");}, };},stepDefinition5() {return {element: '#step-item-5',        // 要突出显示的查询选择器字符串或节点popover: {                    // 如果为空或未指定弹窗,则不会有弹窗className: 'popover-class', // 除了驱动程序选项中的一般类名外,还要包装这个特定步骤弹出窗口title: '步骤5',             // popover 标题description: '这是步骤5的向导描述', // popover 描述},onNext: () => { // 从当前步骤移动到下一步时调用console.log("步骤5:onNext");},             onPrevious: () => { // 从当前步骤移动到上一步时调用console.log("步骤5:onPrevious");}, };}},
};
</script><style lang="scss" scoped>
.driver-demo {position: relative;text-align: center;background-color: #eee;padding: 40px;.btn {width: 100px;height: 48px;line-height: 48px;border: 1px solid purple;background-color: plum;border-radius: 4px;cursor: pointer;}.top {position: absolute;top: 0;left: 400px;width: 300px;height: 140px;background-color: silver;}.right {position: absolute;top: 60px;right: 0;width: 200px;height: 300px;background-color: salmon;}.bottom {position: absolute;bottom: 200px;left: 400px;width: 200px;height: 100px;background-color: skyblue;}.left {position: absolute;top: 50%;left: 0;width: 300px;height: 70px;background-color: seagreen;}.center {margin: 330px auto;width: 400px;height: 100px;background-color: sandybrown;}
}
</style>
效果
实现的功能向导指引效果如下: