docker-compose安装nginx
基于docker-compose安装nginx
目录
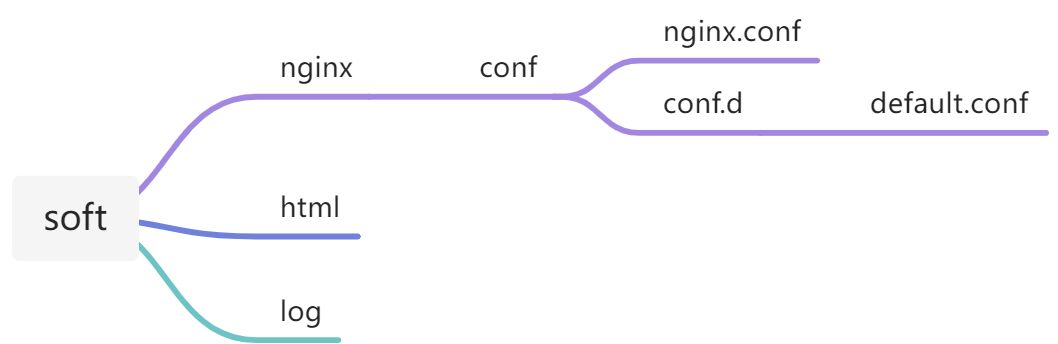
一、目录结构
1、docker-compose.yml
2、nginx.conf
3、default.conf
4、index.html
二、访问测试
一、目录结构
1、docker-compose.yml
version: '3'
services:nginx:image: registry.cn-hangzhou.aliyuncs.com/zhengqing/nginx:1.21.1                 # 镜像`nginx:1.21.1`container_name: nginx               # 容器名为'nginx'restart: unless-stopped                                       # 指定容器退出后的重启策略为始终重启,但是不考虑在Docker守护进程启动时就已经停止了的容器volumes:                            # 数据卷挂载路径设置,将本机目录映射到容器目录- "./nginx/conf/nginx.conf:/etc/nginx/nginx.conf"- "./nginx/conf/conf.d/default.conf:/etc/nginx/conf.d/default.conf"- "./nginx/html:/usr/share/nginx/html"- "./nginx/log:/var/log/nginx"environment:                        # 设置环境变量,相当于docker run命令中的-eTZ: Asia/ShanghaiLANG: en_US.UTF-8ports:                              # 映射端口- "80:80"
2、nginx.conf
user  nginx;
worker_processes  1;error_log  /var/log/nginx/error.log warn;
pid        /var/run/nginx.pid;events {worker_connections  1024;
}http {include       /etc/nginx/mime.types;default_type  application/octet-stream;log_format  main  '$remote_addr - $remote_user [$time_local] "$request" ''$status $body_bytes_sent "$http_referer" ''"$http_user_agent" "$http_x_forwarded_for"';access_log  /var/log/nginx/access.log  main;sendfile        on;#tcp_nopush     on;keepalive_timeout  65;#gzip  on;# include /etc/nginx/conf.d/*.conf;server {listen       80;server_name  petty.icuapi.com; # 服务器地址或绑定域名#charset koi8-r;#access_log  /var/log/nginx/host.access.log  main;# =========================================================# ================== ↓↓↓↓↓↓ start ↓↓↓↓↓↓ ==================# =========================================================location / {root   /usr/share/nginx/html;#try_files $uri $uri/ @router;index  index.html index.htm;try_files $uri $uri/ /index.html; # 解决页面刷新 404 问题#proxy_pass http://zhengqingya.gitee.io; # 代理的ip地址和端口号#proxy_connect_timeout 600; #代理的连接超时时间(单位:毫秒)#proxy_read_timeout 600; #代理的读取资源超时时间(单位:毫秒)}#location @router {#rewrite ^.*$ /index.html last; # 拦截80端口后的所有请求地址到登录页面 -> 相当于后端的拦截器#}#   location ^~ /api {  # ^~/api/表示匹配前缀为api的请求#       proxy_pass  http://www.zhengqingya.com:5000/api/;  # 注:proxy_pass的结尾有/, -> 效果:会在请求时将/api/*后面的路径直接拼接到后面
##       #  proxy_set_header作用:设置发送到后端服务器(上面proxy_pass)的请求头值#       #   【当Host设置为 $http_host 时,则不改变请求头的值;#       #     当Host设置为 $proxy_host 时,则会重新设置请求头中的Host信息;#       #     当为$host变量时,它的值在请求包含Host请求头时为Host字段的值,在请求未携带Host请求头时为虚拟主机的主域名;#       #     当为$host:$proxy_port时,即携带端口发送 ex: $host:8080 】#       proxy_set_header Host $host;
##       proxy_set_header X-Real-IP $remote_addr; # 在web服务器端获得用户的真实ip 需配置条件①    【 $remote_addr值 = 用户ip 】#       proxy_set_header X-Forwarded-For $proxy_add_x_forwarded_for;# 在web服务器端获得用户的真实ip 需配置条件②#       proxy_set_header REMOTE-HOST $remote_addr;#       # proxy_set_header X-Forwarded-For $http_x_forwarded_for; # $http_x_forwarded_for变量 = X-Forwarded-For变量#   }#   location ^~ /blog/ {#       proxy_pass  http://zhengqingya.gitee.io/blog/;  # ^~/blog/表示匹配前缀是blog的请求,proxy_pass的结尾有/, 则会把/blog/*后面的路径直接拼接到后面,即移除blog
##       proxy_set_header Host $proxy_host; # 改变请求头值 -> 转发到码云才会成功#       proxy_set_header  X-Real-IP  $remote_addr;#       proxy_set_header  X-Forwarded-For $proxy_add_x_forwarded_for;#       proxy_set_header X-NginX-Proxy true;#   }# =========================================================# ================== ↑↑↑↑↑↑ end ↑↑↑↑↑↑ ==================# =========================================================#error_page  404              /404.html;# redirect server error pages to the static page /50x.html#error_page   500 502 503 504  /50x.html;location = /50x.html {root   /usr/share/nginx/html;}}
}
3、default.conf
server {listen       80;server_name  localhost;#charset koi8-r;#access_log  /var/log/nginx/host.access.log  main;location / {root   /usr/share/nginx/html;index  index.html index.htm;}#error_page  404              /404.html;# redirect server error pages to the static page /50x.html#error_page   500 502 503 504  /50x.html;location = /50x.html {root   /usr/share/nginx/html;}# proxy the PHP scripts to Apache listening on 127.0.0.1:80##location ~ \.php$ {#    proxy_pass   http://127.0.0.1;#}# pass the PHP scripts to FastCGI server listening on 127.0.0.1:9000##location ~ \.php$ {#    root           html;#    fastcgi_pass   127.0.0.1:9000;#    fastcgi_index  index.php;#    fastcgi_param  SCRIPT_FILENAME  /scripts$fastcgi_script_name;#    include        fastcgi_params;#}# deny access to .htaccess files, if Apache's document root# concurs with nginx's one##location ~ /\.ht {#    deny  all;#}
}
4、index.html
<!DOCTYPE html>
<html>
<head><title>Welcome to nginx!</title><style>body {width: 35em;margin: 0 auto;font-family: Tahoma, Verdana, Arial, sans-serif;}</style>
</head>
<body>
<h1>Welcome to nginx!</h1>
<p>If you see this page, the nginx web server is successfully installed andworking. Further configuration is required.</p><p>For online documentation and support please refer to<a href="http://nginx.org/">nginx.org</a>.<br/>Commercial support is available at<a href="http://nginx.com/">nginx.com</a>.</p><p><em>Thank you for using nginx.</em></p>
</body>
</html>
二、访问测试
直接用你nginx配置的ip或者域名进行访问即可。