Java GUI三种常见的布局方式.FlowLayout,BorderLayout,GridLayout.教程
FlowLayout,BorderLayout,GridLayout是3种常见的java布局Layout 方式,下面是使用教程.
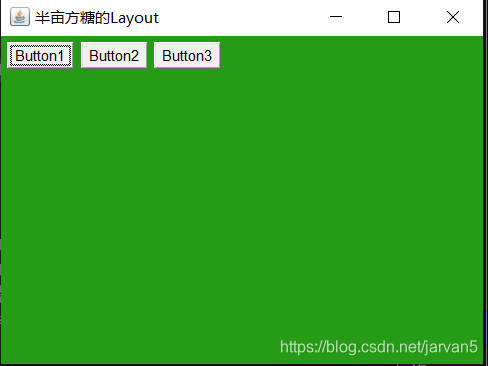
一、FlowLayout 浮动布局.
1. 创建一个普通的窗口Frame ,创建教程点击跳转
package GUI.Layout布局管理器;import java.awt.*;
import java.awt.event.WindowAdapter;
import java.awt.event.WindowEvent;/*** 这个Demo介绍3种常见的布局.* 1.流式布局:* 2.方向布局:* 3.表格布局:*/
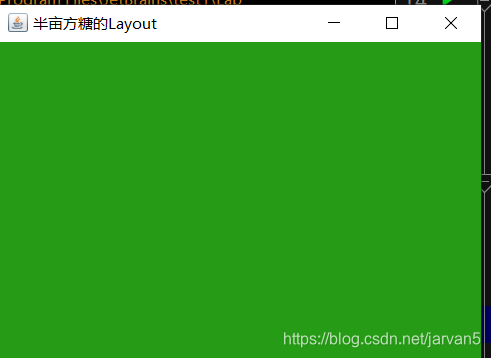
public class FlowLayout流式布局 {public static void main(String[] args) {//创建一个窗口.Frame frame = new Frame("半亩方糖的Layout");
// //创建组件,布局流式布局,添加按钮=============================
// Button btn1 = new Button("Button1");
// Button btn2 = new Button("Button2");
// Button btn3 = new Button("Button3");
//
// //布局
// frame.setLayout(new FlowLayout(FlowLayout.TRAILING));//此处的LEFT参数可选,trailing 后面的
// //添加按钮
// frame.add(btn1);
// frame.add(btn2);
// frame.add(btn3);//设置位置,大小,颜色frame.setLocation(100,100);frame.setSize(400,300);frame.setBackground(new Color(38, 156, 22));//退出frame.addWindowListener(new WindowAdapter() {@Overridepublic void windowClosing(WindowEvent e) {System.out.println("exist successfully.");System.exit(0);}});//可见性frame.setVisible(true);}
}效果
2.设置Frame窗体的布局,具体设置原理在idea中 CTRL+ 左键点击查看源码.
还有RIGHT,CENTER,LEADING,TRAILING等属性,自己可以查看源码.
frame.setLayout(new FlowLayout(FlowLayout.LEFT);
//此处的LEFT参数可选,trailing 后面的
3.添加按钮到frame窗口.(2,3 步骤的位置可以调换)
//创建组件,布局流式布局,添加按钮Button btn1 = new Button("Button1");Button btn2 = new Button("Button2");Button btn3 = new Button("Button3");//添加按钮frame.add(btn1);frame.add(btn2);frame.add(btn3);
总代码.
package GUI.Layout布局管理器;import java.awt.*;
import java.awt.event.WindowAdapter;
import java.awt.event.WindowEvent;/**
* 这个Demo介绍3种常见的布局.
* 1.流式布局:
* 2.方向布局:
* 3.表格布局:
*/
public class FlowLayout流式布局 {public static void main(String[] args) {//创建一个窗口.Frame frame = new Frame("半亩方糖的Layout");//布局frame.setLayout(new FlowLayout(FlowLayout.LEFT)); //此处的LEFT参数可选,trailing 后面的//创建组件,布局流式布局,添加按钮=============================Button btn1 = new Button("Button1");Button btn2 = new Button("Button2");Button btn3 = new Button("Button3");//添加按钮frame.add(btn1);frame.add(btn2);frame.add(btn3);//设置位置,大小,颜色frame.setLocation(100,100);frame.setSize(400,300);frame.setBackground(new Color(38, 156, 22));//退出frame.addWindowListener(new WindowAdapter() {@Overridepublic void windowClosing(WindowEvent e) {System.out.println("exist successfully.");System.exit(0);}});//可见性frame.setVisible(true);}
}
总效果.
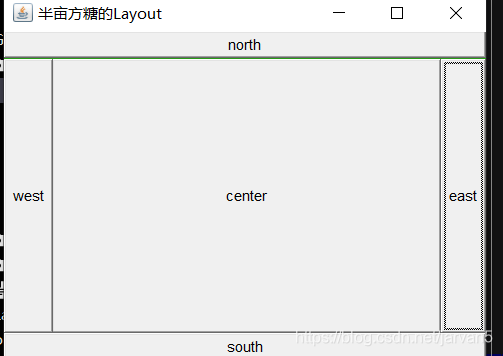
二、BorderLayout 边界布局.
1.如同 一、1.所示创建一个窗口.
2.设置布局类型,BorderLayout(其实3步骤使用了BorderLayout.EAST等的方法,此处不用设置也行,但是养成好习惯,心底有底)
frame.setLayout(new BorderLayout());
3.创建按钮,添加按钮同时设置BorderLayout布局,
注意:BorderLayout.EAST 指定边界布局的位置.
//创建组件,布局流式布局,添加按钮Button east = new Button("east");Button west = new Button("west");Button south = new Button("south");Button north = new Button("north");Button center = new Button("center");//添加按钮同时布局.frame.add(east,BorderLayout.EAST);frame.add(west,BorderLayout.WEST);frame.add(south,BorderLayout.SOUTH);frame.add(north,BorderLayout.NORTH);frame.add(center,BorderLayout.CENTER);
输出结果.
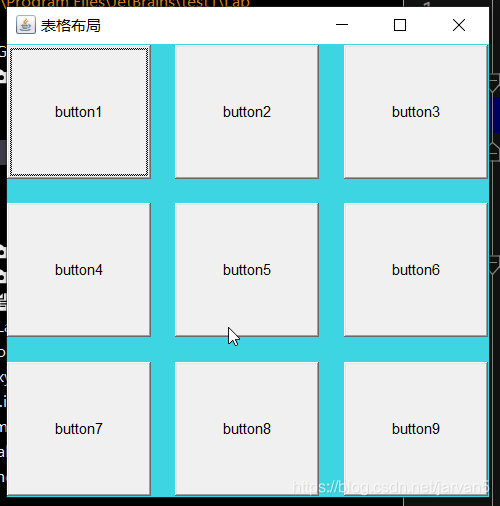
三、GridLayout 网格布局.
1.创建一个普通的frame
2.设置网格布局GridLayout,
** 三行三列 ,竖直间距 20像素,水平间距20像素,
frame.setLayout(new GridLayout(3,3,20,20));
3.创建按钮,添加按钮同时设置按钮添加到的网格位置
frame.add(button1,new GridLayout(1,1)); 就是把button1添加到 第一行第一个处
Button button1 = new Button("button1");Button button2 = new Button("button2");Button button3 = new Button("button3");Button button4 = new Button("button4");Button button5 = new Button("button5");Button button6 = new Button("button6");Button button7 = new Button("button7");Button button8 = new Button("button8");Button button9 = new Button("button9");//add buttonsframe.add(button1,new GridLayout(1,1));frame.add(button2);frame.add(button3);frame.add(button4);frame.add(button5);frame.add(button6);frame.add(button7);frame.add(button8);frame.add(button9);
输出
四、思考题:利用上面的三种Layout和Panel知识写一个如下类似的Frame,Layout可以自由组合(答案不唯一)
