ck-editor5的研究 (3):初步使用 CKEditor5 的事件系统和API
前言
在上一篇文章中—— ck-editor5的研究(2):对 CKEditor5 进行设计,并封装成一个可用的 vue 组件 ,我已经把 CKEditor5 封装成了一个通用vue组件,并且成功在nuxt中运行,并具备一定的通用性,已经可以正式使用了。
但是,它只能完全替换内容,或者手动输入,并不能通过使用 js 的方法,对 CKEditor5 进行更细粒度的控制,比如 在编辑器中插入一小部分内容。
那么这篇文章,我将初步研究 CKEditor5 的 事件系统 和 API。大概的效果如下:
大概分成了3步
1. 理解CKEditor5的核心概念
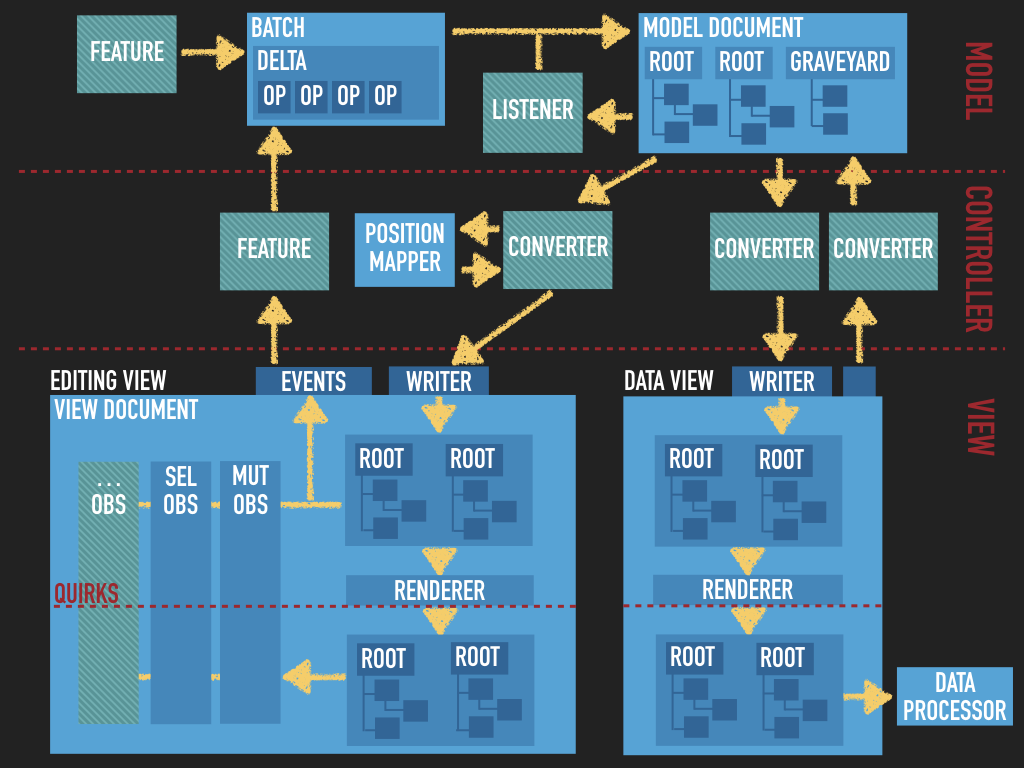
首先,来看看这张图:

也可以去 官方文档 看,但是 ckeditor 设计理念太过于庞大,太难读懂了。我这里就按我的理解,把CKEditor5比作人体的 脑(Model)、眼睛(Input data)、手和脚(Editing view 和 Data view) 三大部分了。
注意:这里我们换了个称呼,把 Output data 叫成 Data view。方便后面写代码更容易理解API。
于是我们就按照常理思考:眼睛用于接收信息,通过神经再次转化信息,并传入我们的大脑,大脑经过思考后下达命令给手和脚,让手和脚都握笔写字 (做同一件事情)。
相对应地,CKEditor5也一样:编辑区域接收用户输入的内容(Input data),通过捕捉并向上转化(Data upcast),传入Model中,Model再把数据进行向下转化(downcast),处理成一条条的命令(也就是给一个对象添加一个个属性),并且分配到Editing 对象和 Data 对象中去,等待我们进行调用。
我们先打印一下 editor实例对象,进行观察:
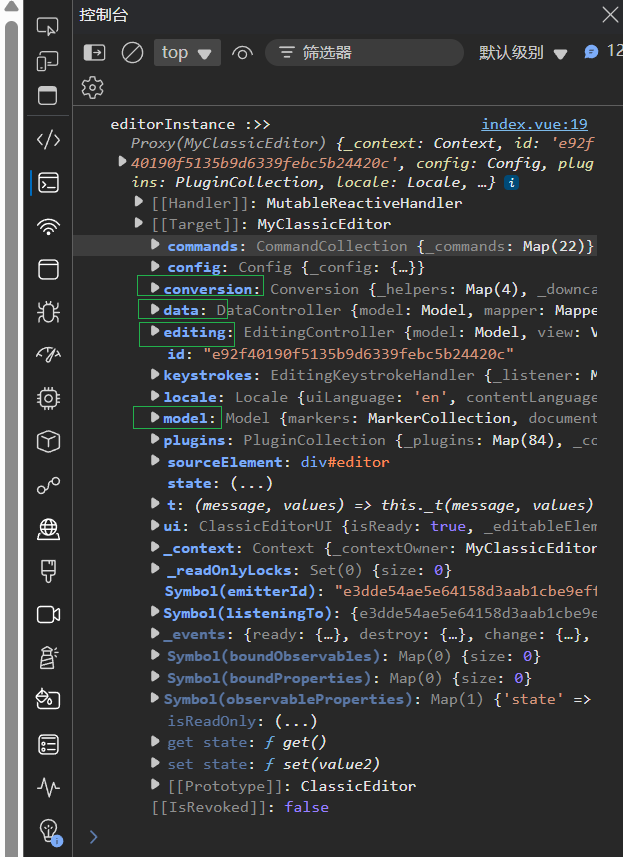
我们发现有 model、editing、data、conversion,正好对应上面提到的 Model、Editing view、Data view 和转化器(upcast, downcast)。
尝试理解一下官方的架构图(MVC设计模式),找找对应的部位:
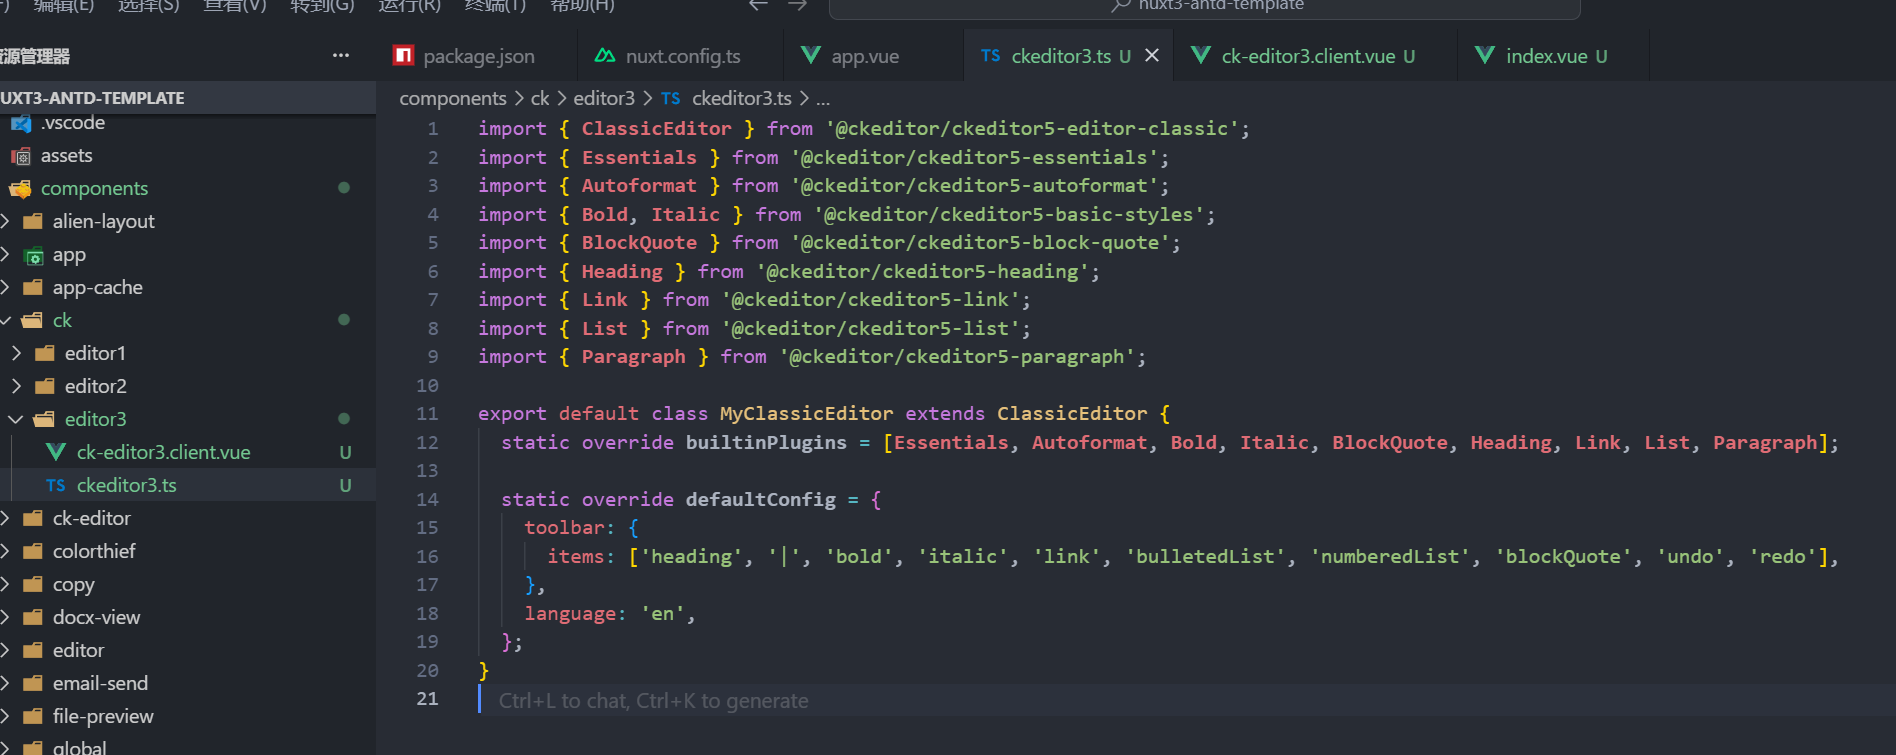
2. 开始搭建目录
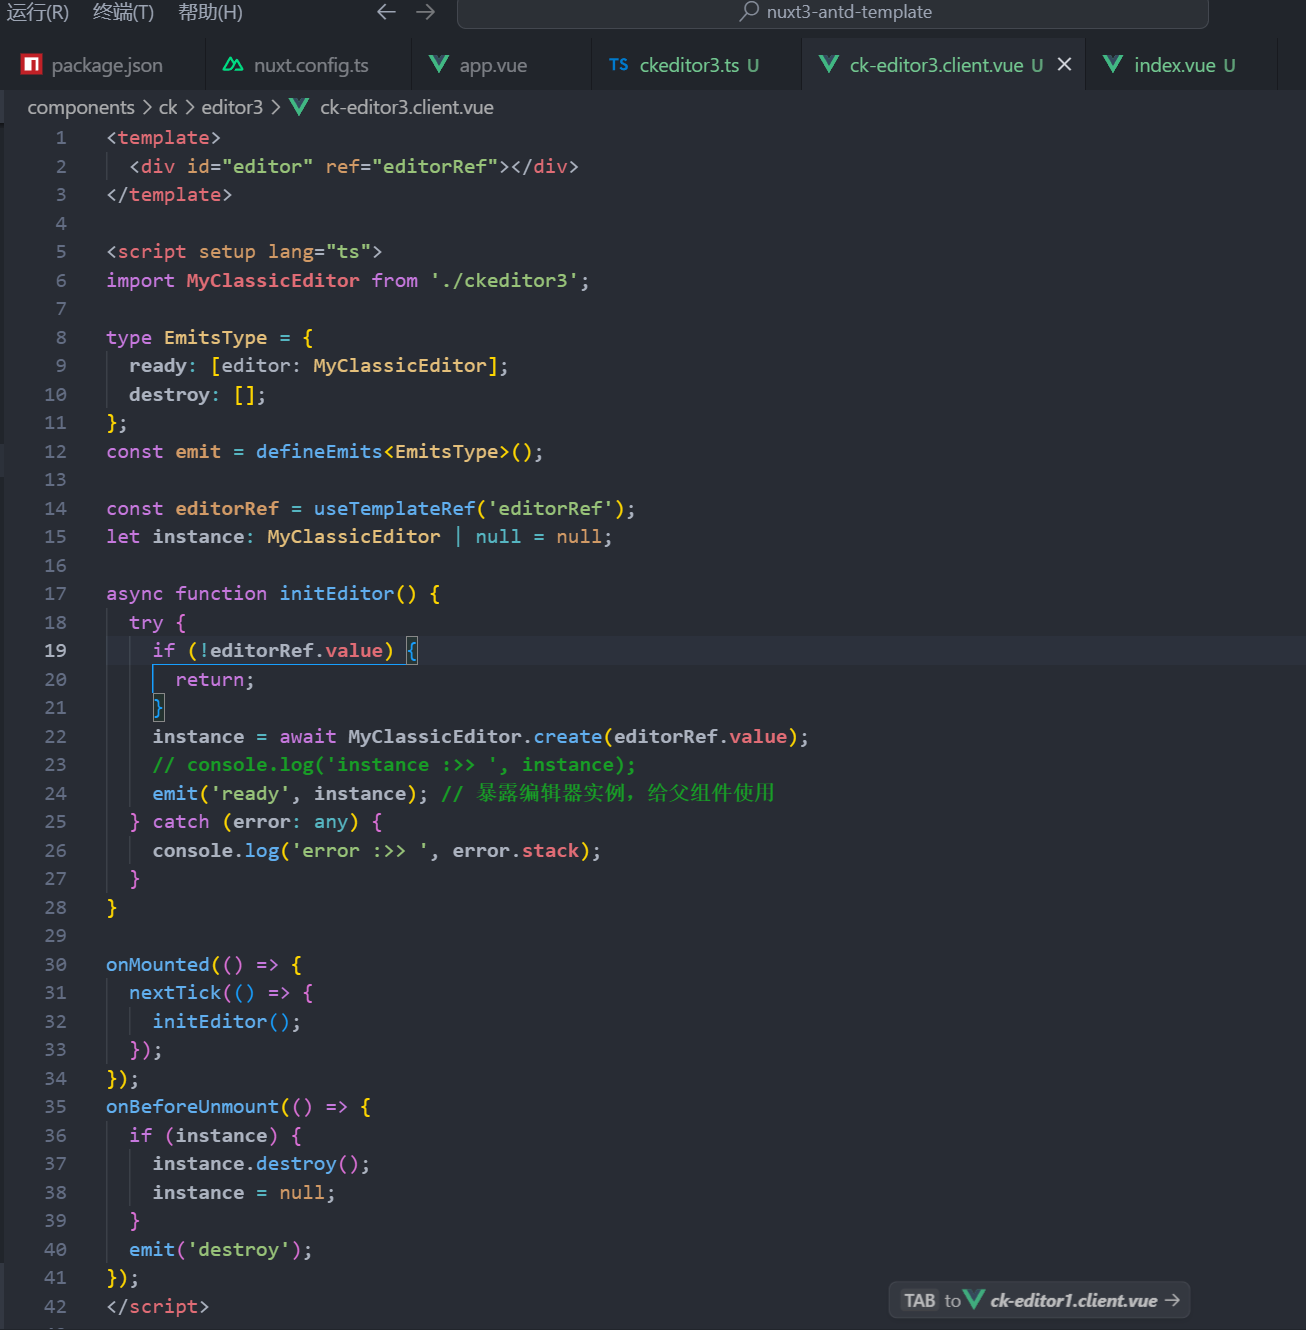
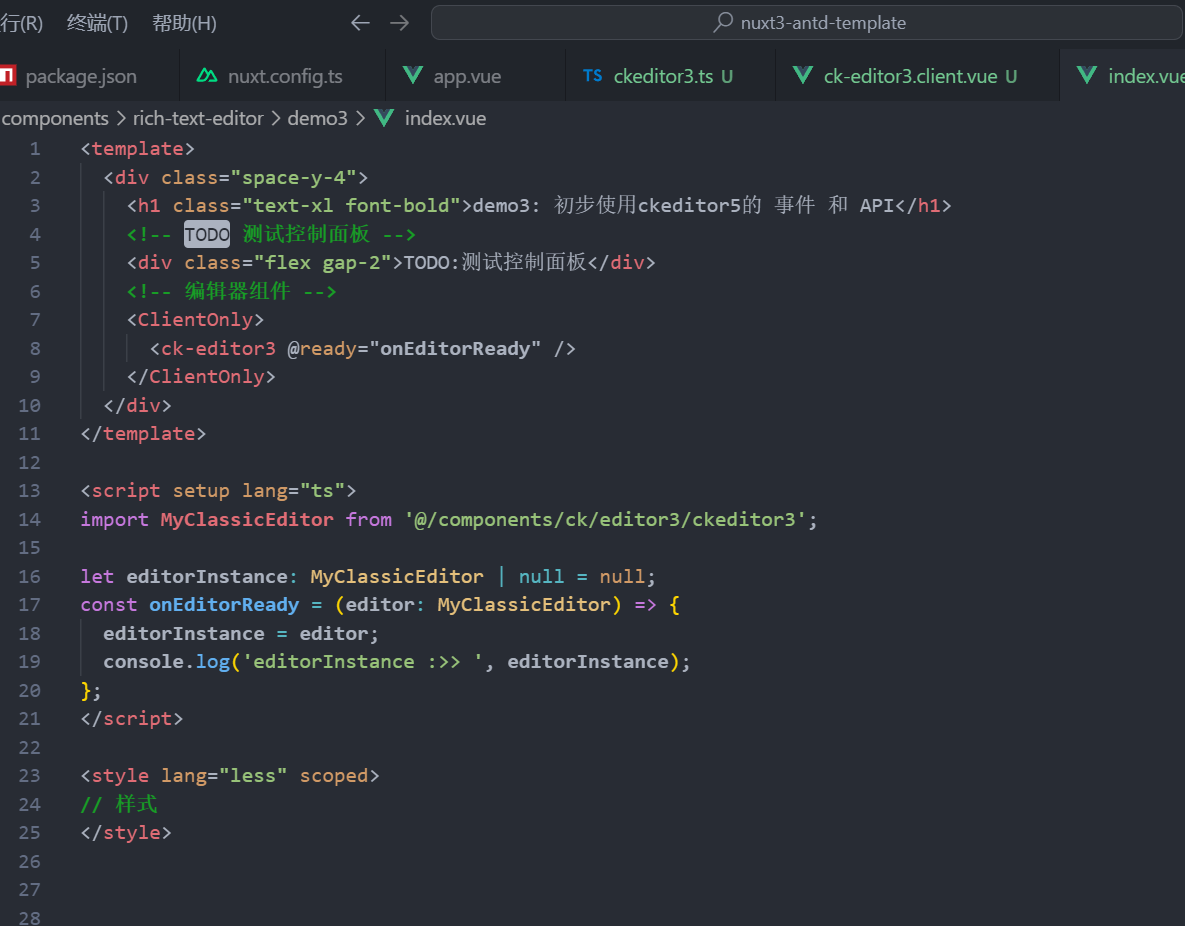
仍然使用之前的代码,准备 一个 ts ,一个 vue组件,一个 demo3/index.vue 测试页面。我将会重点在 demo3/index.vue 里面写代码,先观察一下3个文件大致内容:
3. 尝试做些事情
通过观察,可以看到,我已经在组件中用 @ready 事件把编辑器实例对象传送了出来,并且用 editorInstance 进行了接收,这样我们就可以在页面中调用实例对象的方法了。
1. 点击按钮插入文本到末尾
我们添加一个按钮和事件,点击按钮时,插入文本到末尾:
/*** 点击按钮插入文本到末尾*/
function insertTextToEnd() {if (!editorInstance) {return;}/*** 使用model.change方法,可以改写编辑内容, change方法是一个回调函数,参数是writer,* 在这里找它的属性 https://ckeditor.com/docs/ckeditor5/latest/api/module_engine_model_writer-Writer.html* 这是我们第一篇文章提到过的 API 文档*/editorInstance.model.change((writer) => {/*** 找到根节点<root> (可以理解为dom树的根节点 document.documentElement 也就是 <html> 标签),* ckeditor5也有自己的一棵dom树,但与网页文档对象dom树不一样,而是一一对应的*/const root = editorInstance?.model.document.getRoot();if (!root) {return;}// 获取末尾位置const endPosition = writer.createPositionAt(root, 'end');console.log('endPosition :>> ', endPosition);// 移动光标到末尾writer.setSelection(endPosition);// 执行enter命令editorInstance?.execute('enter');// 插入文本editorInstance?.model.change((writer) => {const content = writer.createText('The End!');console.log('content :>> ', content);editorInstance?.model.insertContent(content);});});
}
看下效果,注意看我的光标:
2. 添加内容变更事件
// 内容变更事件
const initContentChangeEvent = () => {editorInstance?.model.document.on('change:data', () => {console.log('The data has changed!');});
};
3. 修改默认回车事件
默认回车换行,是创建一个 p 标签,我们使用 Editing view,把它换成 br 标签。
默认的 shitf + 回车 是创建一个 br 标签,反而变成 p 标签了。
/*** 把默认的回车事件,由 p 标签改为 br 标签*/
function changeEnterEvent() {editorInstance?.editing.view.document.on('enter',(evt, data) => {data.preventDefault();evt.stop();if (data.isSoft) {editorInstance?.execute('enter');editorInstance?.editing.view.scrollToTheSelection();return;}editorInstance?.execute('shiftEnter');editorInstance?.editing.view.scrollToTheSelection();},{ priority: 'high' },);
}
4. 插入一些较长的 HTML 代码
使用 Data view 方式来插入内容
/*** 插入一些较长的 HTML 代码*/
function insertLongHtmlCode() {editorInstance?.model.change((writer) => {const content = '<p>A paragraph with <a href="https://ckeditor.com">some link</a>.</p>';const viewFragment = editorInstance?.data.processor.toView(content);if (!viewFragment) {return;}const modelFragment = editorInstance?.data.toModel(viewFragment);if (!modelFragment) {return;}editorInstance?.model.insertContent(modelFragment);});
}
最终的demo代码和测试效果图
demo的代码
<template><div class="space-y-4"><h1 class="text-xl font-bold">demo3: 初步使用ckeditor5的 事件 和 API</h1><!-- TODO 测试控制面板 --><div class="flex gap-2"><button@click="insertTextToEnd"class="text-white cursor-pointer rounded border-none bg-blue-500 px-4 py-2 text-[#fff] outline-none">插入文本到末尾</button><button@click="changeEnterEvent"class="text-white cursor-pointer rounded border-none bg-blue-500 px-4 py-2 text-[#fff] outline-none">把默认的回车事件,由 p 标签改为 br 标签</button><button@click="insertLongHtmlCode"class="text-white cursor-pointer rounded border-none bg-blue-500 px-4 py-2 text-[#fff] outline-none">插入一些较长的 HTML 代码</button></div><!-- 编辑器组件 --><ClientOnly><ck-editor3 @ready="onEditorReady" /></ClientOnly></div>
</template><script setup lang="ts">
import type MyClassicEditor from '@/components/ck/editor3/ckeditor3';let editorInstance: MyClassicEditor | null = null;
const onEditorReady = (editor: MyClassicEditor) => {editorInstance = editor;console.log('editorInstance :>> ', editorInstance);initContentChangeEvent();
};/*** 点击按钮插入文本到末尾*/
function insertTextToEnd() {/*** 使用model.change方法,可以改写编辑内容, change方法是一个回调函数,参数是writer,* 在这里找它的属性 https://ckeditor.com/docs/ckeditor5/latest/api/module_engine_model_writer-Writer.html* 这是我们第一篇文章提到过的 API 文档*/editorInstance?.model.change((writer) => {/*** 找到根节点<root> (可以理解为dom树的根节点 document.documentElement 也就是 <html> 标签),* ckeditor5也有自己的一棵dom树,但与网页文档对象dom树不一样,而是一一对应的*/const root = editorInstance?.model.document.getRoot();if (!root) {return;}// 获取末尾位置const endPosition = writer.createPositionAt(root, 'end');// console.log('endPosition :>> ', endPosition);// 移动光标到末尾writer.setSelection(endPosition);// 执行enter命令editorInstance?.execute('enter');// 插入文本editorInstance?.model.change((writer) => {const content = writer.createText('The End!');// console.log('content :>> ', content);editorInstance?.model.insertContent(content);});});
}// 内容变更事件
const initContentChangeEvent = () => {editorInstance?.model.document.on('change:data', () => {console.log('The data has changed!');});
};/*** 把默认的回车事件,由 p 标签改为 br 标签*/
function changeEnterEvent() {editorInstance?.editing.view.document.on('enter',(evt, data) => {data.preventDefault();evt.stop();if (data.isSoft) {editorInstance?.execute('enter');editorInstance?.editing.view.scrollToTheSelection();return;}editorInstance?.execute('shiftEnter');editorInstance?.editing.view.scrollToTheSelection();},{ priority: 'high' },);
}/*** 插入一些较长的 HTML 代码*/
function insertLongHtmlCode() {editorInstance?.model.change((writer) => {const content = '<p>A paragraph with <a href="https://ckeditor.com">some link</a>.</p>';const viewFragment = editorInstance?.data.processor.toView(content);if (!viewFragment) {return;}const modelFragment = editorInstance?.data.toModel(viewFragment);if (!modelFragment) {return;}editorInstance?.model.insertContent(modelFragment);});
}
</script><style lang="less" scoped>
// 样式
</style>
效果图
