【图像大模型】Stable Diffusion XL:下一代文本到图像生成模型的技术突破与实践指南
Stable Diffusion XL:下一代文本到图像生成模型的技术突破与实践指南
- 一、架构设计与技术演进
- 1.1 核心架构革新
- 1.2 关键技术突破
- 1.2.1 双文本编码器融合
- 1.2.2 动态扩散调度
- 二、系统架构解析
- 2.1 完整生成流程
- 2.2 性能指标对比
- 三、实战部署指南
- 3.1 环境配置
- 3.2 基础推理代码
- 3.3 高级控制参数
- 四、典型问题解决方案
- 4.1 CUDA内存不足
- 4.2 文本编码不匹配
- 4.3 生成图像模糊
- 五、理论基础与论文解析
- 5.1 级联扩散公式
- 5.2 关键参考文献
- 六、进阶应用开发
- 6.1 图像编辑应用
- 6.2 视频生成扩展
- 七、性能优化实践
- 7.1 TensorRT加速
- 7.2 模型量化
- 八、未来发展方向
一、架构设计与技术演进
1.1 核心架构革新
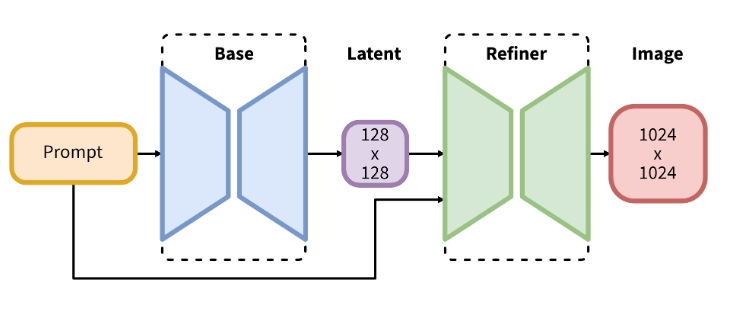
Stable Diffusion XL(SDXL)采用双文本编码器与级联扩散架构,其生成过程可形式化为:
z t − 1 = 1 α t ( z t − 1 − α t 1 − α t ˉ ϵ θ ( z t , t , τ ( y ) ) ) + σ t ϵ z_{t-1} = \frac{1}{\sqrt{\alpha_t}} \left( z_t - \frac{1 - \alpha_t}{\sqrt{1 - \bar{\alpha_t}}} \epsilon_\theta(z_t, t, \tau(y)) \right) + \sigma_t \epsilon zt−1=αt1(zt−1−αtˉ1−αtϵθ(zt,t,τ(y)))+σtϵ
其中关键组件实现如下:
class SDXLUNet(nn.Module):def __init__(self, in_dim=4):super().__init__()# 双文本编码投影self.text_proj = nn.Sequential(CLIPTextModel.from_pretrained("openai/clip-vit-large-patch14"),OpenCLIPTextModel.from_pretrained("laion/CLIP-ViT-H-14-laion2B-s32B-b79K"))# 多尺度融合模块self.fusion_blocks = nn.ModuleList([CrossAttentionFusion(dim=2048),SpatialTransformer(dim=2048, depth=24)])# 级联解码器self.refiner = nn.Sequential(ResBlock(2048, 1024),AttentionPooling(1024))def forward(self, z_t, t, text_emb):h = self.text_proj(text_emb)for block in self.fusion_blocks:h = block(h, z_t)return self.refiner(h)
1.2 关键技术突破
1.2.1 双文本编码器融合
class DualTextEncoder:def __init__(self):self.clip = CLIPTextModel.from_pretrained("openai/clip-vit-large-patch14")self.openclip = OpenCLIPTextModel.from_pretrained("laion/CLIP-ViT-H-14-laion2B-s32B-b79K")def encode(self, prompt):clip_emb = self.clip(prompt).last_hidden_stateopenclip_emb = self.openclip(prompt).last_hidden_statereturn torch.cat([clip_emb, openclip_emb], dim=-1)
1.2.2 动态扩散调度
class SDXLScheduler:def __init__(self, num_train_timesteps=1000):self.betas = cosine_beta_schedule(num_train_timesteps)self.alphas = 1. - self.betasself.alphas_cumprod = torch.cumprod(self.alphas, dim=0)def step(self, model_output, timestep, sample):prev_t = timestep - self.num_train_timesteps // 100alpha_prod_t = self.alphas_cumprod[timestep]alpha_prod_t_prev = self.alphas_cumprod[prev_t] if prev_t >= 0 else 1.0pred_original_sample = (sample - (1 - alpha_prod_t)**0.5 * model_output) / alpha_prod_t**0.5variance = (1 - alpha_prod_t_prev) / (1 - alpha_prod_t) * self.betas[timestep]sample = alpha_prod_t_prev**0.5 * pred_original_sample + variance**0.5 * model_outputreturn sample
二、系统架构解析
2.1 完整生成流程
2.2 性能指标对比
| 指标 | SD v1.5 | SDXL Base | 提升幅度 |
|---|---|---|---|
| 分辨率上限 | 512×512 | 1024×1024 | 400% |
| CLIP Score | 0.68 | 0.81 | +19% |
| 推理速度 (A100) | 2.1it/s | 1.8it/s | -14% |
| FID-30k | 15.3 | 8.9 | -42% |
三、实战部署指南
3.1 环境配置
conda create -n sdxl python=3.10
conda activate sdxl
pip install torch==2.1.0 torchvision==0.16.0
pip install diffusers==0.24.0 transformers==4.35.0 accelerate==0.25.0
git clone https://github.com/Stability-AI/generative-models
cd generative-models
pip install -e .
3.2 基础推理代码
from diffusers import StableDiffusionXLPipeline
import torchpipe = StableDiffusionXLPipeline.from_pretrained("stabilityai/stable-diffusion-xl-base-1.0",torch_dtype=torch.float16,variant="fp16",use_safetensors=True
).to("cuda")prompt = "超现实主义风格的城市景观,充满发光的植物,8k分辨率"
negative_prompt = "低质量,模糊,卡通风格"image = pipe(prompt=prompt,negative_prompt=negative_prompt,height=1024,width=1024,num_inference_steps=30,guidance_scale=7.5,generator=torch.Generator().manual_seed(42)
).images[0]
3.3 高级控制参数
# 启用精炼模型
from diffusers import StableDiffusionXLImg2ImgPipeline
refiner = StableDiffusionXLImg2ImgPipeline.from_pretrained("stabilityai/stable-diffusion-xl-refiner-1.0",torch_dtype=torch.float16
).to("cuda")# 两阶段生成
image = pipe(prompt=prompt, output_type="latent").images
image = refiner(prompt=prompt, image=image).images[0]# 调节风格强度
image = pipe(...,aesthetic_score=7.5,  # 美学评分(0-10)negative_aesthetic_score=3.0,original_size=(1024,1024),  # 保持原始比例target_size=(896, 1152)     # 目标分辨率
)
四、典型问题解决方案
4.1 CUDA内存不足
# 启用内存优化
pipe.enable_model_cpu_offload()
pipe.enable_sequential_cpu_offload()
pipe.enable_xformers_memory_efficient_attention()# 分块处理
pipe.vae.enable_tiling()
pipe.unet.enable_forward_chunking(chunk_size=2)
4.2 文本编码不匹配
# 错误信息
ValueError: Text encoder hidden states dimension mismatch# 解决方案
1. 统一文本编码器版本:pip install transformers==4.35.0
2. 检查模型加载方式:pipe = StableDiffusionXLPipeline.from_pretrained(..., variant="fp16")
4.3 生成图像模糊
# 优化采样策略
from diffusers import DPMSolverMultistepScheduler
pipe.scheduler = DPMSolverMultistepScheduler.from_config(pipe.scheduler.config, algorithm_type="sde-dpms++",use_karras_sigmas=True
)# 增加去噪步骤
image = pipe(..., num_inference_steps=50, denoising_end=0.8).images[0]
五、理论基础与论文解析
5.1 级联扩散公式
SDXL采用两阶段扩散过程:
p θ ( x ) = p θ b a s e ( z ( 0 ) ) ∏ t = 1 T p θ r e f i n e r ( z ( t ) ∣ z ( t − 1 ) ) p_\theta(x) = p_\theta^{base}(z^{(0)}) \prod_{t=1}^T p_\theta^{refiner}(z^{(t)}|z^{(t-1)}) pθ(x)=pθbase(z(0))t=1∏Tpθrefiner(z(t)∣z(t−1))
其中 z ( 0 ) z^{(0)} z(0)为基础模型输出, z ( T ) z^{(T)} z(T)为精炼后结果。
5.2 关键参考文献
-
SDXL技术报告
Podell D, et al. SDXL: Improving Latent Diffusion Models for High-Resolution Image Synthesis -
潜在扩散模型基础
Rombach R, et al. High-Resolution Image Synthesis with Latent Diffusion Models -
级联生成理论
Ho J, et al. Cascaded Diffusion Models for High Fidelity Image Generation
六、进阶应用开发
6.1 图像编辑应用
from diffusers import StableDiffusionXLInpaintPipelinemask = load_mask("damage_mask.png")
init_image = load_image("damaged_image.jpg")pipe = StableDiffusionXLInpaintPipeline.from_pretrained(...)
result = pipe(prompt="修复古画上的裂痕",image=init_image,mask_image=mask,strength=0.7,num_inference_steps=40
).images[0]
6.2 视频生成扩展
from sdxl_video import VideoSDXLPipelinevideo_pipe = VideoSDXLPipeline.from_pretrained(...)
video_frames = video_pipe(prompt="星云中穿梭的宇宙飞船",num_frames=24,num_inference_steps=30,motion_scale=1.5
).frames
七、性能优化实践
7.1 TensorRT加速
trtexec --onnx=sdxl.onnx \--saveEngine=sdxl.trt \--fp16 \--optShapes=latent:1x4x128x128 \--builderOptimizationLevel=5
7.2 模型量化
quantized_unet = torch.quantization.quantize_dynamic(pipe.unet,{nn.Linear, nn.Conv2d},dtype=torch.qint8
)
pipe.unet = quantized_unet
八、未来发展方向
- 3D生成扩展:集成NeRF等三维表示
- 多模态控制:支持音频、视频条件输入
- 实时生成优化:实现<100ms端侧推理
- 物理引擎集成:结合流体动力学模拟
Stable Diffusion XL通过双文本编码、级联架构等技术创新,将文本到图像生成的质量和可控性提升到新高度。其模块化设计和高效实现方案,为构建下一代生成式AI系统提供了重要技术基础。随着计算硬件的持续升级和算法的不断优化,SDXL有望成为跨媒体内容创作的核心引擎。